DHCP Not Working on Windows 10: How to Enable it Again
Fix DHCP issues by enabling the necessary services on your PC
Key notes
- If DHCP is not working, the problem might be related to your network configuration.
- Network glitches can sometimes cause this issue, but you can fix them with Command Prompt.

If DHCP is not working on Windows 10, your devices won’t be able to obtain the IP address, and they’ll have difficulty connecting to the Internet.
Therefore, it if you want to restore Internet connectivity, you need to fix this issue, and this guide will show you how to do it properly.
Why is my DHCP not working?
- The required services aren’t enabled on your PC.
- Your adapter isn’t configured to automatically obtain an IP address.
- Firewall or antivirus might be interfering with the service.
- Outdated network drivers can sometimes cause this problem.
What can I do if DHCP is not working on Windows 10?
1. Turn on the DHCP Client service
- Right-click the Start button and click Run to open that accessory’s window.
- Input services.msc in the Open text box and click OK to open the Services window.

- Double-click DHCP Client to open the properties window in the shot directly below.

- Click the Startup type drop-down menu to select Automatic.
- Select the Apply option.
- Click OK to close the window.
- Thereafter, reboot the desktop or laptop.
2. Adjust the network adapter settings
- Open Run in Windows.
- Enter
control.exe /name Microsoft.NetworkAndSharingCenter - You’ll now see a Control Panel applet shown directly below.

- Click Change adapter settings on the left side of the Control Panel window.

- Right-click your connection and select Properties.
- Select Internet Protocol Version 4 (TCP/IPv4) and click Properties to open the window shown directly below.
- Select the Obtain an IP address automatically option.

- Then click the Obtain DNS server address automatically radio button.
- Press the OK button on the IPv4 window.
- Click OK on the Wi-Fi Properties window.
- Thereafter, restart Windows before opening a web browser.
3. Turn off the Windows Defender Firewall
- Open Cortana’s search box by pressing the Windows key + Q keyboard shortcut.
- Enter firewall in Cortana’s Type here to search text box.
- Select Windows Defender Firewall to open its Control Panel applet.
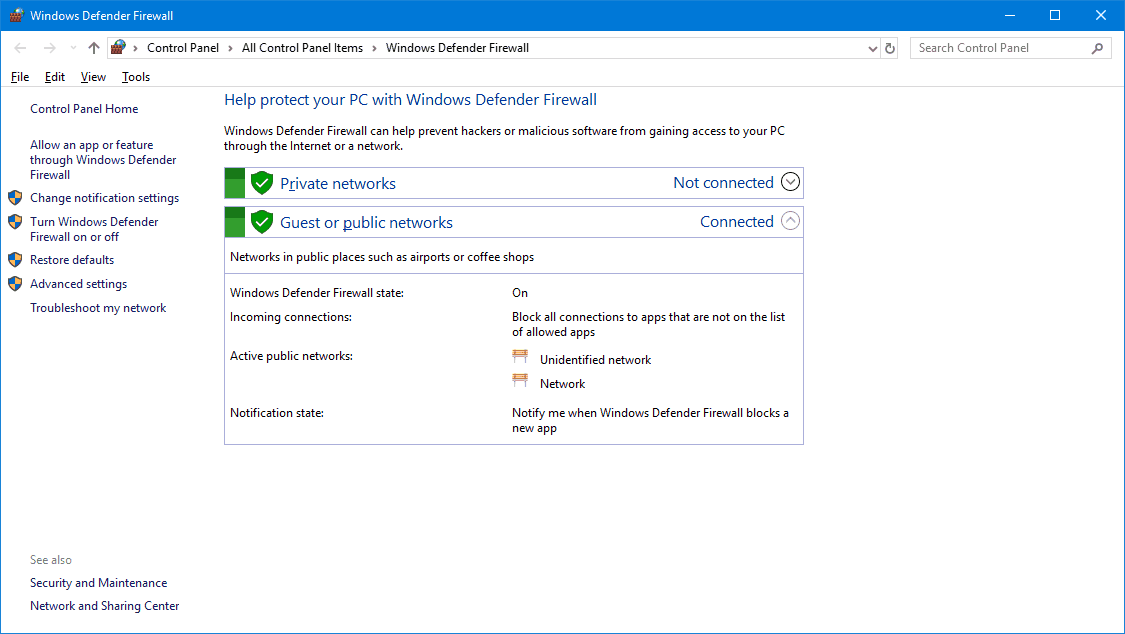
- Click Turn Windows Defender Firewall on or off to open the options shown below.
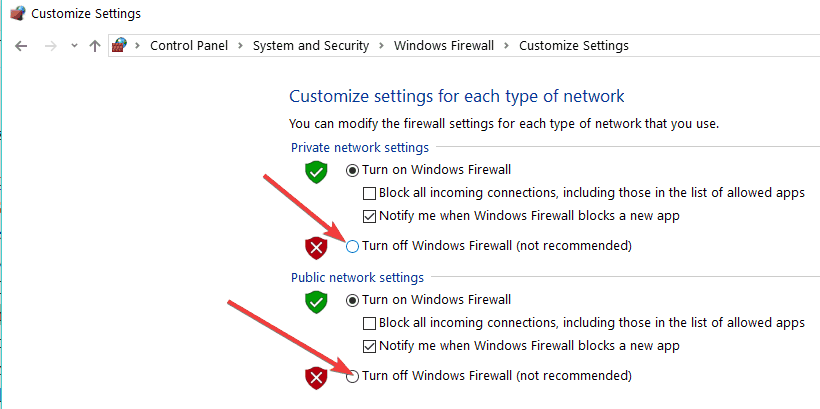
- Select both the Turn off Windows Defender Firewall settings, and click the OK button.
If turning the firewall does unblock the DHCP, restore WDF to its defaults. To do that, click Restore Defaults on the left of the firewall’s Control Panel applet. Then press the Restore defaults button.
4. Reinstall the network adapter driver
- Right-click the Start button to select Device Manager.

- Double-click Network adapters to expand that category.

- Right-click the Wi-Fi adapter listed there and select the Uninstall device option.
- Select the Uninstall option on the dialog box window that opens.
- Right-click the Wi-Fi adapter listed there and select Scan for hardware changes.
- Thereafter, restart the Windows OS
- Download and install Outbyte Driver Updater.
- Launch the software.
- Wait for the app to detect all faulty drivers.

- Now, it will show you all the malfunctioning drivers listed to select the ones to Update or Ignore.
- Click on Update & Apply Selected to download and install the newest versions.
- Restart your PC to ensure the applied changes.

Outbyte Driver Updater
Secure your Windows PC with Outbyte from various errors caused by problematic drivers.5. Disable third-party antivirus utilities
- To remove an antivirus utility from the system startup, right-click the taskbar and select Task Manager.
- Select the Startup tab on Task Manager’s window.
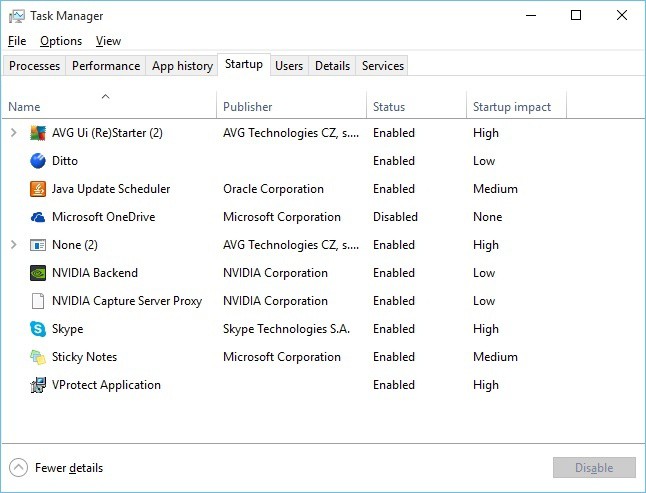
- Select the antivirus utility to disable from the startup.
- Then select the Disable option.
- Restart Windows 10 after removing the antivirus utility from the startup.
6. Reset the TCP/IP protocol and winsock
- Enter the keyword Command Prompt in Cortana’s search box.
- Right-click Command Prompt and select Run as administrator to open the CMD.
- Enter
ipconfig /flushdns - Next, input
nbtstat –r - Enter the command
netsh int ip reset
- Then input
netsh winsock reset
- Thereafter, close the Command Prompt window. Then restart the laptop or desktop.
Those are a few potential resolutions that might enable DHCP so that Windows gets an IP address. Then users can open websites in their browsers once again.
There are other network issues that you can experience, and many reported that the PC was unable to contact DHCP server. This is most likely because DHCP is not enabled for Ethernet or your network connection.
If this happens, Windows can’t get DHCP address and work properly. Luckily, we covered most of these issues in separate guides.
Did you find a different way to fix this issue? If so, share it with us in the comments below.
Read our disclosure page to find out how can you help Windows Report sustain the editorial team. Read more


Improve this guide


User forum
0 messages