Fix: BSoD while Launching Minecraft on Windows 11
Try repairing the Minecraft launcher or disabling the antivirus
Key notes
- Several Minecraft users have reported facing BSoD errors while launching the game on Windows 11, caused by the antivirus and not only.
- Try to select the correct version of Java, by updating the Minecraft launcher.
- You can also go for the advanced troubleshooting method of updating your BIOS.

Blue Screen of Death or BSoD errors are some of the most crucial errors you would come across on your Windows 11 PC. If you want to know more about BSoD, then you can check out our dedicated guide.
Many of our readers reported that Windows 11 throws a BSoD when Minecraft is launched. If you are also experiencing the same issue, then this guide is here to help you.
What can cause the BSoD error in Minecraft on Windows 11?
Here are a few common reasons because of why you could come across the Blue Screen of Death error when launching Minecraft on your PC.
- You are using a different Minecraft launcher – Several user reports confirm that using a different launcher other than the original one causes this issue.
- The Minecraft launcher isn’t up to date – You need to make sure that you are running the latest available version of the Minecraft launcher.
- The correct Java file isn’t selected – You need to make sure that the correct version of the Java installed on your PC is selected in the Minecraft launcher.
- Your antivirus is causing issues – Often antivirus software can cause issues running a program, as it may appear as a threat to the PC.
- Problems with your BIOS – If you haven’t updated your BIOS then this could also result in BSoD errors.
Now that we know the reasons behind this BSoD, let’s start fixing it with our solutions below.
How can I fix the Minecraft BSoD error on Windows 11?
Before you attempt any advanced troubleshooting, here are a few things that you can try:
- The error could be because of a temporary glitch which can be easily fixed by restarting your PC.
- New updates can fix the bugs present because of the previous update. Check and install if a new Windows update is available.
- It is essential that you update all the drivers on your PC.
- Check if Minecraft is running fine when you launch it as an administrator. If yes, then there is some issue with file or folder access of the app.
If you have crossed these preliminary measures from your list, you may start performing the solutions below.
1. Select the correct Java version
- Open the Minecraft launcher.
- From the left side, select Minecraft Java Edition.

- Select the Installations tab from the right side.

- Click on the 3-dot menu for the Latest release option.

- Select Edit.

- Expand MORE OPTIONS.

- Under Java Executable, click on Browse.

- Locate your Java EXE file on your Windows 11 PC. It is usually inside the C:\Program Files\Java\jdk-XX.0.X\bin\ folder.
- Hit the Save button.

- Switch to the Play tab and run the game.

Following the above steps has helped several users rectify the issue of the Minecraft BSoD Windows 11 error.
2. Disable or remove the antivirus
- Open the Start menu by pressing the Windows key.
- Search for Control Panel and open it.

- Select the Programs and Features option.
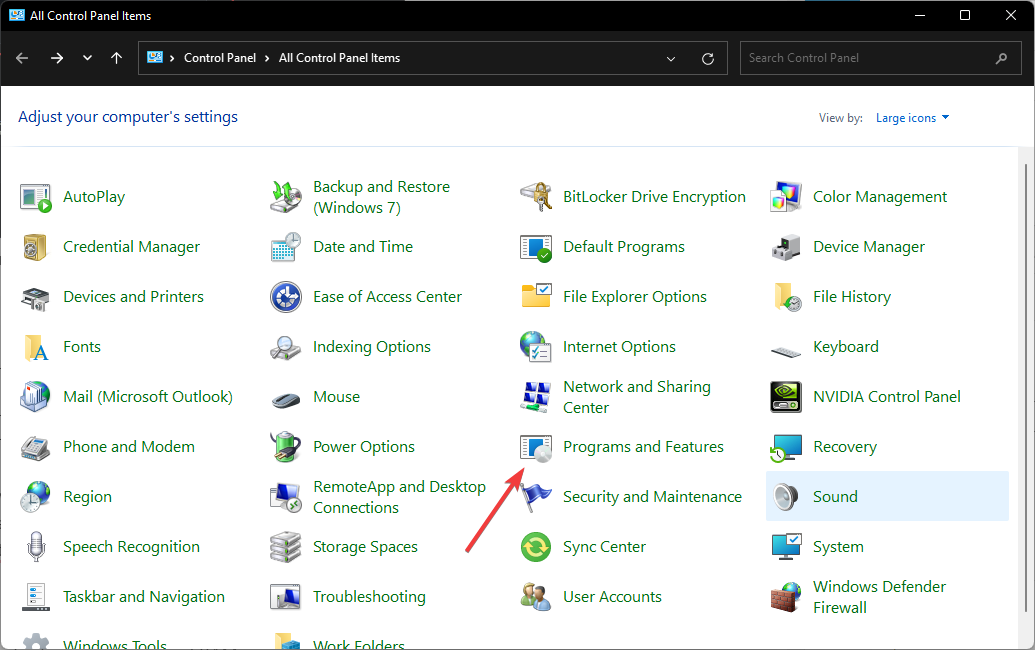
- Click on your antivirus software and hit the Uninstall button at the top.
- Follow the on-screen steps to remove the antivirus from your PC.
Our solution shows you how to remove the antivirus completely. However, you should first open its menu and disable its protection temporarily first.
If disabling or removing the antivirus unlocks Minecraft, don’t remember to enable it again after you finish playing.
In the long run, we recommend using a better third-party antivirus on Windows 11 that doesn’t interfere with your programs.
3. Repair/Reset the Minecraft launcher
- Open the Start menu by pressing the Windows button.
- Search for Minecraft launcher.

- Right-click on it and select App Settings.

- Click on Repair and Reset.

For several of our readers, simply repairing and resetting the Minecraft launcher solved the BSoD error with it. You can also try and check if this fixes the issue for you.
4. Update the Minecraft launcher
- Launch Minecraft launcher.
- Click on the drop-down menu next to the Play button.

- Choose Latest Release.

- The update should start.
Usually, the Minecraft Launcher updates itself if a new update is available when you launch it. However, you can force the update to install by following the above method.
You can also follow our guide on how to update the Minecraft launcher in Windows 11 where you will find more information.
5. Update BIOS
You need to keep the BIOS updated if you want to ensure your PC’s performance is optimal and you don’t run into multiple issues with it.
However, updating BIOS is a tricky task and should not be done, if you haven’t created a data backup. So, the first thing before you should do a BIOS update is to back up all of your data.
Now, you can follow our guide that helps you with all the necessary steps that you need to follow to update BIOS on your Windows 11 PC.
Well, the Windows 11 Minecraft BSoD error isn’t the only issue users have reported facing. You could also come across the Minecraft launcher not working in Windows 11 issue but this dedicated guide will help you fix it.
If Minecraft isn’t using GPU on your PC, then you can check out our guide that gives you 3 tips to fix the problem at hand.
That is it from us in this guide. Let us know in the comments below, which one of the solutions helped you resolve the Minecraft BSoD problem in Windows 11.
Read our disclosure page to find out how can you help Windows Report sustain the editorial team. Read more


Improve this guide


User forum
0 messages