Windows 11 Screen Keeps Refreshing? Fix It in [8 Steps]
Check if the refresh rate matches the capabilities of your monitor
Key notes
- The Windows 11 keeps refreshing issue occurs due to outdated drivers, corrupted system files, or malware infection.
- To fix it, update graphics drivers, disable dynamic refresh rate, run SFC & DISM scan, or scan your PC for malware.

If you’ve been struggling with a screen that keeps refreshing on your Windows 11, interrupting your workflow, and causing annoyance, this guide can help!
We will discuss the root causes of the problem and provide you with a simple yet effective solution to overcome this issue.
Why does the Windows 11 screen keep refreshing?
There could be several factors that can contribute to the issue of a Windows 11 screen constantly refreshing. Here are some common reasons:
- Outdated graphics driver – If the graphics driver is not functioning properly or doesn’t support the specific hardware or Windows 11, it can result in screen flickering or constant refreshes.
- Software conflicts – Certain software applications or processes running in the background may interfere with the screen refresh rate, causing it to refresh continuously.
- Corrupted system files – Damaged system files can cause all sorts of issues on your computer, including this one. Try running an SFC scan to fix the issue.
- Malware infection – Malware or viruses can disrupt system processes, including those related to screen rendering, leading to screen refresh problems. Try running an antivirus tool.
- Dynamic refresh rate – This feature can sometimes cause screen flickering or refreshing issues if it doesn’t work optimally with the hardware or software configuration.
Now that you know the probable causes, let us move to the troubleshooting methods to fix it accordingly.
What can I do if Windows 11 screen keeps refreshing?
Before engaging in advanced troubleshooting steps, you should consider performing the following checks:
- Turn off the PC, disconnect the monitor from the PC, and turn it off, wait a few seconds, then reconnect it and turn everything back on.
- Make sure your system specifications meet the Windows 11 requirements.
- Uninstall any recently installed software.
- Check for all the connections and cables to ensure no cable is loosely connected.
- Check Task Scheduler for recurring tasks.
- Ensure there are no pending Windows updates.
- Disable any background apps.
Once you have gone through these, let us check out the detailed solutions.
1. Restart Windows File Explorer
- Press Shift + Ctrl + Esc to open the Task Manager.

- Go to the Processes tab, locate, and right-click Windows Explorer. then select Restart.
If also the Taskbar is missing, it’s a clear sign that this issue is related to File Explorer, and restarting it should also fix the screen refreshing problem.
2. Run SFC & DISM scans
- Press the Windows key, type cmd, and click Run as administrator.

- Type the following command to repair system files and press Enter:
sfc /scannow
- Wait for the command to execute; once done, copy & paste the following command to restore OS image files and hit Enter:
Dism /Online /Cleanup-Image /RestoreHealth
- The process will complete in some time. Once done, restart your computer to let the changes take effect.
On the other hand, if you’re not sure about proceeding with the manual steps, we suggest you try a specialized repair app.
3. Disable the related services
- Press Windows + R to open the Run console.

- Type services.msc and click OK to open the Services app.
- Locate and double-click the Windows Error Reporting Service to open its Properties.

- Go to Start-up type and select Disabled.
- Under Service status, ensure it says Stopped or click Stop.

- Click Apply, then OK to confirm the changes.
- Now locate Problem Reports and Solutions Control Panel Support service and double-click it.

- Go to Start-up type and select Disabled.
- Under Service status, ensure it says Stopped or click Stop.

- Click Apply, then OK to confirm the changes.
4. Update the graphics driver
- Press Windows + R to open the Run dialog box.

- Type devmgmt.msc and click OK to open Device Manager.
- Go to Display adapters and click it to expand.
- Right-click the graphics driver and choose Update driver.

- Click Search automatically for drivers.

- Follow the onscreen instructions to complete the process.
You can also opt for an automatic driver updater to detect all outdated or malfunctioning drivers and select the latest updates within minutes.
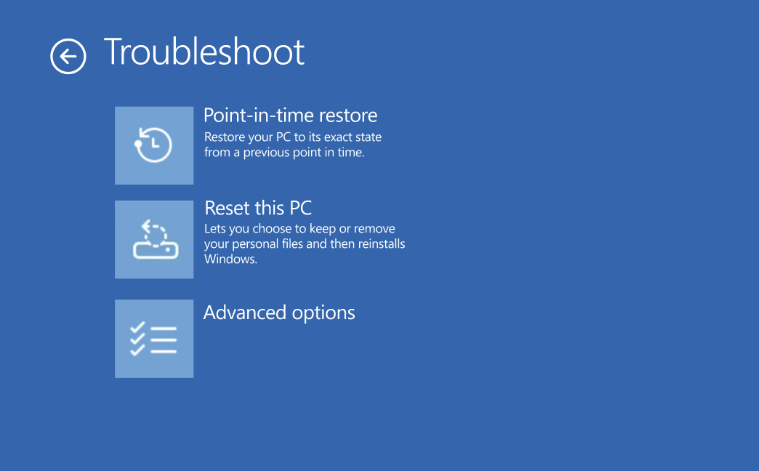
5. Restart your computer in Safe Mode
- Press Windows + I to open the Settings app.
- Go to System, then click Recovery.

- Locate Advanced startup and click Restart.

- The computer will reboot, and on the Choose an option page, select Troubleshoot.

- Select Advanced options.

- Now choose the Startup Settings option.

- Click Restart once your computer starts and choose the option for Enable Safe Mode.

Now when your PC boots into safe mode, you can narrow down the reason for the issue so that you can fix the screen keeps refreshing problem.
6. Delete the icon and thumbnail cache
- Press the Windows key, type cmd, and click Run as administrator.
- Copy & paste the following command and hit Enter:
cd %userprofile%\AppData\Local\Microsoft\Windows\Explorer
- Type the following command to see all the contents and press Enter:
dir - Copy & paste the following command to terminate Windows Explorer and hit Enter:
taskkill /f /im explorer.exe - Type the following command one by one and press Enter after every command:
attrib -h iconcache_*.db
del /f iconcache_*.db
attrib -h thumbcache_*.db
 del /f thumbcache_*.db
- Close the Command Prompt window.
7. Modify your desktop settings
- Press Windows + I to open the Settings app.
- Go to Personalization, and click Background.

- Go to Personalize your background; if your background is a picture, change it to Solid color from the drop-down.

- If it is Slideshow, for Change picture every, select 1 day or 6 hours
 .
.
It would also help to check if the monitor refresh rate matches the performance of your monitor. Windows 11 also has a Dynamic Refresh Rate option that you can try to toggle on and off to see if it fixes the issue.
8. Tweak the Power Plan
- Press the Windows key, type control panel, and click Open.

- Select Category for View as and click System and Security.

- Click Power options.

- Now click High Performance.

By following the steps outlined here, you can troubleshoot and fix the problem of your Windows 11 screen repeatedly refreshing. If these steps didn’t work for you, you might have to perform a clean installation of Windows to fix it.
If you are facing similar issues, like the desktop keeps refreshing on Windows 10, we recommend you check out this informative guide to find easy solutions.
Please feel free to give us any information, tips, and your experience with the subject in the comments section below.
Read our disclosure page to find out how can you help Windows Report sustain the editorial team. Read more


Improve this guide

User forum
0 messages