How to convert a Windows 7 MBR to a Windows 10 GPT Disk
Since Microsoft no longer supports Windows 7, it is only natural that the general public directs its attention to the next suitable OS available, and that is Windows 10.
While those that are part of business environments can always simply opt for the Windows 7 Extended Support for business, this is only a temporary solution, so migrating to Windows 10 is your only viable long-term solution.
With the change in OS, you may also feel the need to make a change in the way your partitions are set. For example, when migrating from Windows 7 to Windows 10, you may also want to change your disks from MBR to GPT.
That is why we’ve created this step-by-step guide that will show you precisely how you can convert your MBR disk to GPT, and be prepared for the OS migration.
How do I convert a Windows 7 MBR to a Windows 10 GPT?
Note: It is advised that you backup all of your data before the migration, or at least after the migration, in case one of the methods listed below fail and cause data loss.
1. Use EaseUS Partition Master
EaseUS Partition Master is one of the biggest names in disk partition tools on the market, and for good reason:
- You don’t need to delete your volumes in order to convert your disks from MBR to GPT
- You can create a bootable media to convert MBR to GPT without operating system or during Windows installation
This is how you convert a disk from MBR to GPT without data loss:
- Launch EaseUS Partition Master
- Right-click the MBR disk that you want to convert
- Choose Convert to GPT
- Click the Execute 1 Operation button on the toolbar
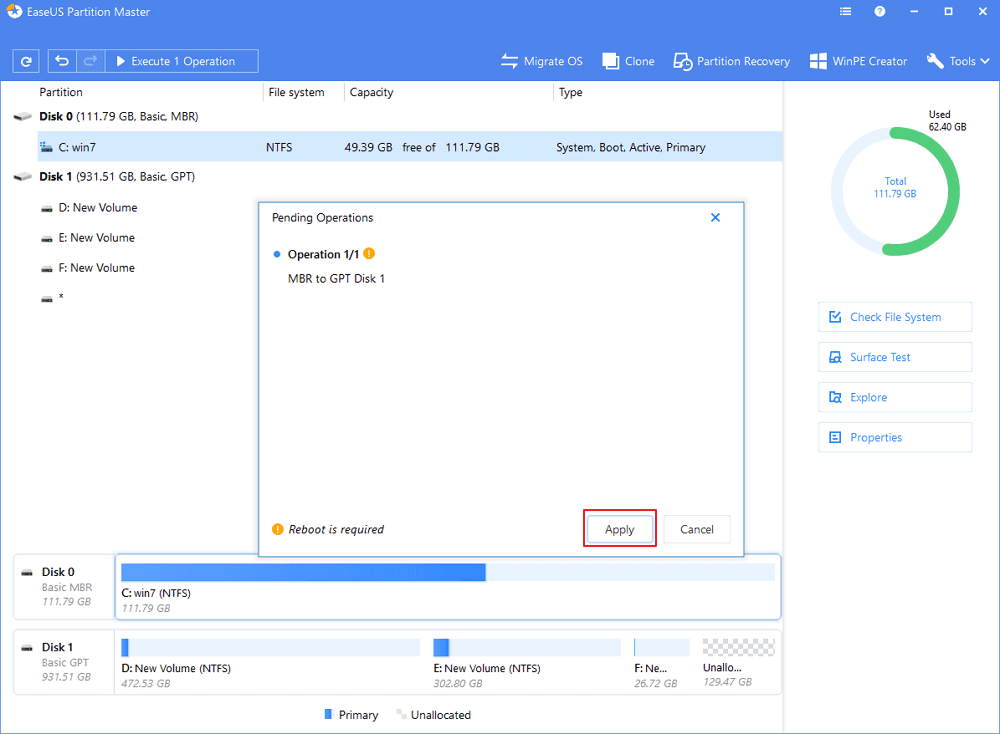
- Choose Apply to start the conversion
- Restart the PC
This method is by far the most efficient, as you don’t need to wipe your disks clean, perform any backups. Additionally, you can even use the bootable media created with this tool to make the conversion while you are upgrading from Windows 7 to Windows 10.
2. Use DiskPart
Back up your disk and then follow the steps below to convert your MBR disk to GPT.
- Press Start
- Type cmd.
- Right-click Command Prompt and choose Run as administrator
- When you see a dialog box asking you for permission, click Yes
- Enter the following commands one by one to delete all the partitions on your disk and then convert it to GPT:
-
- list disk
- select disk disknumber
- clean
- convert gpt
Note: You can use this method even during the Windows 10 install process, as you also have access to the Command Prompt from there.
3. Use Disk Management
Back up your disk and then follow the steps below to convert your MBR disk to GPT.
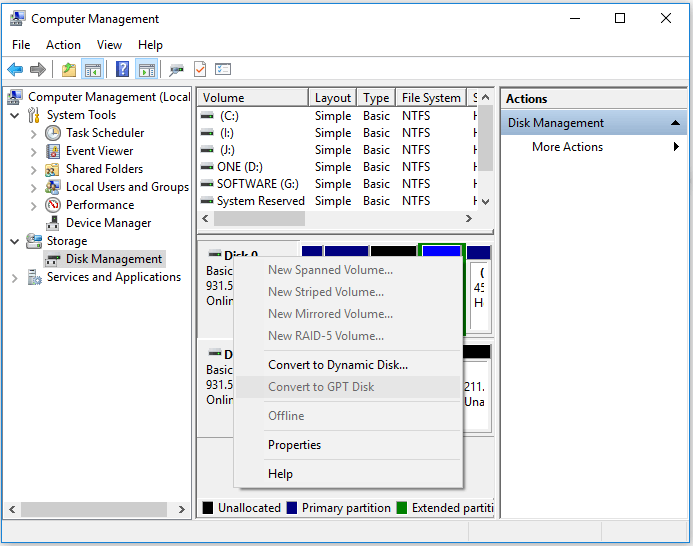
- In Windows 10, right-click on This PC
- Choose Manage
- Select Disk Management
- Right-click each partition on the disk you want to convert and select Delete Volume
- Do this until you have deleted all volumes
- Right-click your hard drive and choose Convert to GPT Disk
4. Use MBR2GPT.EXE
Microsoft has provided a software solution called MBR2GPT.EXE, but it is only available in the Windows Creator’s Update. It is far more complicated than the solutions listed above, and if you want more info, check out Microsoft’s documentation page on the matter.
By following these methods, you should be able to convert your disk from MBR to GPT, and be ready to migrate from Windows 7 to Windows 10 all at the same time.
Did you find this article useful? Let us know what other things you want to read about in the comment section below.
RELATED ARTICLES YOU SHOULD CHECK OUT:
Read our disclosure page to find out how can you help Windows Report sustain the editorial team. Read more


Improve this guide


User forum
0 messages