Wake On LAN Not Working on Windows [Solved]
Expert-tested solutions to fix WOL on your PC right now
Key notes
- Wake-on-LAN is a default feature in Windows 10 that allows you to start a PC with a signal through the network.
- It is actually a network so-called magic packet that will trigger the start of the machine.
- If Wake On LAN is not working, you will have to make a few changes to the system using Settings, BIOS, and the Registry Editor.
Your Windows device can be used in different ways and for various tasks since Microsoft added useful built-in features that can ease your daily schedule.
But, maybe the most popular feature that can be used in Windows 10 and Windows 11 is Wake-on-LAN. Unfortunately, more and more users are complaining about WOL issues, so we must find a way to fix these problems.
So, due to some reasons, if the Wake on LAN is not working on your device, try to use the guidelines from below in order to easily correct that.
Why is my Wake-On-LAN not working?
- Wake-on-LAN not working after shutdown, over Internet, after a long sleep – Various problems with Wake-on-LAN can occur, and users reported that they are unable to wake their PC over the Internet or after a long sleep.
- ASUS Wake-on-LAN not working – This problem can appear on almost any PC and many ASUS users reported it. You need to update your driver or BIOS to fix the issue.
- GIGABYTE Wake on LAN not working – This issue can also arise on PCs that run GIGABYTE hardware.
- Shutdown Wake-on-LAN Realtek – Many Realtek owners reported this issue with Realtek network adapters. In most cases, you can fix this problem by updating your drivers or by making a few changes in your registry.
- Wake-on-LAN in BIOS – To use the Wake-on-LAN feature, first you need to enable it in BIOS. In addition, you also have to disable Deep Sleep mode as well. If you don’t see these options, update your BIOS to the latest version.
How can I fix Wake On LAN not working on my PC?
[wr_toc]
1. Disable Fast Startup
- In the Search bar enter control panel. Select Control Panel from the list of results.
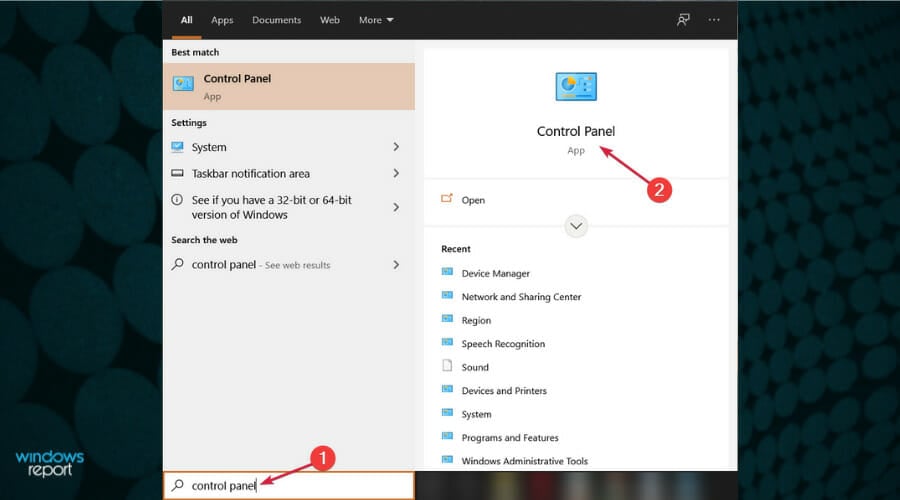
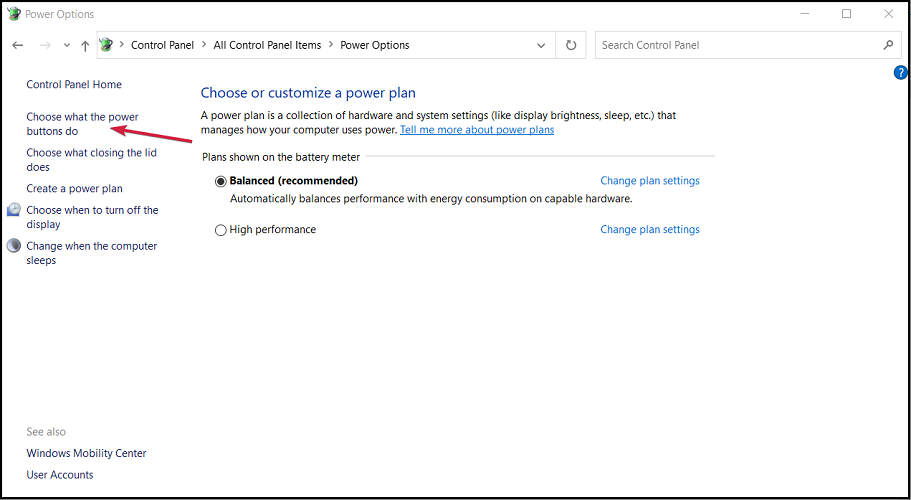
- When Control Panel opens, select Power Options from the menu.

- Power Options window will now appear. Click on Choose what the power button does from the menu on the left.
- Now click on Change settings that are currently unavailable.
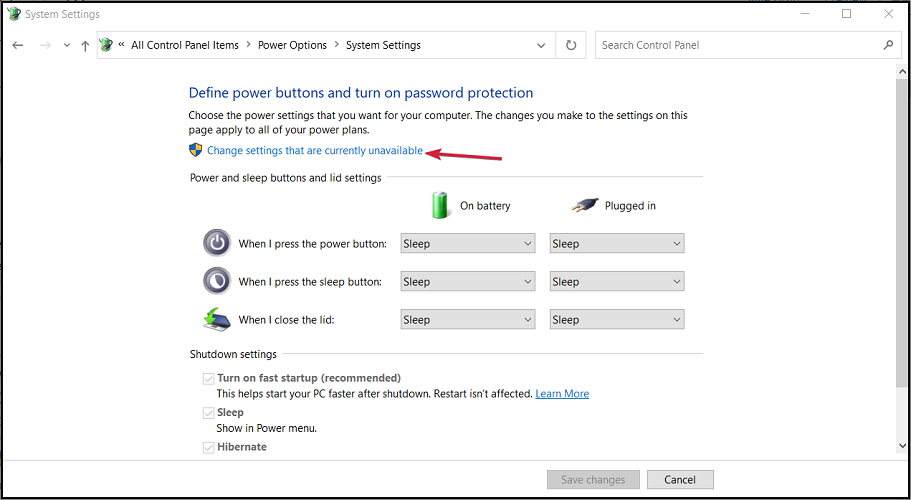
- Uncheck Turn on fast startup option and click on Save changes.
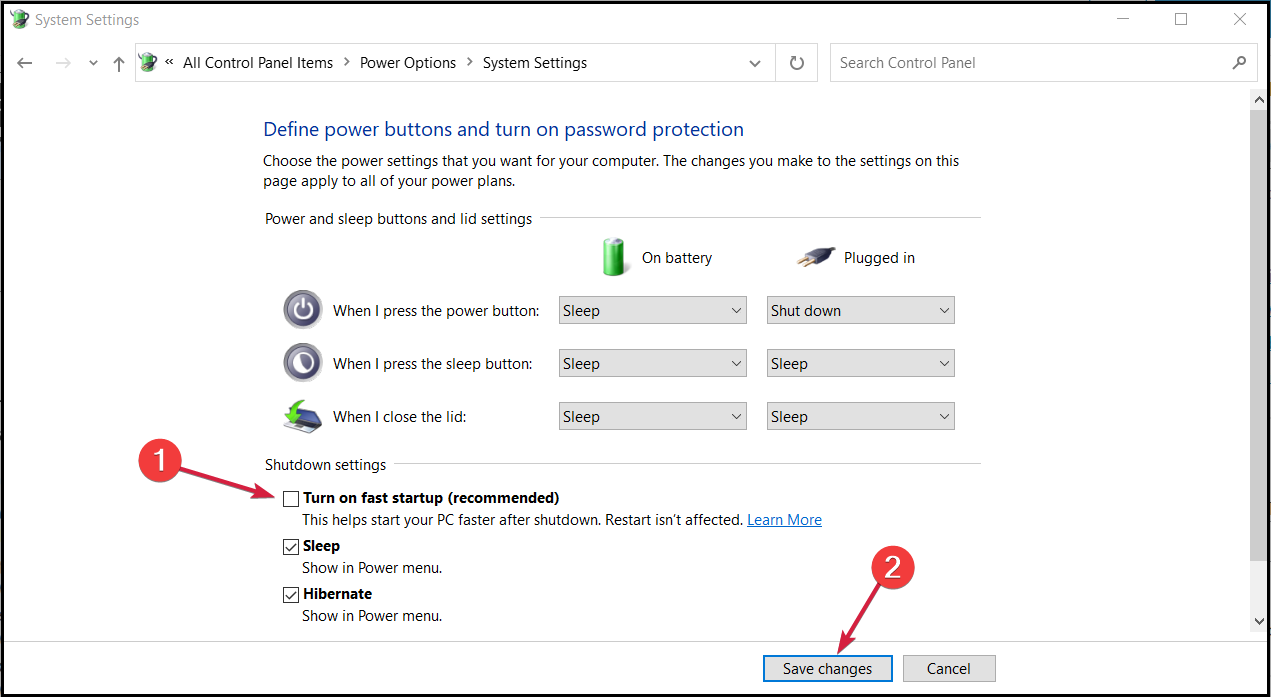
Fast Startup is a feature that can be activated or disabled from your Windows 10 settings. When enabled, you will be able to power off your device faster than usual. But, in some cases, the WOL protocol will not work when the mentioned feature is activated. Therefore, you need to disable it to fix the problem.
After making these changes, check if the Wake-on-LAN feature is working. This also helps when Wake on Magic Packet is missing.
When you can’t perform this procedure, learn how to fix Control Panel if it’s not opening.
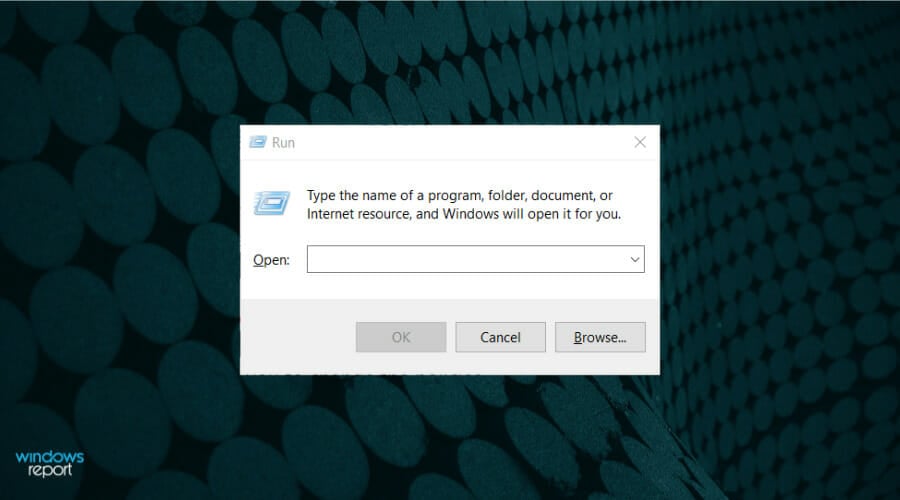
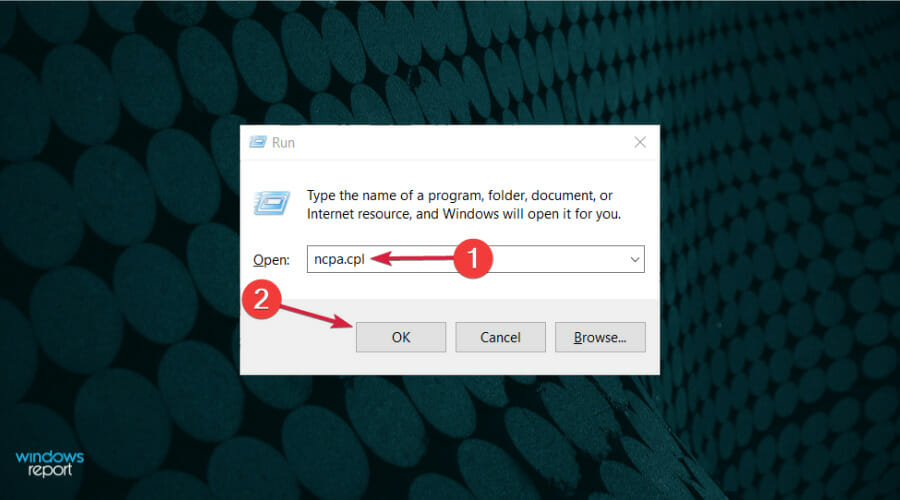
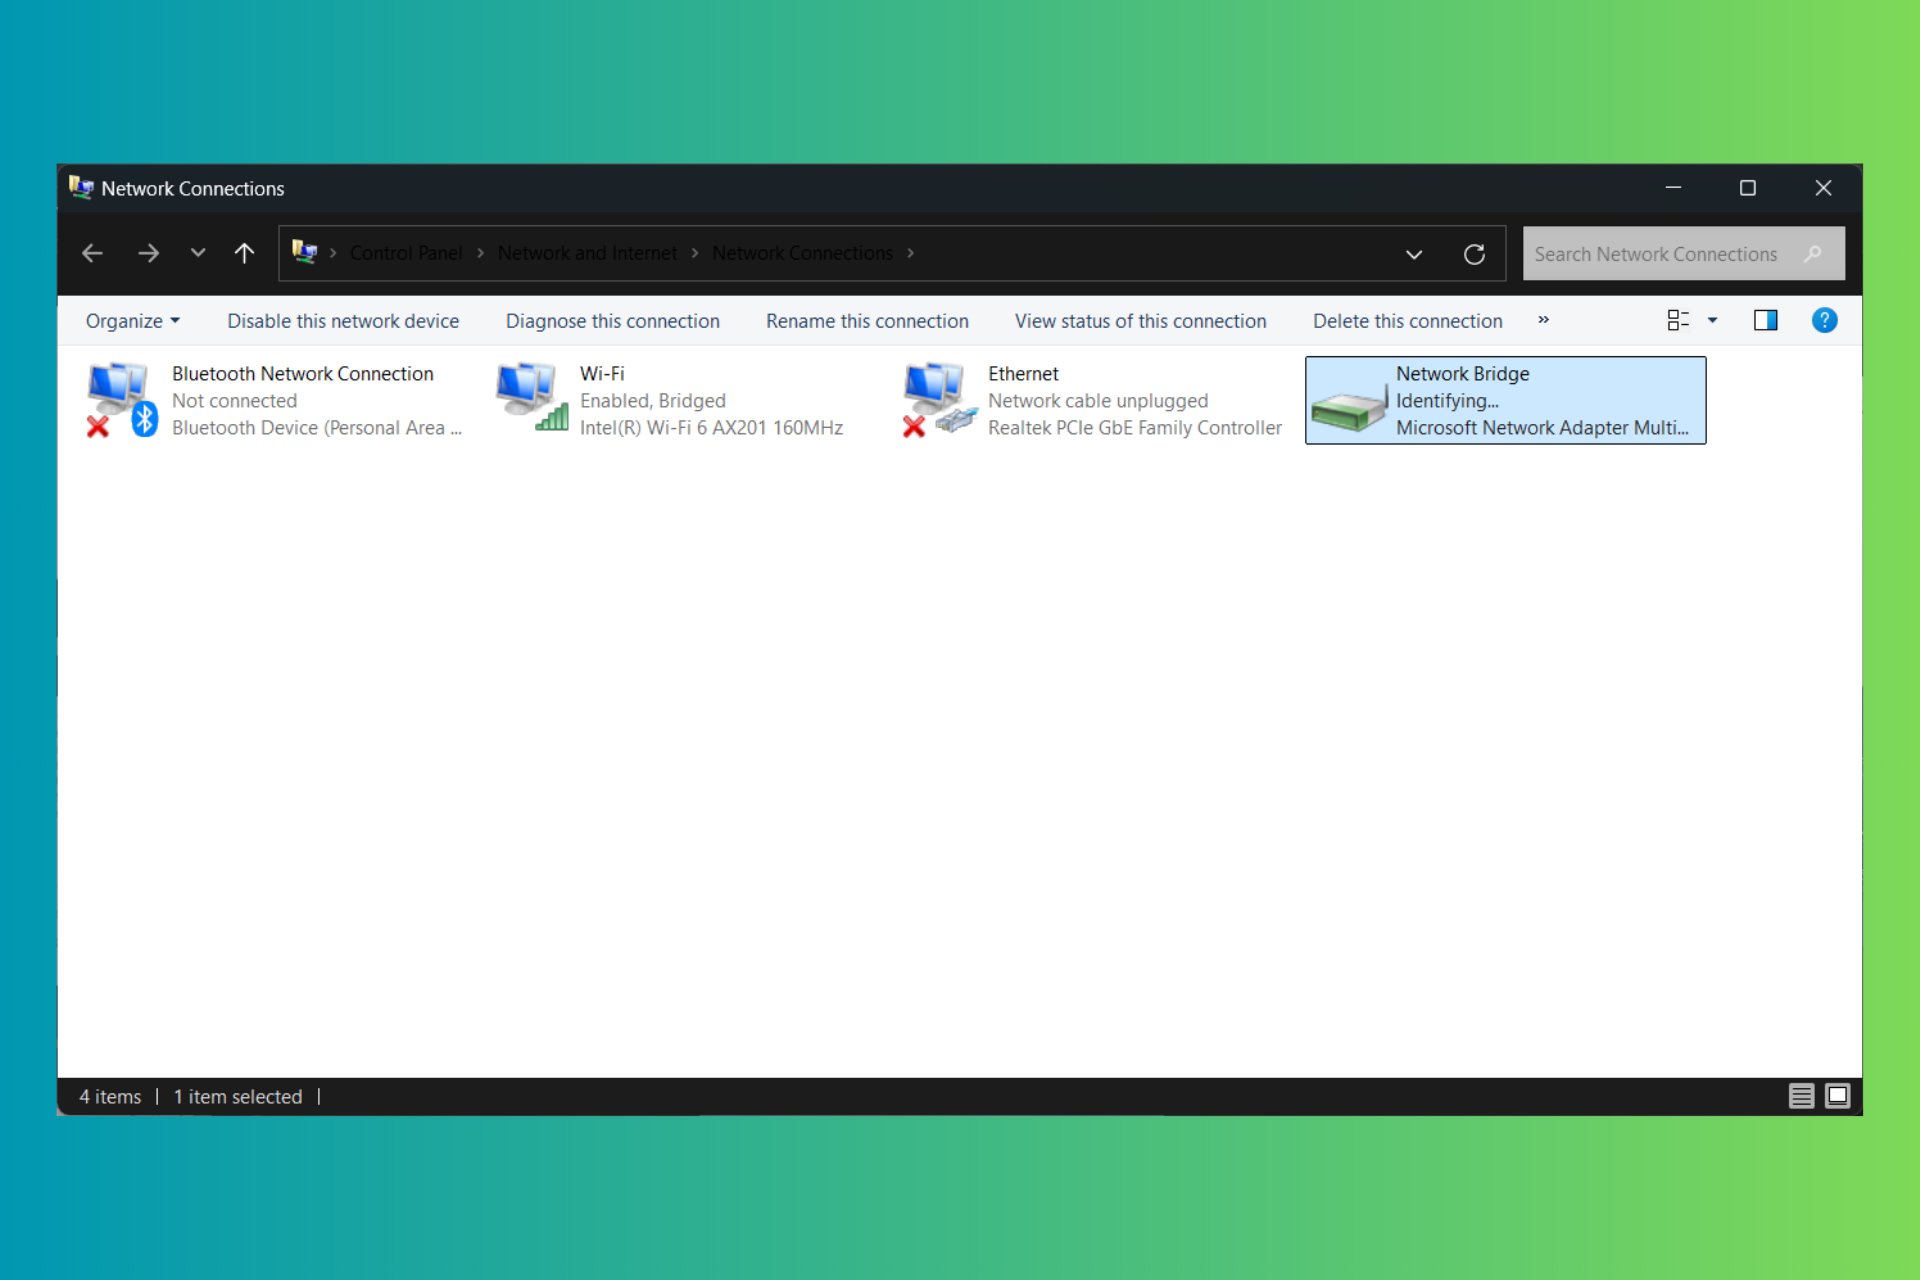
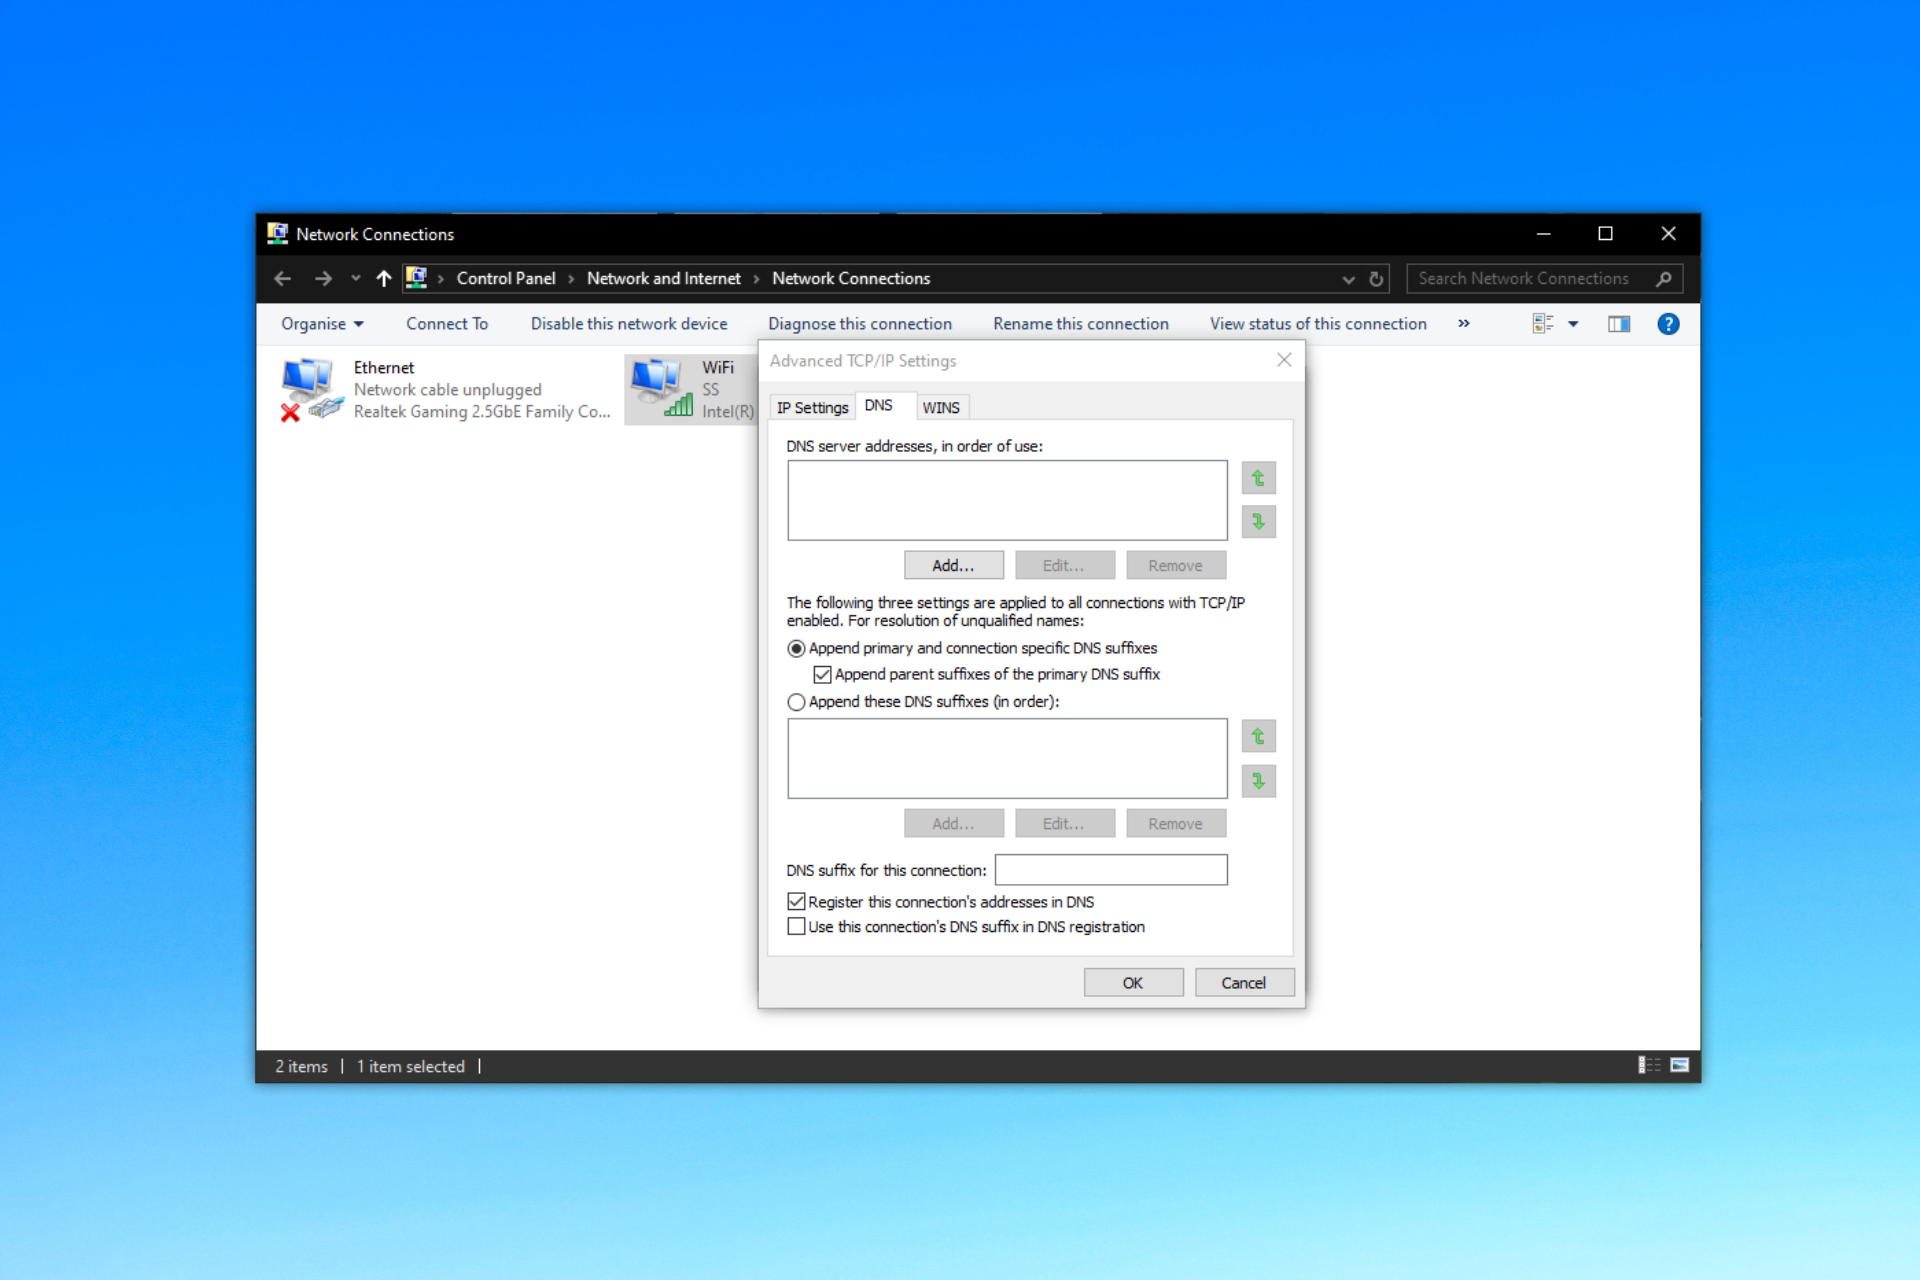
2. Use Network Configuration Settings
- From the Start screen use Win + R keyboard buttons in order to launch the Run console.
- In the Run box type ncpa.cpl and click OK.
- Right click your connection and choose Properties from the menu.
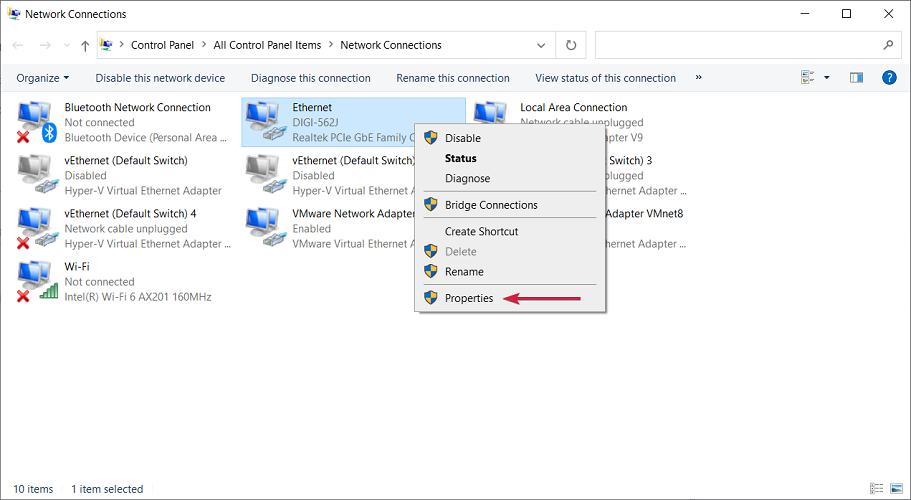
- When Properties window opens click on Configure.

- Go to Advanced tab and select the Enable PME option. Change the value into to Enabled and save changes. For some adapters the function is called Shutdown Wake-On-Lan so if you can’t see the Enable PME, you should enable this instead.
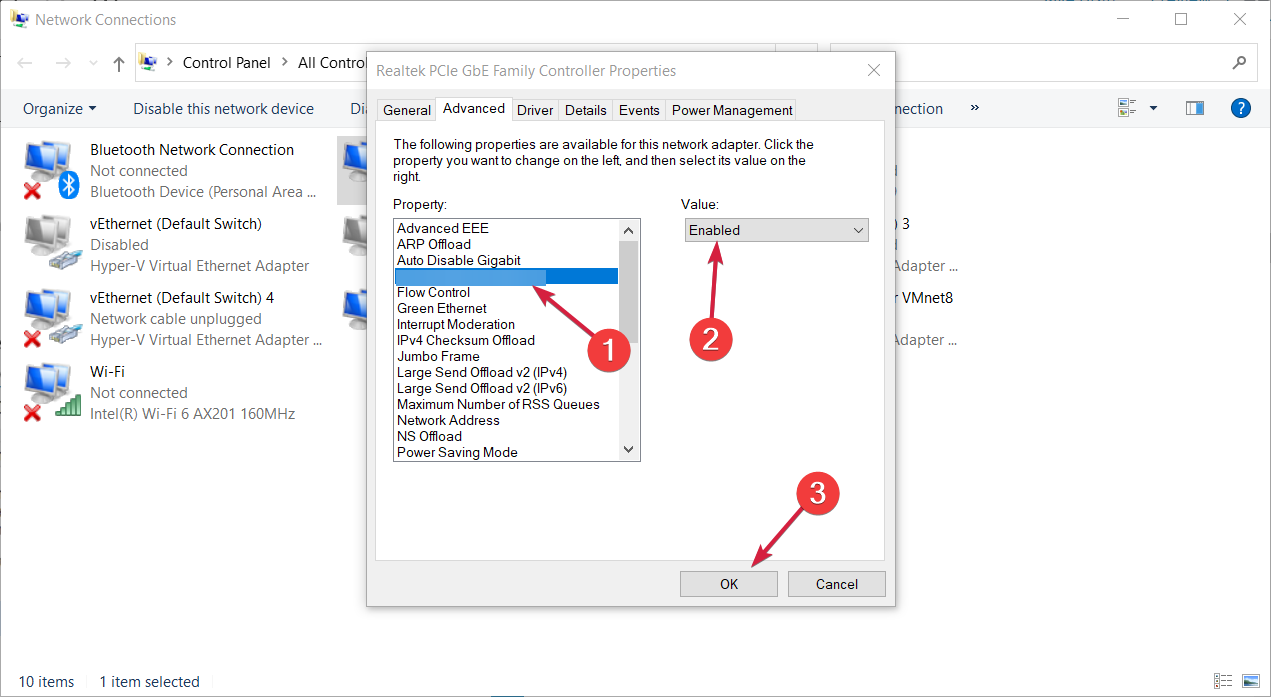
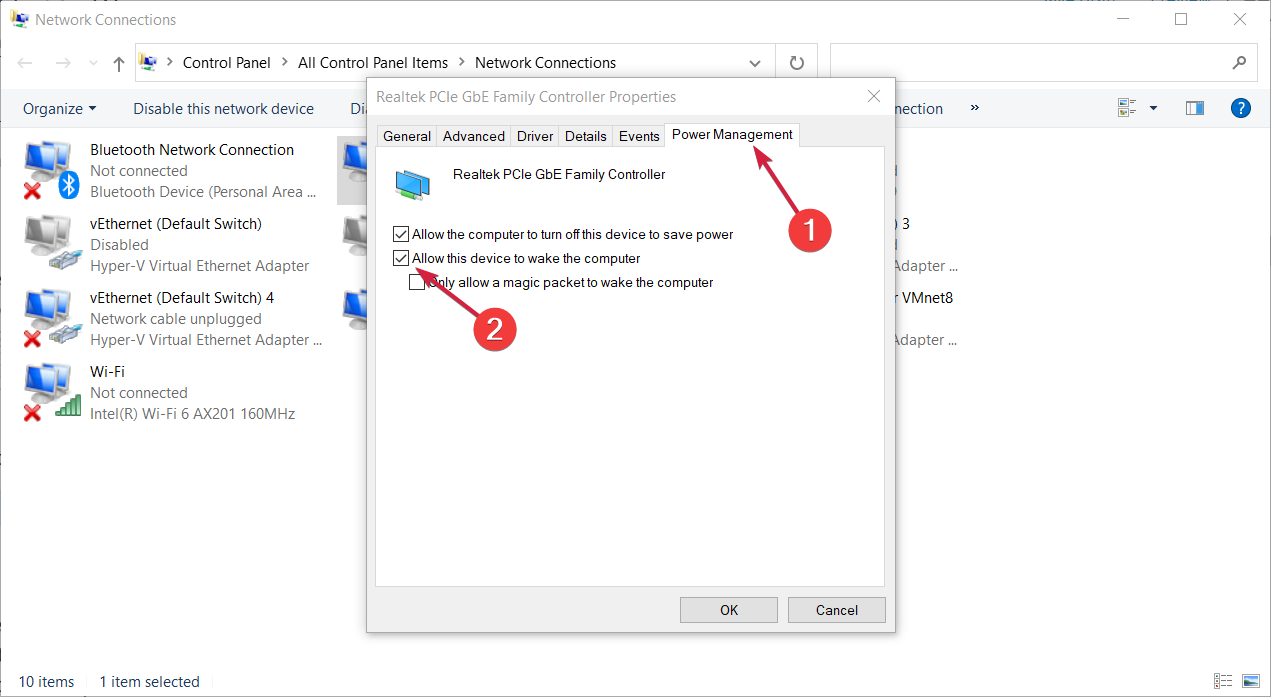
- Next, click the Power Management tab and check the Allow this device to wake the computer.
If you can’t perform this method our solutions on how to fix the Start button will help you solve this problem right away. Most users don’t know what to do when the Windows key stops working.
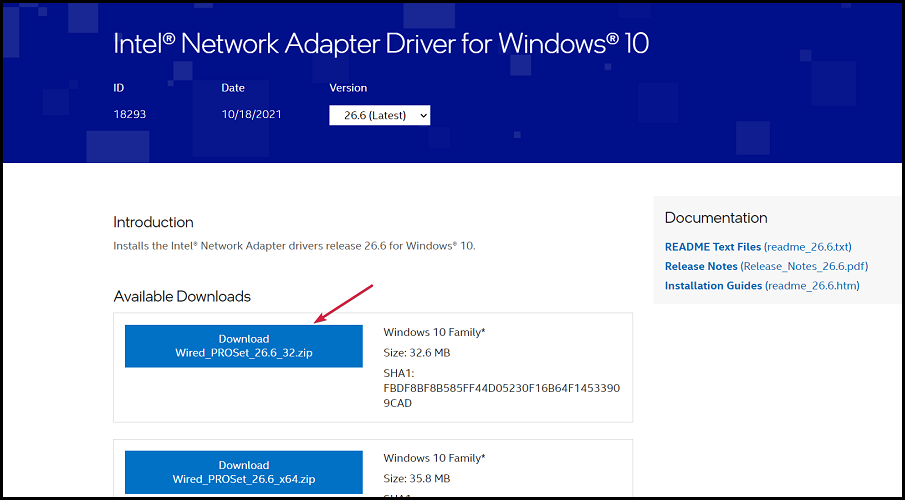
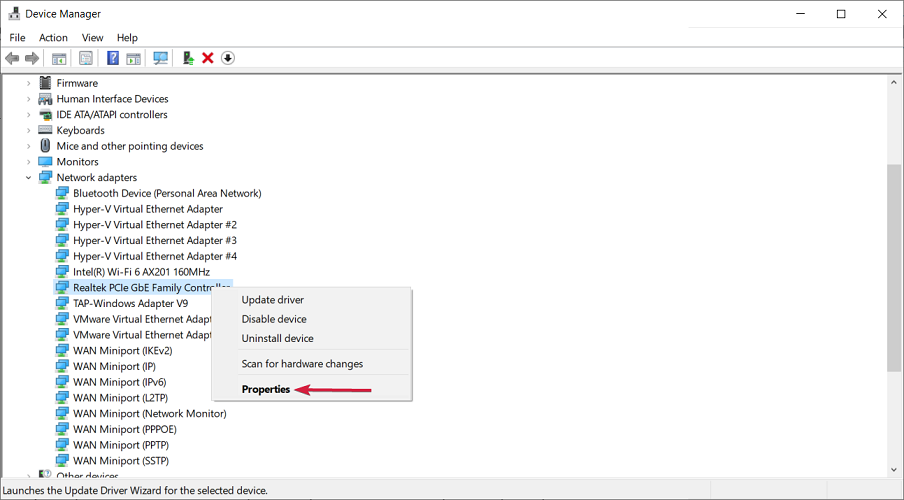
3. Install the older network driver
- Go to your network adapter or motherboard manufacturer’s website, locate the driver for your device, and download it.
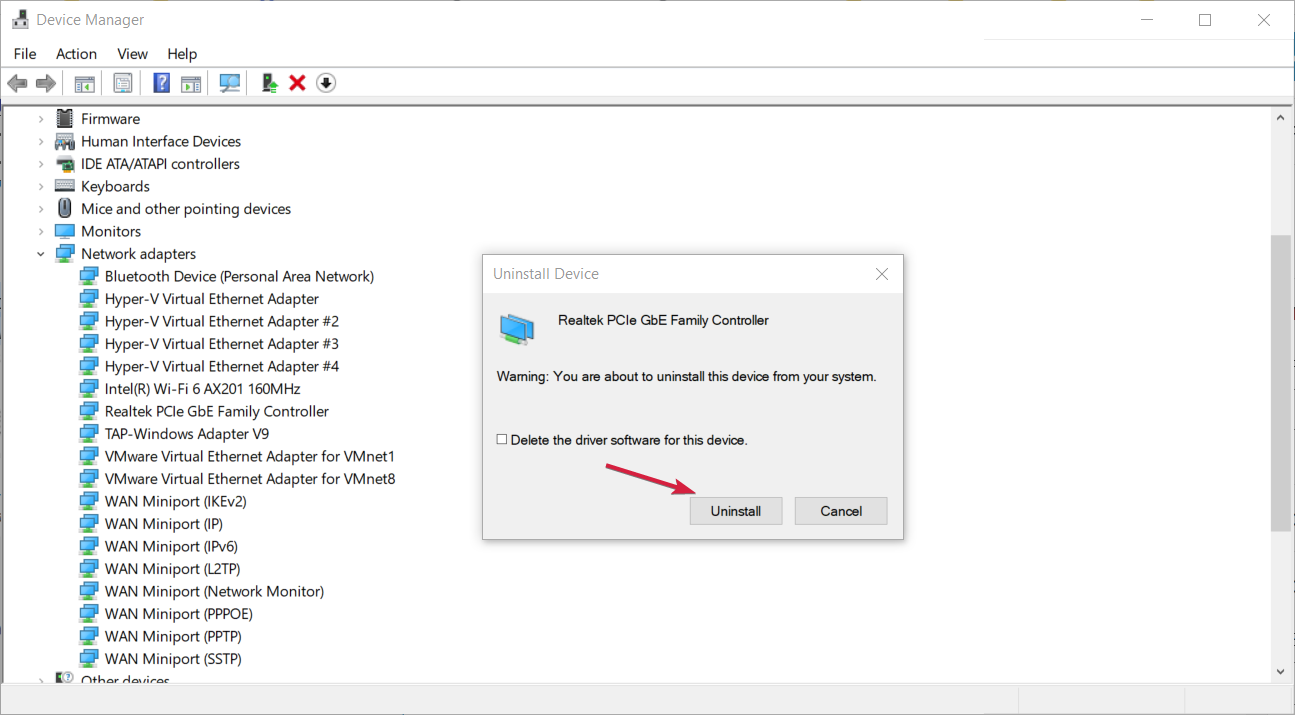
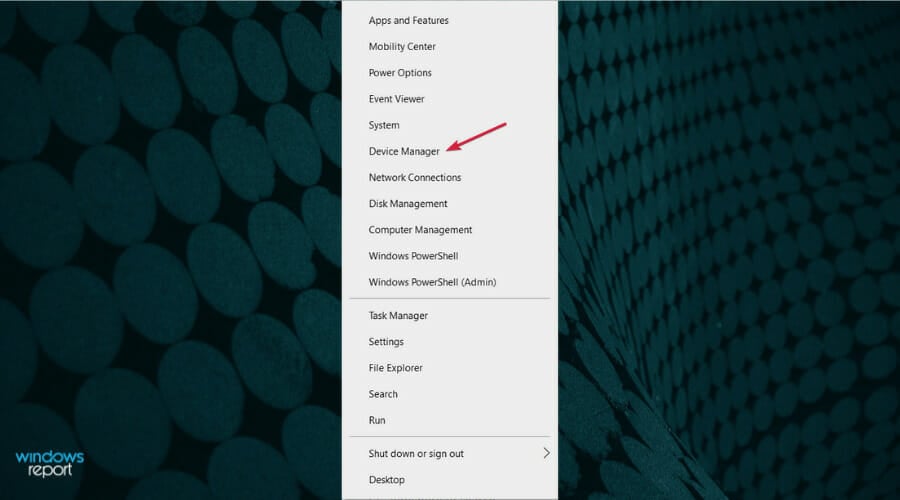
- Now press Windows key + X to open Win + X menu and choose Device Manager from the list.

- Once Device Manager opens, locate your network adapter, right click it and choose Uninstall device.
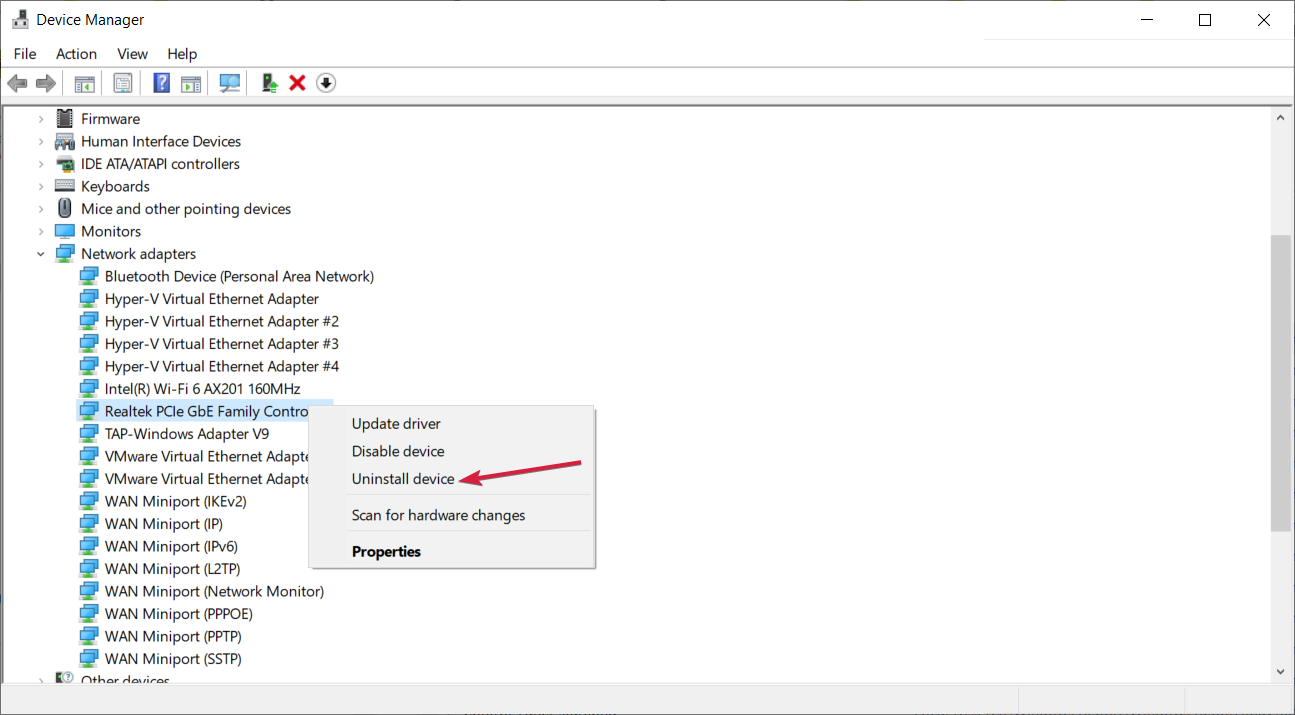
- When the confirmation dialog appears, click on Uninstall.
- Now click on Scan for hardware changes icon. Windows will now try to install the default driver.

If Wake-on-LAN is not working in Windows 10, the problem might be related to your network driver.
According to users, they managed to fix the issue simply by installing the older version of their network driver.
Once the default driver is installed, check if the problem is resolved. If the issue persists or if that default driver doesn’t work at all, install the driver that you downloaded in Step 1.
After installing the older driver, check if the Wake-on-LAN feature works. If the older driver solves the problem, you’ll have to prevent Windows from automatically updating it in the future.
In case the manual process doesn’t work out and you need a more streamlined method, the standalone driver manager will help you in any matter.
4. Install the latest network driver
- Press the Windows key + X and select Device Manager from the list.
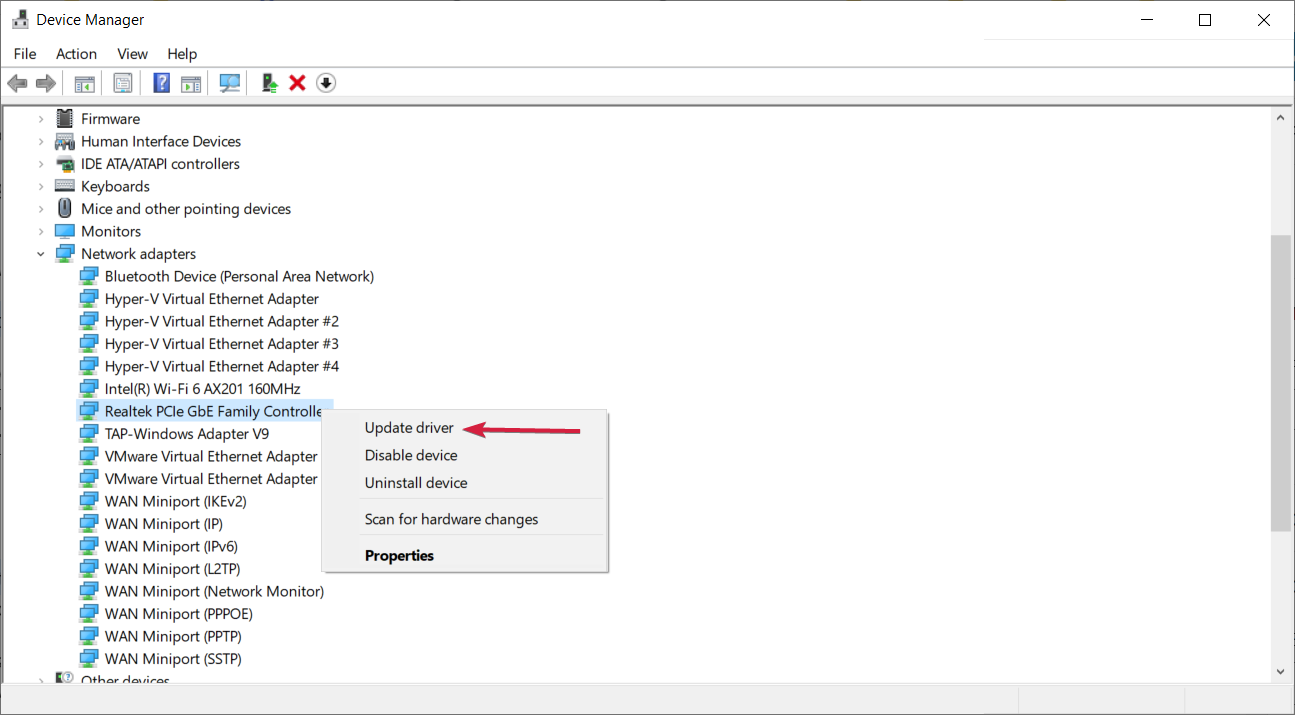
- Expand the Network adapters section, right click the device and select Update driver.
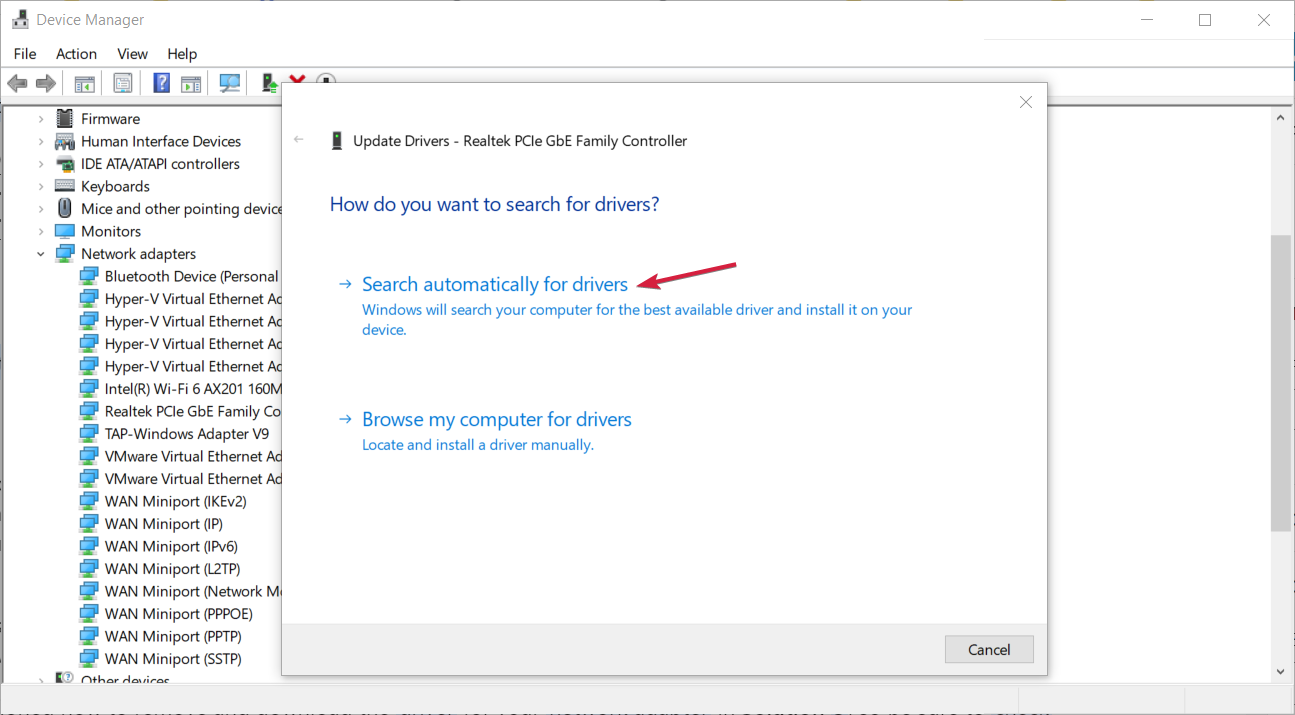
- You can click on Search automatically for drivers of if you downloaded the latest driver from the manufacturer you can opt for the second choice and indicate its location on your PC.
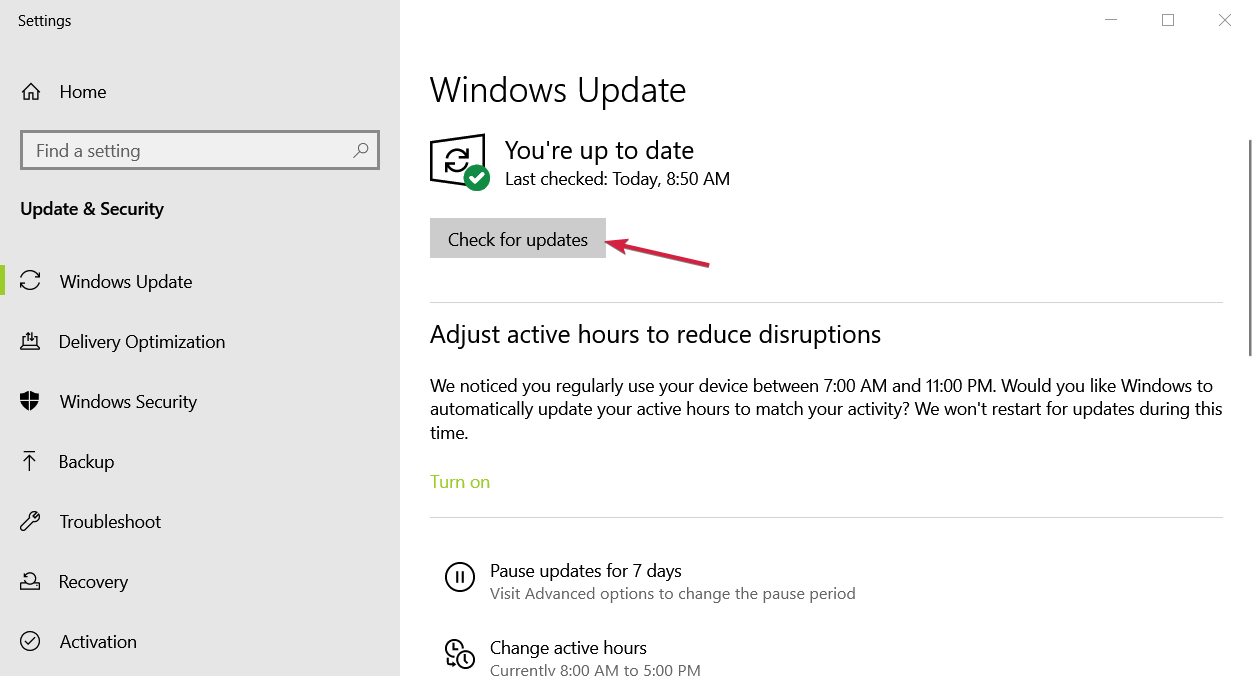
- If the system finds a new one, it will install it and you will be prompted for a restart. If not, click on Search for updated drivers on Windows Update.
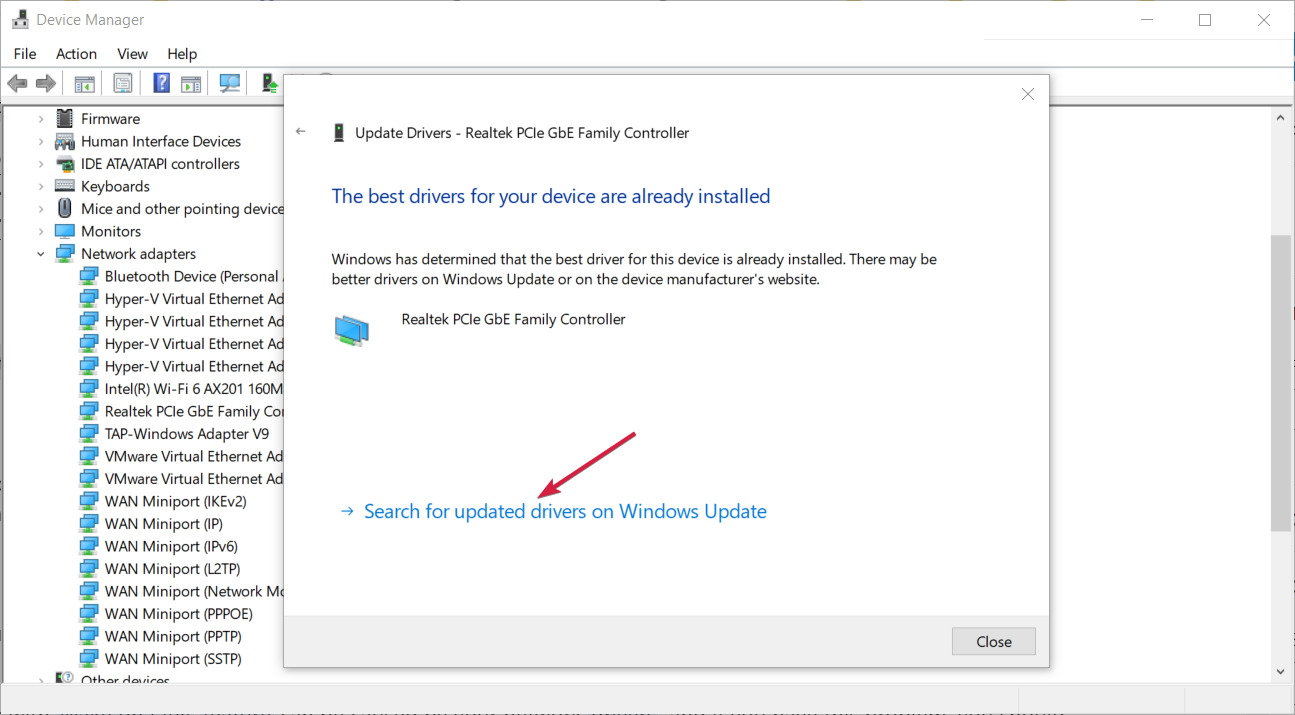
- Hit the Check for updates button and if there are any, download and install them. Also, check the Optional updates if the system finds any.
Your network drivers can cause problems with the Wake-on-LAN feature, and if you have this issue, you should try removing your current network driver and updating it to the latest version.
We mentioned how to remove and download the driver for your network adapter in Solution 3, so be sure to check it out for detailed instructions.
Once your network driver is up to date, the issue should be completely resolved, and you’ll be able to use the Wake-on-LAN feature again.
If you don’t want to fix the drivers manually, we suggest doing it automatically by using third-party software that will download and update the drivers that better match your needs.
These applications have been developed to prevent PC damage due to incorrect driver version installations. After you select the drivers to update, the software will do all the work on your behalf automatically.
5. Check your BIOS settings
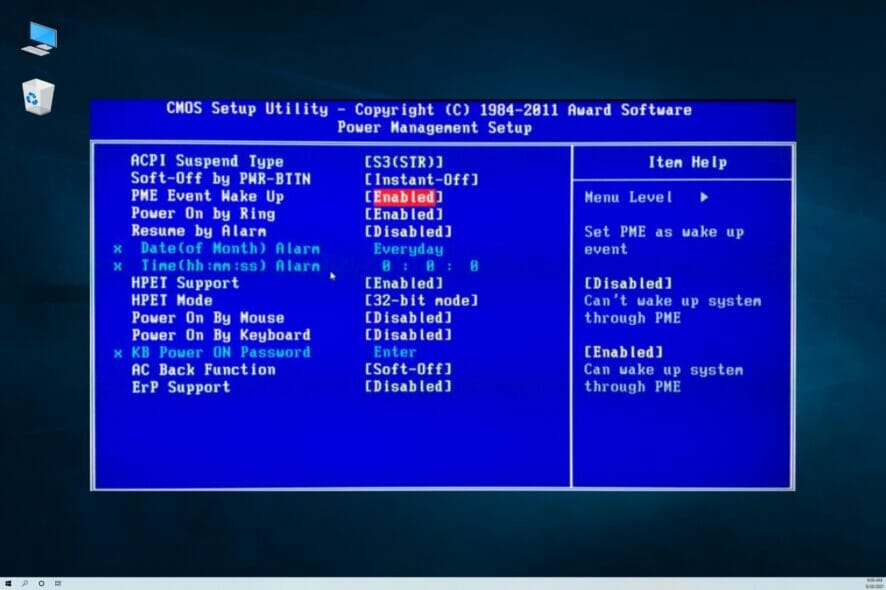
- Restart your PC and press an F, Del, or Enter keys according to your settings to enter BIOS. This can be different for every manufacturer so look for your PC instructions or the indications on your screen.
- Now look for the Power management section and enable the Wake-on-LAN feature. This may be called differently on each version of BIOS and motherboard. In our example it’s PME Event Wake Up.
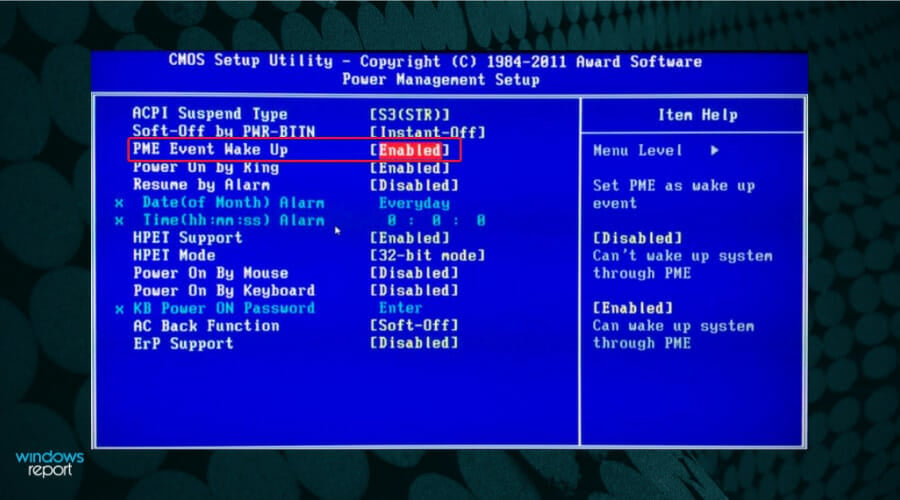
- Also, if you have a DELL PC or laptop, try to locate the Deep Sleep Control feature and disable it. If you don’t have it, move on and press the F10 key to save the changes and exit.
After enabling these features the problem should be resolved. If you can’t enter BIOS, follow our solutions on what to do if your PC skips BIOS.
6. Modify your registry
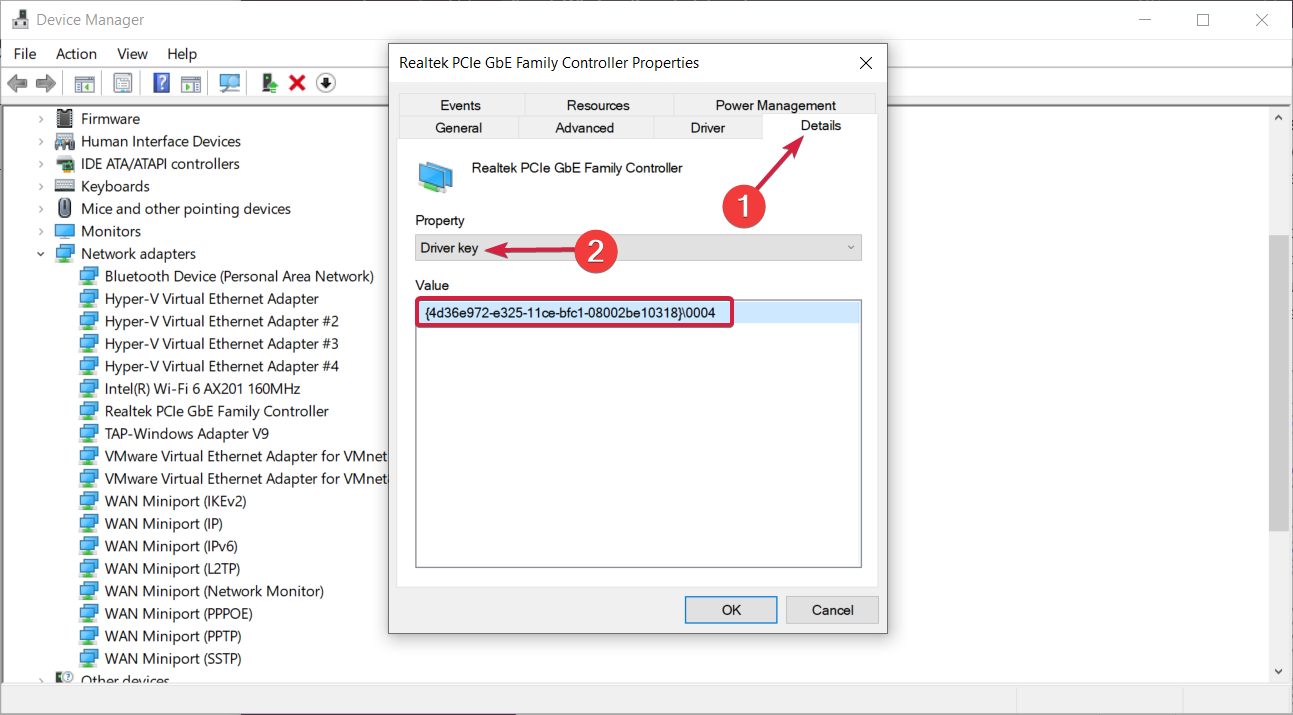
6.1 Find the Registry key for your network adapter
- Press the Windows key + X and select Device Manager from the list.
- Click the Network adapters section to expand it, right-click the adapter and select Properties.
- Now click on the Details tab, select Driver key from the drop-down menu and you now know what is the key for your network adapter.
6.2 Change the network adapter Registry key values
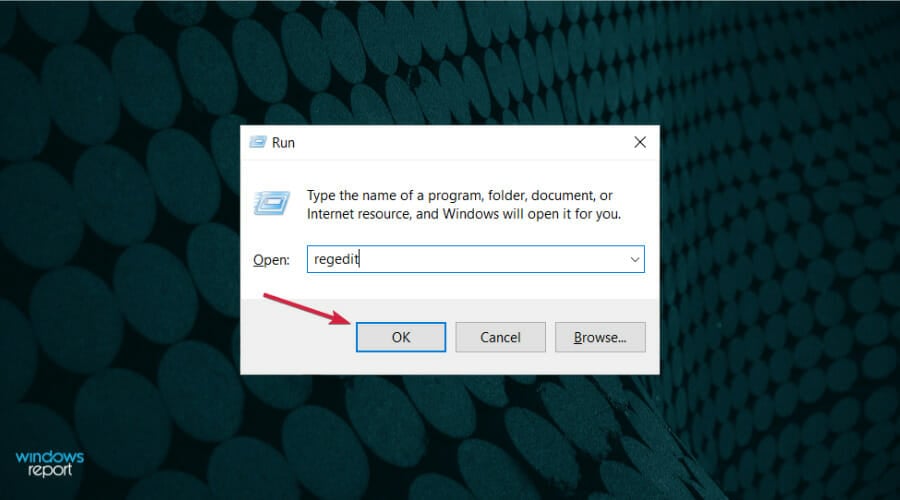
- Press Windows key + R and enter regedit. Press Enter or click on OK.
- When Registry Editor opens in the left panel navigate to the following key (keep in mind that the last part might be different on your PC, so you might need to manually find your network adapter):
Computer\HKEY_LOCAL_MACHINE\SYSTEM\CurrentControlSet\Control\Class\4de3e972-e325-11ce-bfc1-08002be10318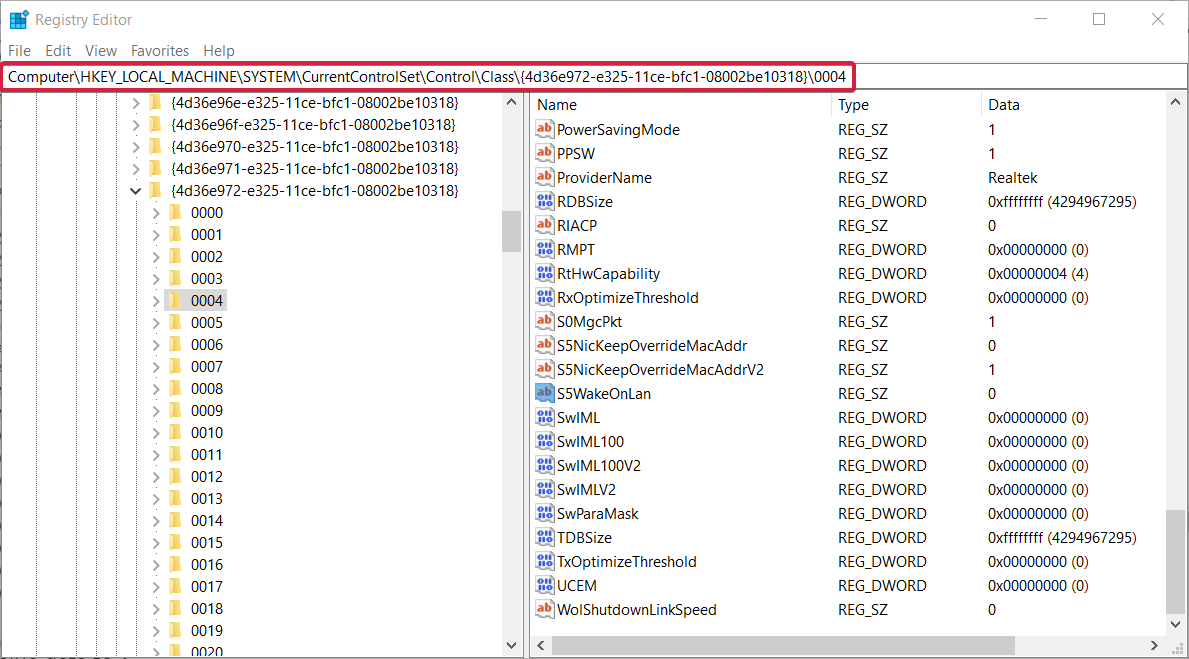
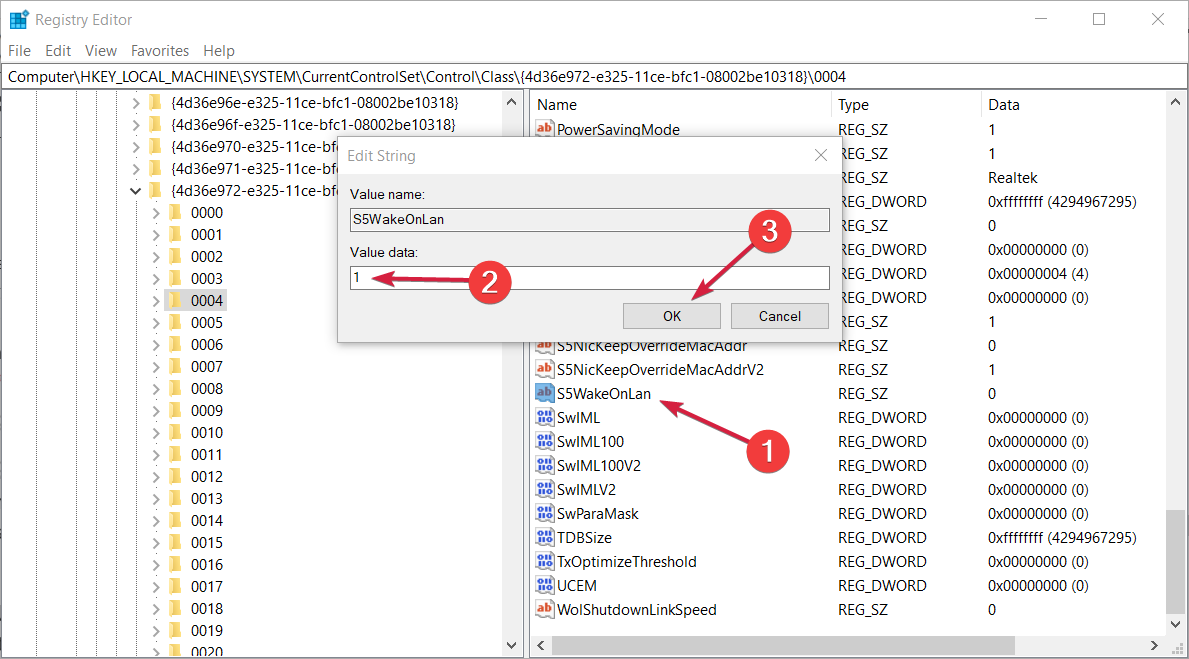
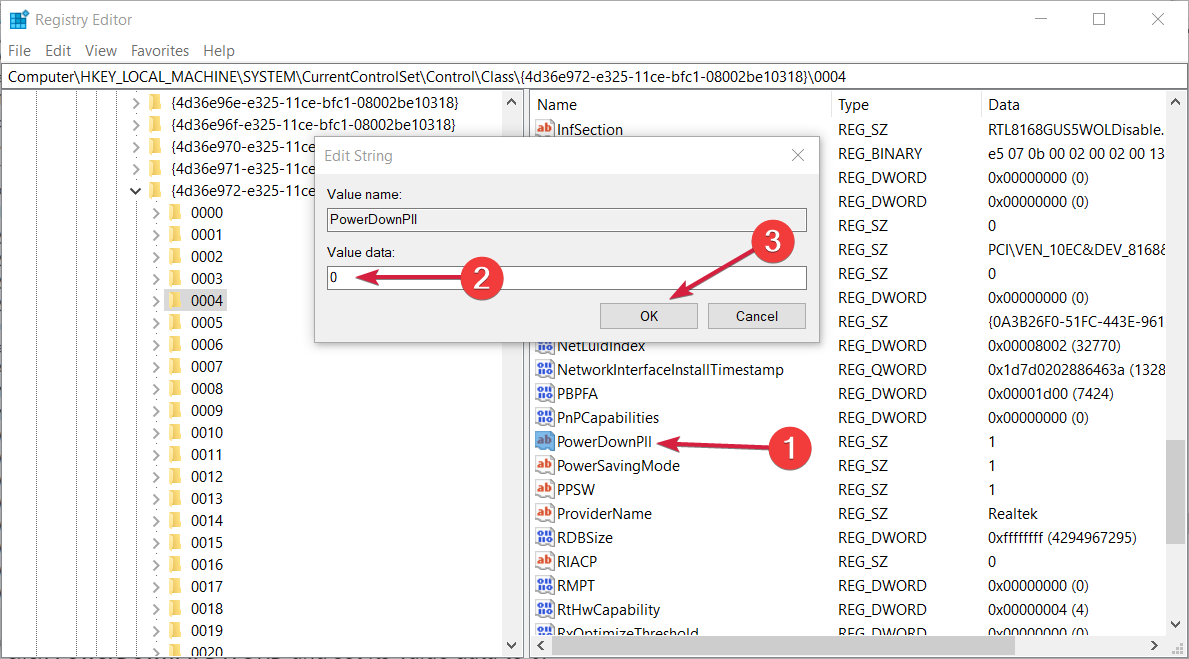
- Once you find your Realtek adapter, in the right pane you should see S5WakeOnLAN DWORD. Double click it and change its Value data to 1.
- Now, double click PowerDownPll DWORD and set its Value data to 0.
If Wake on LAN isn’t working in Windows 10, the problem might be related to your registry. To fix the issue, you need to find your network device and change its settings.
6.3 Change the NDIS Parameters key
- While in the Registry Editor, navigate to the following key:
KEY_LOCAL_MACHINE\SYSTEM\CurrentControlSet\Services\NDIS\Parameters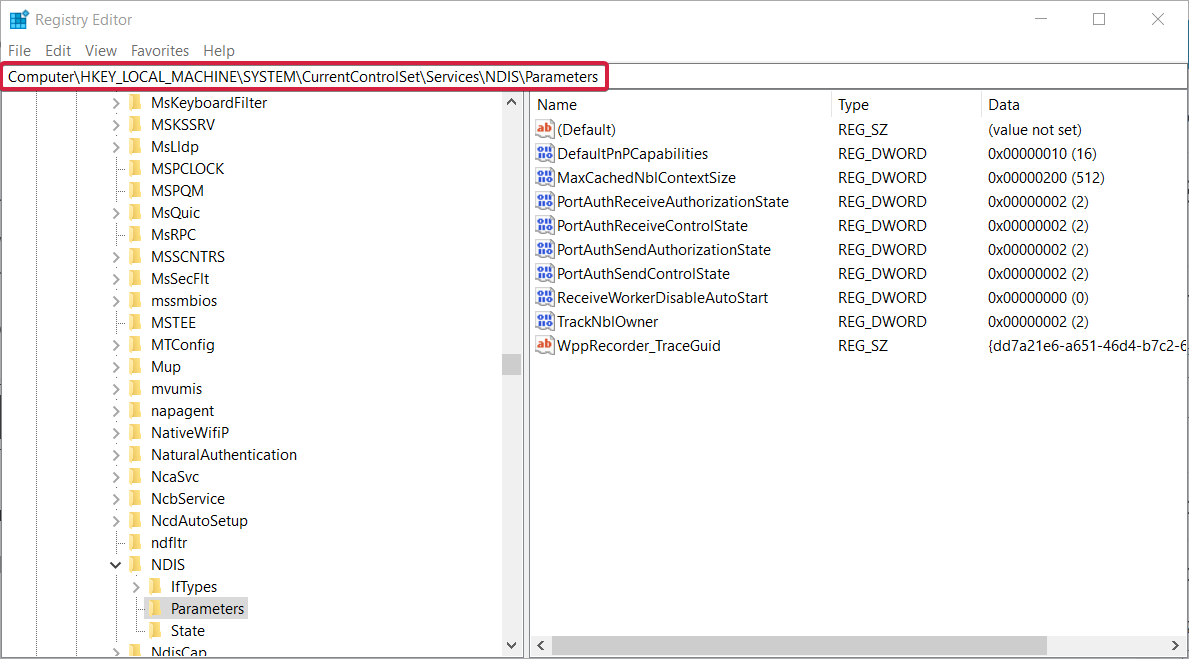
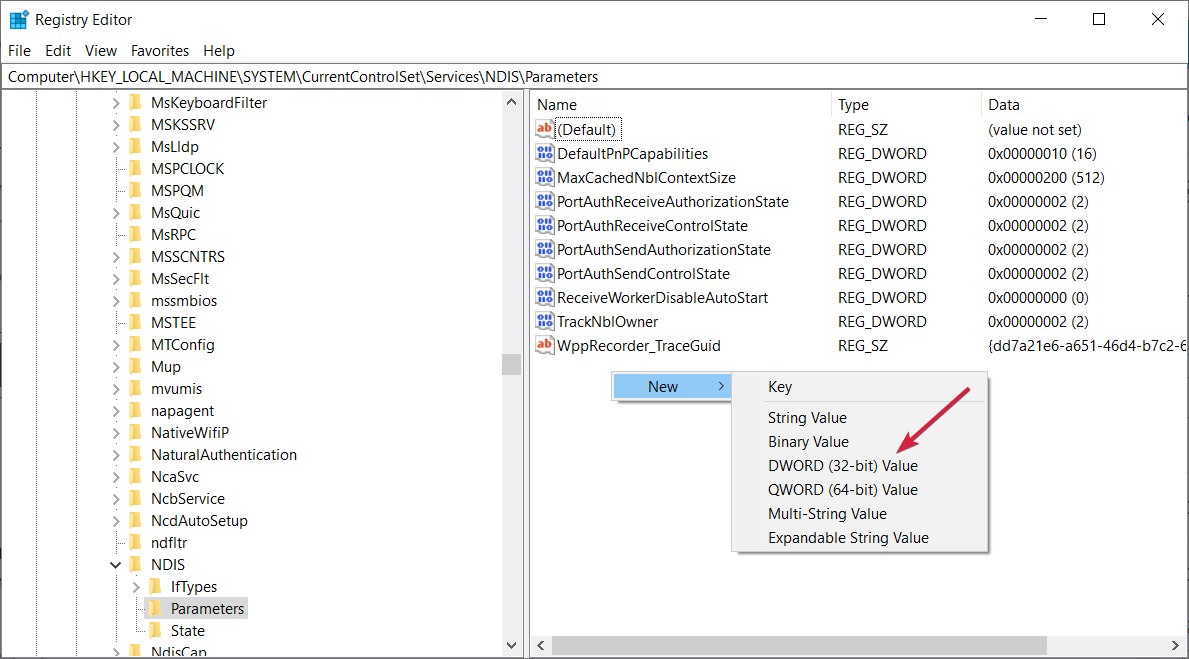
- Right-click on an empty space from the right pane, select New, and then choose DWORD (32-bit) Value.
- Name the new value AllowWakeFromS5.
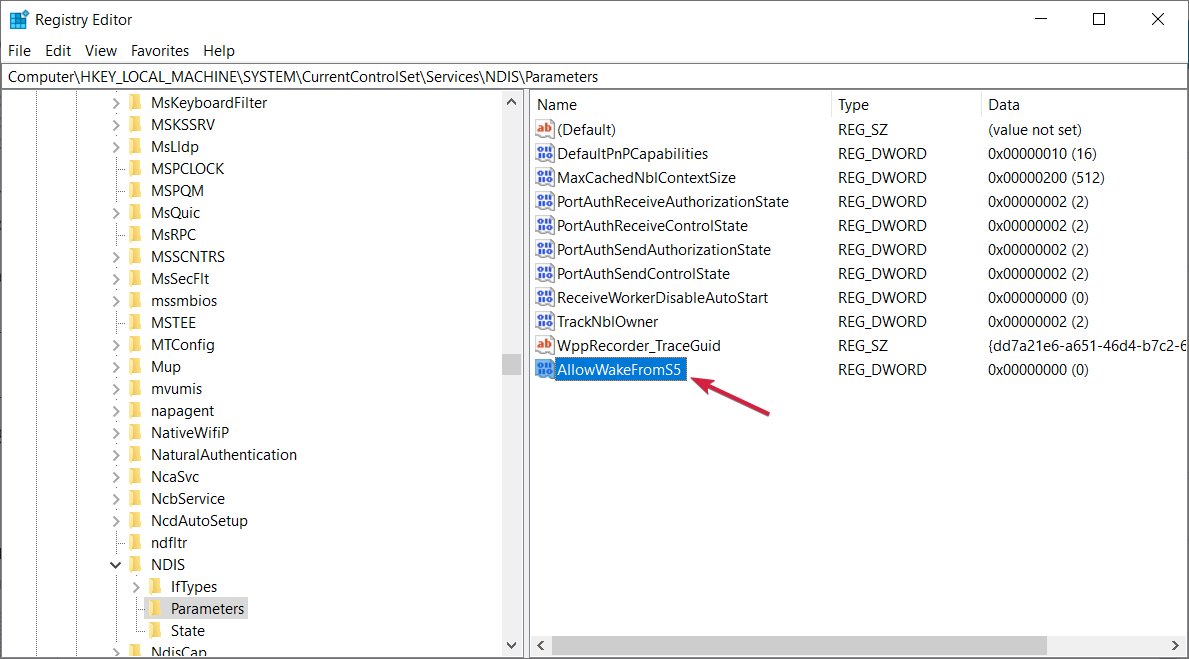
- Double click the item and set its Value data to 1, then hit the OK button.
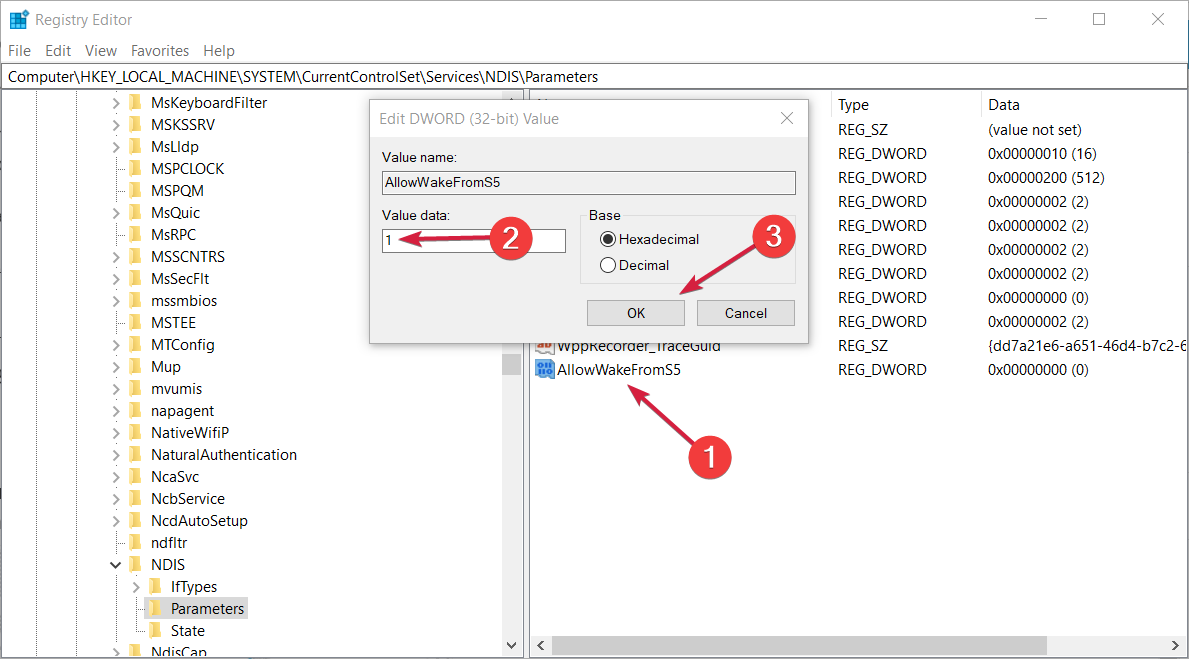
- Exit the Registry Editor and restart your PC.
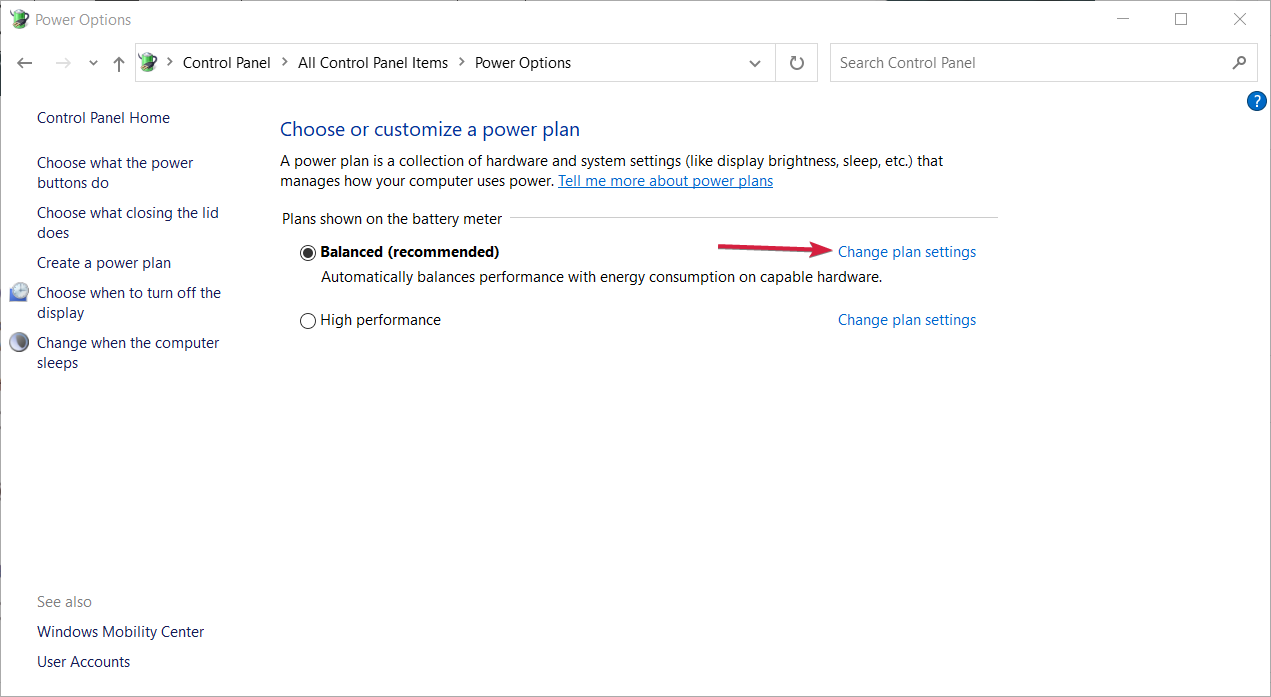
7. Change your power plan settings
- In the Search bar enter control panel. Select Control Panel from the list of results.
- When Control Panel opens, select Power Options from the menu.

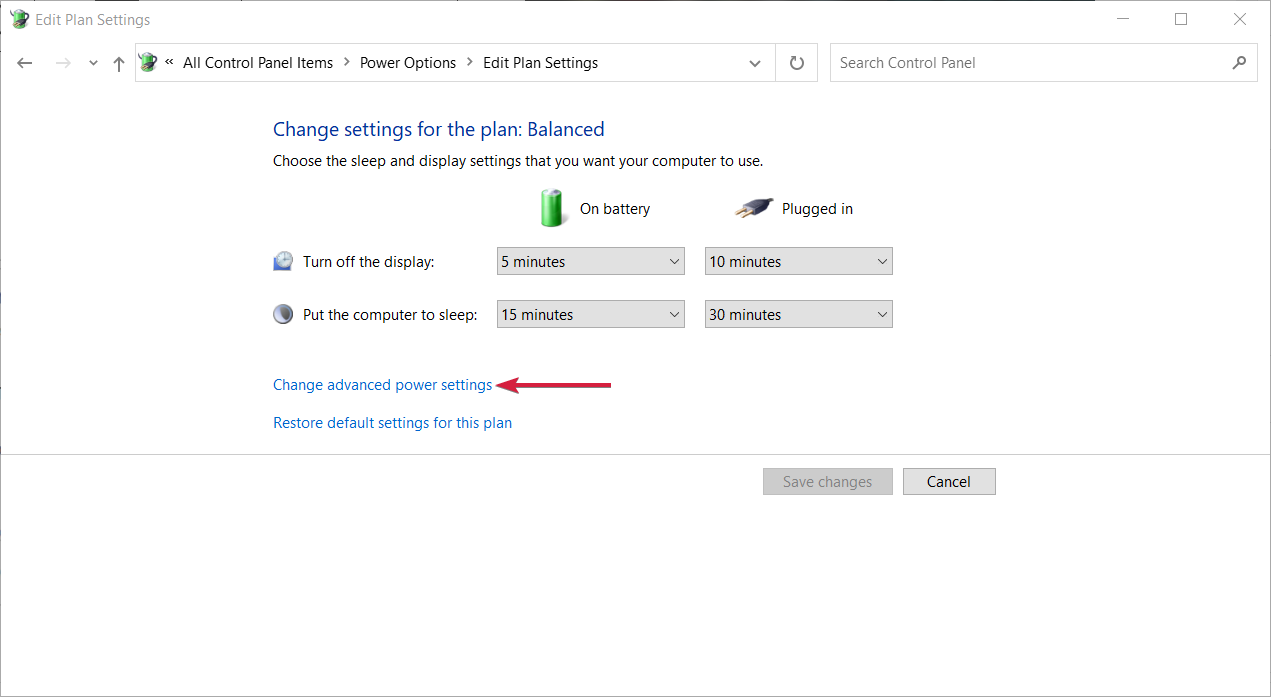
- When it opens, locate your power plan and click on Change plan settings next to it.
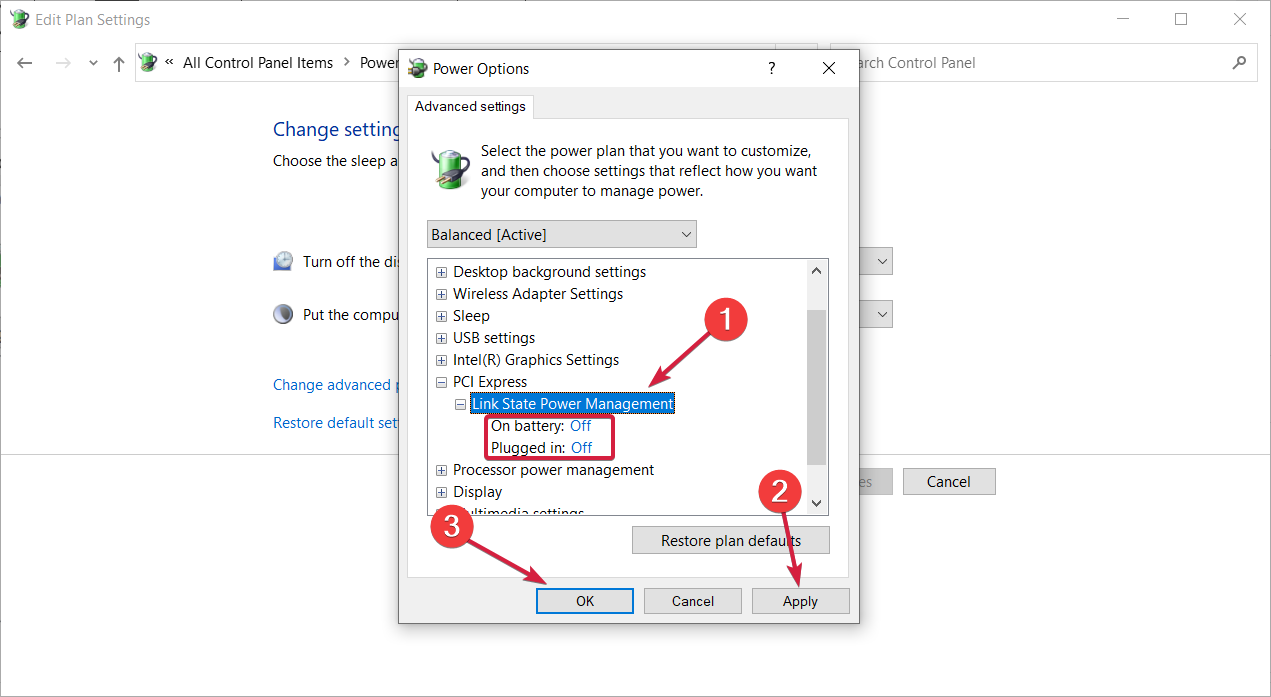
- Now click on Change advanced power settings.
- Expand PCI Express section and set power saving to Off. Now click on Apply and OK to save the changes.
According to our readers, you might be able to fix the problems with the WOL not working simply by changing your Power Settings so follow the steps above to do that.
8. Upgrade BIOS
If you’re having problems with Wake-on-LAN, you might be able to solve them by updating BIOS to the latest version. BIOS update is a complicated procedure that can be potentially dangerous if you don’t perform it properly.
To see how to properly update your BIOS, check your motherboard manual for detailed instructions.
In addition to upgrading BIOS, a few of our readers reported that downgrading BIOS to the older version fixed the problem for them, so you might want to try that if the BIOS upgrade doesn’t work.
9. Reset BIOS and enable APM
If Wake-on-LAN isn’t working, you might be able to fix the problem simply by resetting your BIOS. You can do that from BIOS or by removing your battery from the motherboard for a few minutes.
Again, this is a delicate procedure, so you should check the precise instructions from your manufacturer or leave this for professionals. If opening the PC case voids your warranty, do not attempt this.
After resetting your BIOS, be sure to enable APM in BIOS. You can do that by going to the Advanced section. Once you do all that, Wake-on-LAN should start working.
What can I do if Wake On LAN is not working on Windows 11?
Although the solutions above are technically for Windows 10, you can safely use them on a Windows 11 PC as well to solve WOL issues.
The steps to solve Wake on LAN not working on Windows 11 are mostly the same, and the best solution remains tweaking your Power Settings.
What is Wake-on-LAN?
Wake-on-LAN is a Windows default feature that basically allows a computer to be turned on by a network message.
This awakening message will be sent from a program running on another computer, laptop, tablet, or desktop located on the same local area network.
Wake-on-LAN can be easily and safely used on any Windows 10-based device, though in rare cases, you might notice that you can’t use this protocol.
This is a useful feature that allows you to wake up your PC remotely, but sometimes issues with it can occur. To learn more, we have a great guide on how to enable wake on LAN in Windows 11, so don’t miss it.
How can I find the MAC address on Windows 10?
To use the Wake-on-LAN feature and wake up your or another PC from sleep, you will need its Mac address, a unique 12-digit code for any network adapter.
There are a few ways to find out that information but we’re going to show you only the easiest method below:
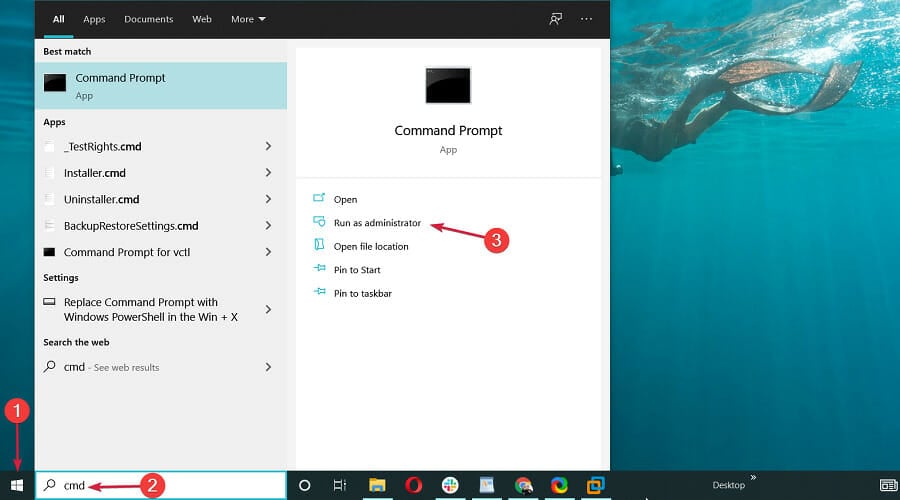
- Click the Start button, type cmd, and select Run as administrator to launch Command Prompt with full privileges.
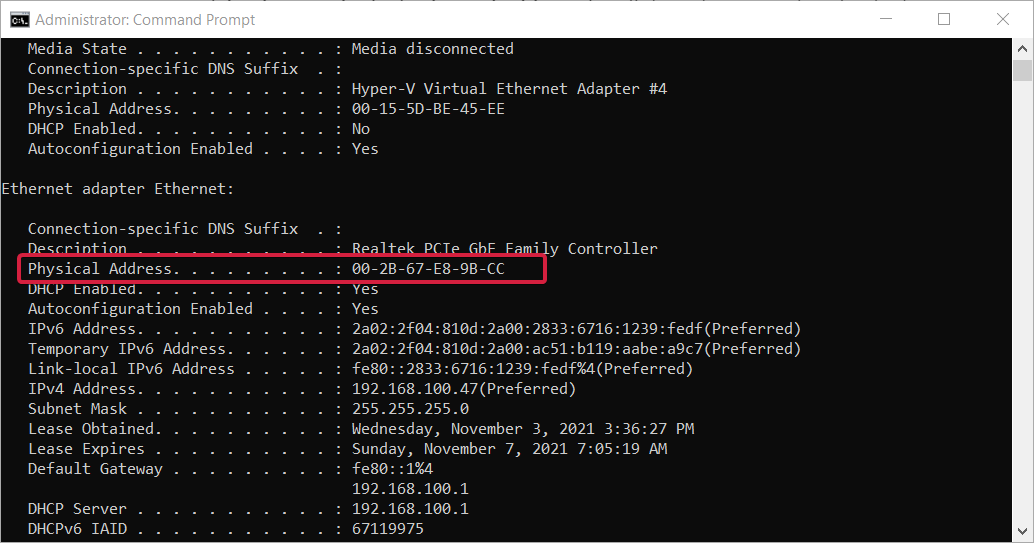
- Now type or paste the following command and press Enter to run it: ipconfig /all
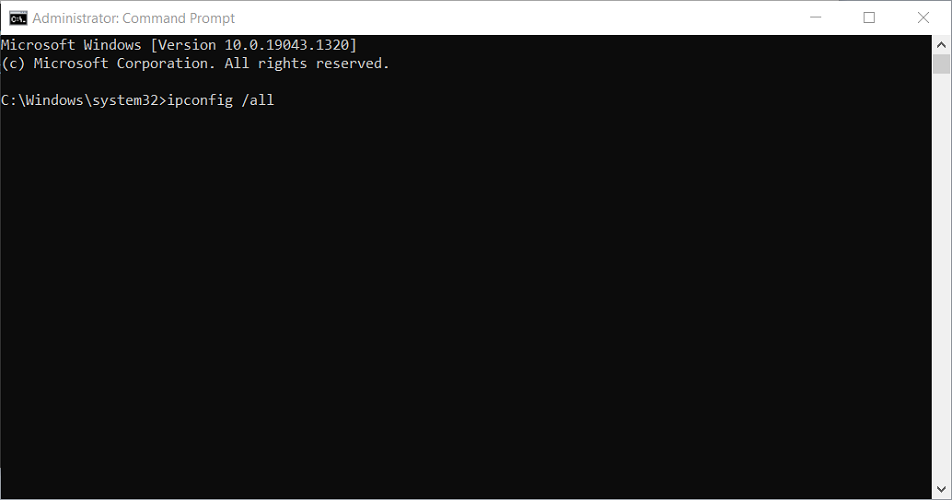
- The command will display a lot of network adapter settings. Look for the Ethernet adapter and you will find its physical address that you will have to use to wake this PC up using the LAN connection.
Now, the Wake-on-Lan feature should work just fine on your Windows device.
If these steps aren’t helpful for you, try to put your computer to hibernate instead of shutting it off – usually, this resolves all the problems.
And while we are on the subject, you might be interested in the best remote PC wake-up software to use right now.
We also have a list of the best VPN for LAN that you can use right now to ensure your privacy.
Be careful because the Wake-on-LAN is a two-way street feature. If someone has physical access to your PC, it can set it up to be awakened and control it afterward with remote software.
This can cause a major data breach, so if it’s not absolutely necessary to enable the Wake-on-LAN, don’t do it.
Also, use the comments field below if you have questions regarding the Wake On LAN not working issue or if you need our assistance, and we will get back to you as soon as possible.
Read our disclosure page to find out how can you help Windows Report sustain the editorial team. Read more


Improve this guide

User forum
5 messages