Solved: Windows Could Not Start the Service on Local Computer
Giving full permission to the service is one of the ways to fix the error

Sometimes, when trying to open a Windows service, it fails to start with the error, Windows could not start the service on a local computer. While this issue is common with the Windows Update service, it can also show up with other services, such as the audio service.
This usually happens if the service dependencies are not running, if the service is disabled or when the service does not have full permissions. However, it could also be due to overflowing temp files or system file corruption.
What to do if Windows could not start the Windows Update service on the local computer?
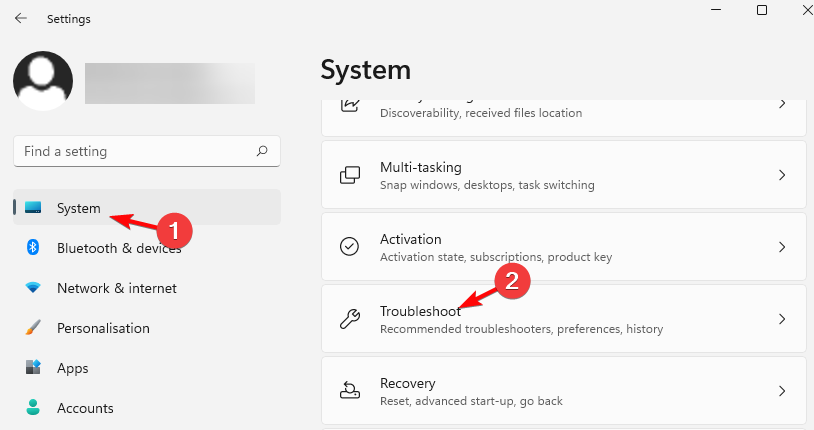
1. Run Windows Troubleshooter
- Press the Win + I keys together to launch the Windows Settings app. Click on System on the left side of the app and then click on Troubleshoot on the right.
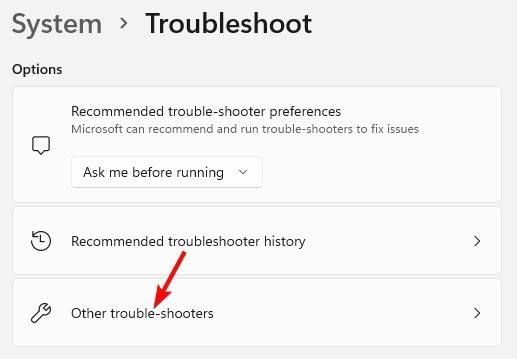
- Next, click on Other trouble-shooters on the right.
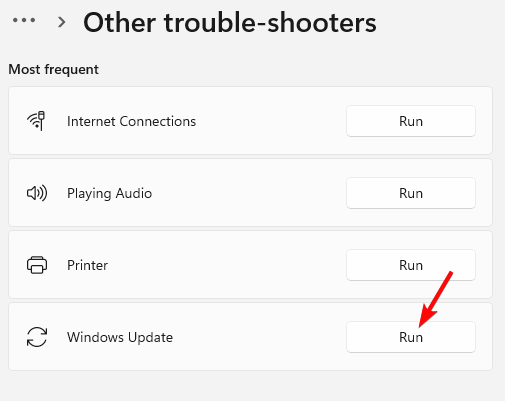
- On the next screen, go to the right, look for the troubleshooter related to the service, for example, Windows Update and click on Run.
- The troubleshooter will now start looking for any issues, and if any are found, it will apply the fix automatically.
Once done, restart your PC and check if the service is running or if you still encounter the Windows service error.
But if the Windows Troubleshooter is not working for some reason, here we have a detailed post on how to fix the issue.
2. Give full permission to the Windows service
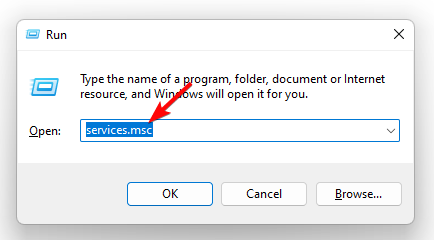
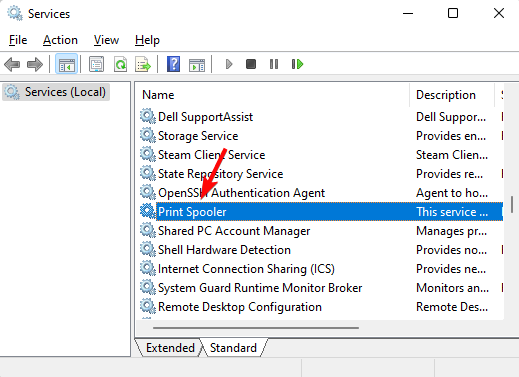
- Press the Win + R keys simultaneously to launch the Run console. Type services.msc in the search be and hit Enter to open the Service manager.
- In the Services window, go to the right and look for the service, for example, Print Spooler. Double-click on it.
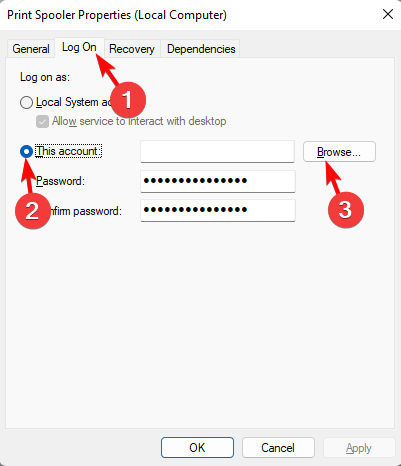
- As the Properties window opens, select the Log On tab, select This account and click on Browse.
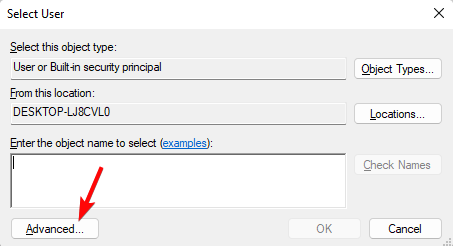
- Next, in the Select User dialog, click on Advanced.
- In the next window, click on Find Now. Now, from the Search results below, select Local Service and press OK.
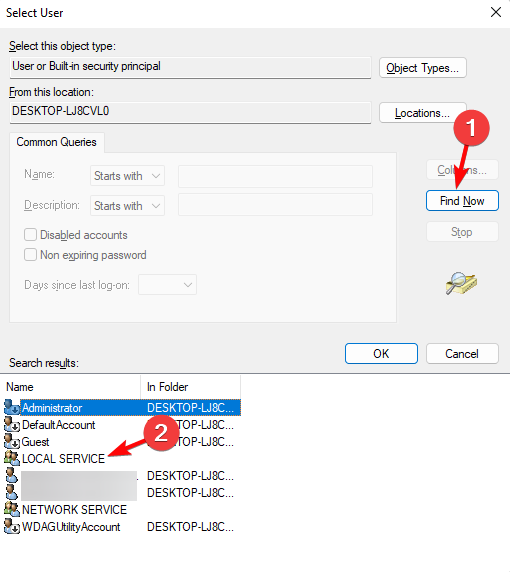
- Let the password field remain blank. Press Apply and then OK to save the changes and exit.
Now, reboot your PC and check if you still see the error, Windows could not start the service on a local computer. Changing the Log On settings also helps with Error 1067: The process terminated unexpectedly.
But if the local print spooler service is still not running, you may refer to the troubleshooting methods in our guide to fix the issue.
3. Re-configure the service
- To open the Run console, press the Win + R shortcut keys. Type cmd in the search bar and press the Ctrl + Shift + Enter keys to launch Command Prompt with admin rights.
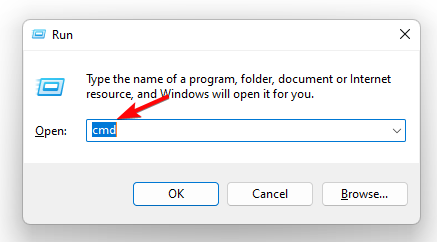
- Run the below commands in the Command prompt window one after another and hit Enter after each one (replace the highlighted part with the relevant service):
net stop w32timew32tm /unregisterw32tm /registernet start w32timew32tm /resync
- Once the commands have been executed successfully, close the Command prompt, restart your PC, and you should not see the error anymore.
4. Delete Temporary Files
- Open the Windows Settings app by pressing the Win + I keys together. Click on System on the left and then click on Storage on the right.
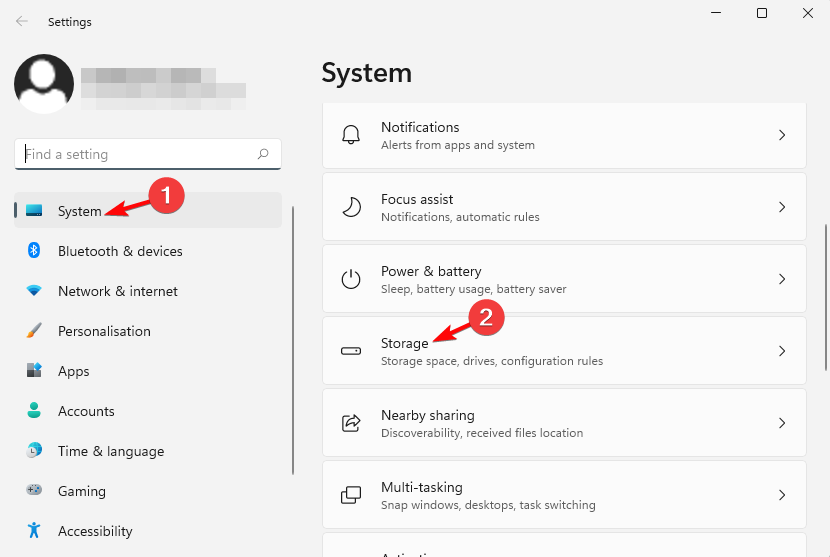
- Now, on the right, click on Temporary files.
- On the next screen, select the files you want to delete and press Remove files.
Once all the files are deleted, close the Windows Settings app and reboot your PC to see if you still encounter the Windows service error.
5. Run SFC Scan and DISM Tool
- Press the Win + R keys together to open the Run dialog, type cmd, and press Ctrl + Shift + Enter keys to open Command Prompt with admin rights.
- Execute the below command in the Command prompt (admin) window and hit Enter:
sfc /scannow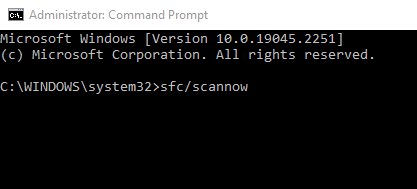
- Windows will now start looking for the corrupted files and repair them automatically. The process takes a while, so wait patiently till you see a success message.
- Next, run the below command and hit Enter:
DISM /Online /Cleanup-Image /CheckHealth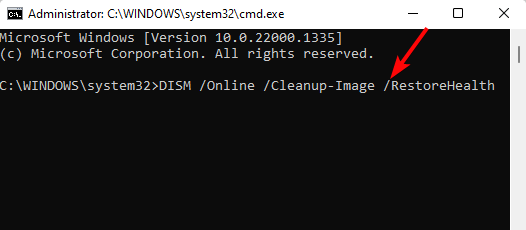
- This process also takes a while, so wait patiently till the utility repairs or replaces the faulty files.
- Once done, exit the Command Prompt and restart your PC.
At the same time, you must also run an antivirus scan or make sure that the Windows Defender Firewall is activated for added protection.
But, if you bump into a Windows service error like WLAN AutoConfig error 1068 instead, we have some effective workarounds for you to fix the issue.
You can let us know in the comments box below for any other queries related to any specific Windows service not running.
Read our disclosure page to find out how can you help Windows Report sustain the editorial team. Read more


Improve this guide


User forum
0 messages