Error 0x80200001 in Windows 10 Update Assistant [Fix]
Run the built-in troubleshooter to fix this error
4 min. read
Updated on
Read our disclosure page to find out how can you help Windows Report sustain the editorial team. Read more
Key notes
- This is a Windows Update error that can occur if your system files are damaged.
- Resettings Windows Update components usually fixes this and many other errors.

Updating your Windows 10 computer should be a smooth task. However, this is not always the case, and sometimes you might get a Windows Update error 0x80200001.
While sometimes you can fix issues with Windows Update Troubleshooter, sometimes you need to use other methods. Fixing these issues is crucial since your system will remain vulnerable and miss out on new features.
So, in today’s guide, let’s take a closer look and see how we can fix this error message.
What does error 0x80200001 mean?
- This Windows Update error occurs if your system files are damaged.
- Issues with Windows Update components can also cause this problem to appear.
- If necessary services aren’t running, you can encounter this and other errors.
How do I fix error 0x80200001?
1. Disable third-party antivirus software
Keep in mind that this should only be used as a temporary solution, so make sure to turn your antivirus back on as soon as you’re finished.
2. Run the Update Troubleshooter
- Go to Settings.
- Head over to Updates & Security and choose Troubleshoot.
- Select Windows Update, and go to Run the Troubleshooter.
- Follow further on-screen instructions and let the process finish.
- Restart your computer.
3. Run the SFC scan
- Right-click on the Start Menu button, and open Command Prompt (Admin).
- Enter the following line and press Enter:
sfc/scannow - Wait until the process is done (it may take a while).
- If the solution is found, it will automatically be applied.
- Now, close the Command Prompt and restart your computer.
Sometimes you might experience problems with this method, and if SFC scannow is not working, we have a special guide that can help you fix it.
4. Run DISM
- Open the Command Prompt as shown above.
- Enter the following command and press Enter:
DISM.exe /Online /Cleanup-image /Restorehealth - Wait for the process to finish.
- Restart your computer.
- In case the DISM can’t obtain files online, try using your installation USB or DVD. Insert media and type the following command:
DISM.exe /Online /Cleanup-Image /RestoreHealth /Source:C:\RepairSourceWindows /LimitAccess - Make sure to replace RepairSourceWindows path of your DVD or USB.
- Follow further on-screen instructions.
5. Reset Windows Update components
- Start Command Prompt as administrator.
- When Command Prompt starts, run the following commands:
net stop wuauservnet stop cryptSvc
net stop bits
net stop msiserver
ren C:\Windows\SoftwareDistribution SoftwareDistribution.old
ren C:\Windows\System32\catroot2 Catroot2.old
net start wuauserv
net start cryptSvc
net start bits
net start msiserver
If you don’t want to run all of these commands manually, you can always use a Windows Update reset script.
6. Make sure Windows Update service is running
- Go to Search, type services.msc, and open Services.
- Find the Windows Update service. Right-click and open Properties.
- On the General tab, find Startup type and choose Automatic.
- If the service is not running, right-click and choose Start.
- Confirm selection and close the window.
7. Change the DNS settings
- Go to Windows Search, type control panel, and open Control Panel.
- Go to Network and Sharing Center, and click on Change adapter settings from the left pane.
- Choose the network you’re currently using, right-click it, and choose Properties.
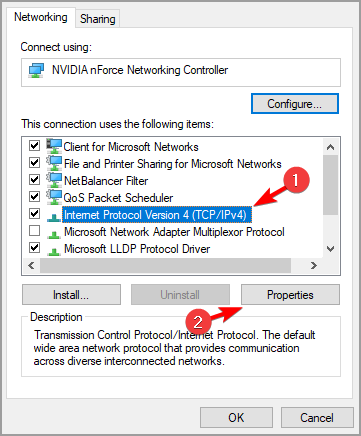
- Scroll down to Internet protocol version 4 (TCP/IPv4), and choose Properties.
- Now, choose Use the following DNS Server addresses
- Enter the following values: DNS Server – 8.8.8.8 and Alternate DNS Server – 8.8.4.4
- Save changes, and restart your computer
We hope the above solutions helped you fix the update error 80200001. This can be a serious error, and it can cause Windows Update to not work properly, but luckily, you managed to fix it.
If you’ve come across other solutions to fix this update problem, list the troubleshooting steps in the comment section below.


User forum
0 messages