Windows Settings Keeps Scrolling Down: 7 Ways to Fix it
Disconnect any controller or joystick from the PC
Key notes
- If Windows Settings is scrolling down, connect the mouse dongle to another port, remove the ghost devices, or perform an in-place upgrade.
- Keep reading to find out more fixes discovered by Windows Report experts!
For many, Windows Settings was scrolling down and even disconnecting the mouse didn’t help, which led them to believe that it was a Windows problem. But that’s not always the case!
Why is Windows Settings scrolling down?
The issue often arises when there’s a controller connected to the PC or a ghost device in the Device Manager is triggering conflicts. Also, a malfunctioning mouse or keyboard can cause the problem.
Besides, outdated mouse and keyboard drivers, corrupt system or user files, or misconfigured settings can just as well be the underlying cause.
What can I do if Windows Settings is scrolling down?
Before we start with the slightly complex solutions, try these quick ones:
- Make sure the Tab key is not stuck.
- Disconnect all external devices, including the mouse, keyboard, and gaming controller. In case the problem is fixed, it’s one of these devices to blame.
- If you have a wireless mouse, connect the dongle to another USB port, preferably directly into the PC, without a USB hub.
 Tip
Tip
1. Disable additional mice and keyboards in the Device Manager
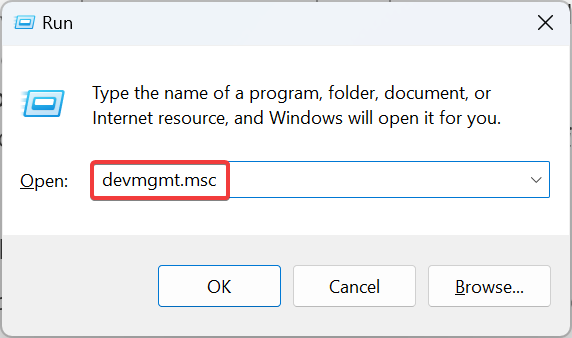
- Press Windows + R to open Run, type devmgmt.msc in the text field, and hit Enter.
- Double-click the Mice and other pointing devices entry, right-click on any ghost device that you can’t identify, and select Disable device.
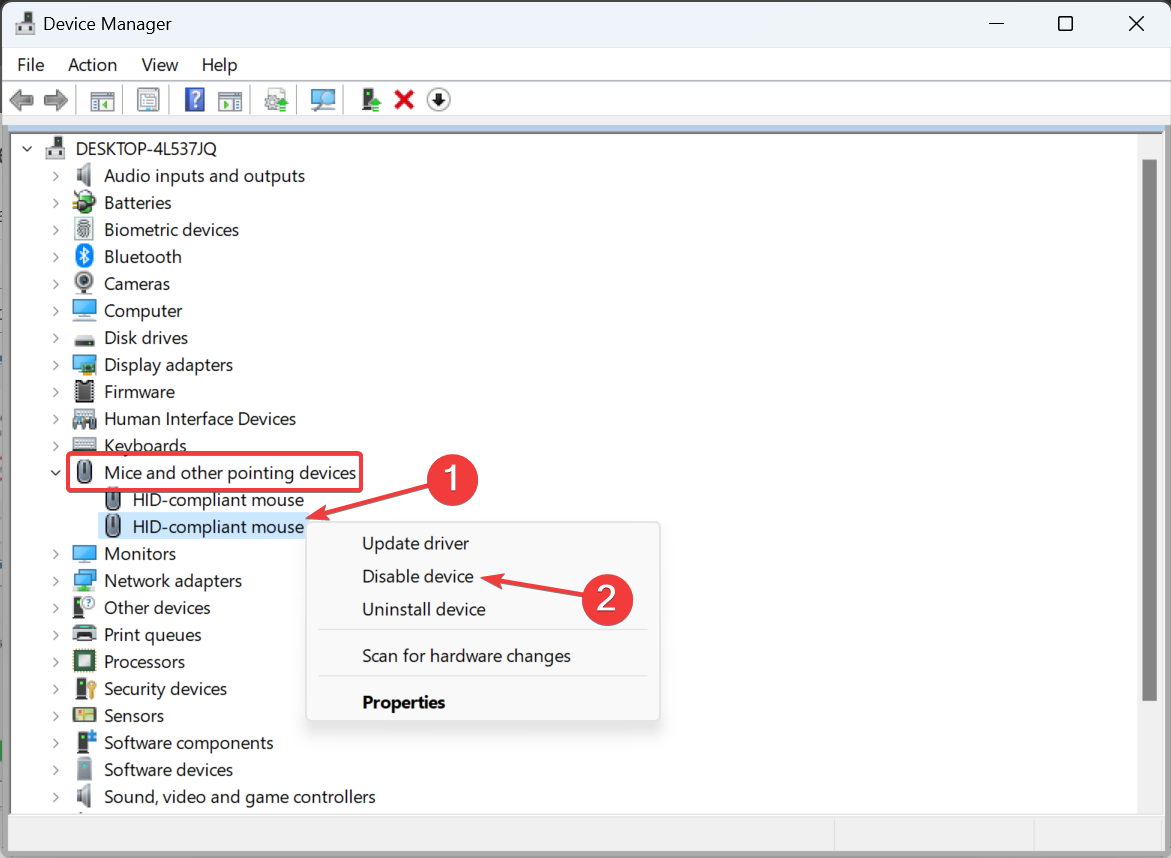
- Click Yes in the confirmation prompt.
- Similarly, disable other additional mice and keyboards. If the Disable device option is missing, choose Uninstall device.
In case you inadvertently disable the active mouse, highlight the device, press Enter to open its Properties, then use the Tab and Arrow keys to move to the Driver tab, select the Enable device option, and hit Enter.
2. Update the mouse and keyboard drivers
- Press Windows + X to open the Power User menu, and select Device Manager.
- Expand the Mice and other pointing devices entry, right-click on your mouse, and select Update driver.
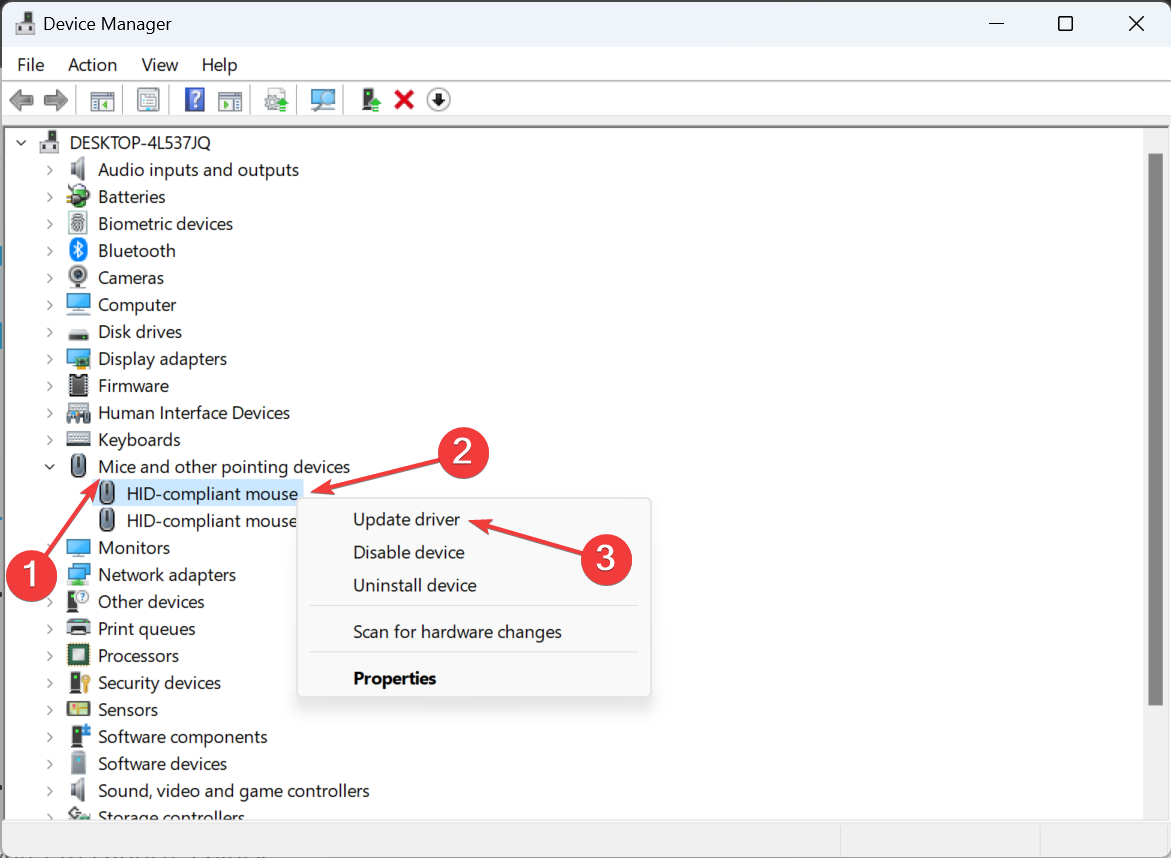
- Choose Search automatically for drivers and wait for Windows to install the best locally available driver.
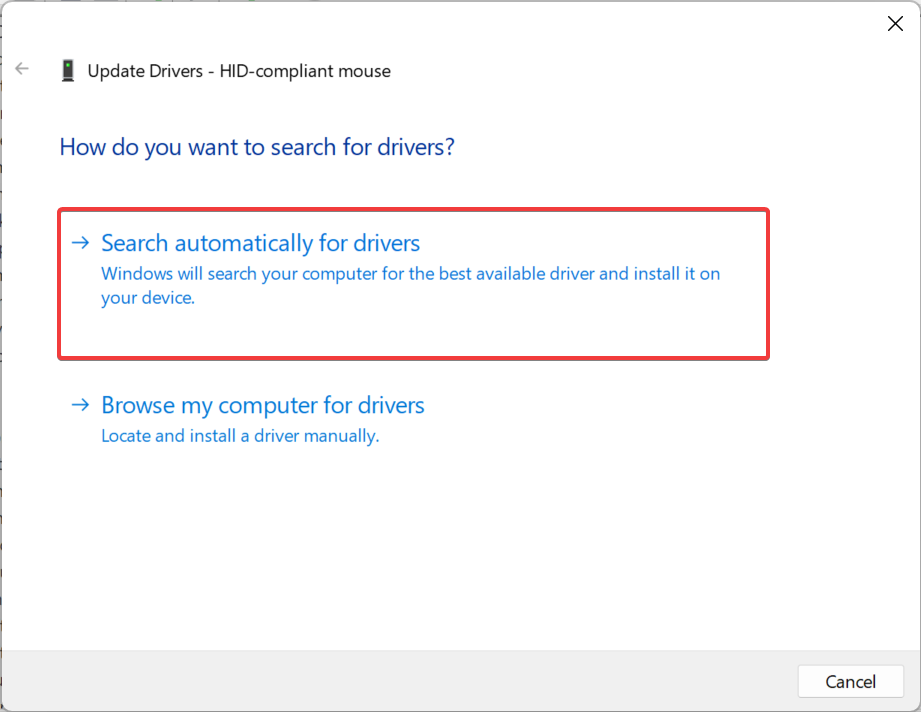
- Once done, restart the computer and check for improvements.
- Similarly, update the keyboard driver.
An outdated or corrupt driver may cause the Windows Settings to keep scrolling down. If Windows can’t find a newer one, head to the manufacturer’s official website, locate the latest version, and manually install the driver.
This also helps when Windows is scrolling by itself.
- Download and install the Outbyte Driver Updater app.
- Launch the software and wait for the app to detect all incompatible drivers.
- Now, it will show you a list of all outdated drivers to select the ones to Update or Ignore.

- Click on Update & Apply Selected to download and install the latest versions.
- Restart your PC to ensure the applied changes.

Outbyte Driver Updater
Maintain your device healthy by letting OutByte Driver Updater find the latest driver options.3. Change the mouse settings
- Press Windows + I to open Settings, go to Bluetooth & devices from the navigation pane, and then select Mouse.

- Scroll down and click on Additional mouse settings.
- Navigate to the Wheel tab, and keep the value under Vertical Scrolling to 3 or lower.
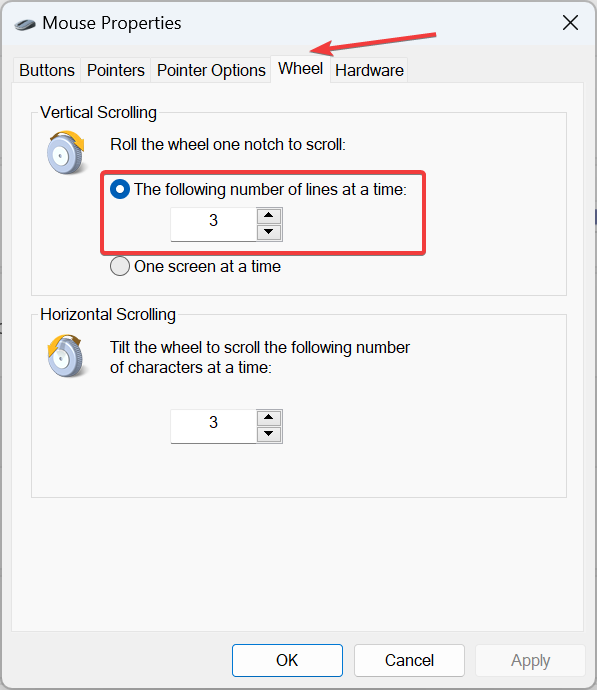
- Click on Apply and OK to save the changes.
4. Repair the corrupt system files
- Press Windows + R to open Run, type cmd, and hit Ctrl + Shift + Enter.
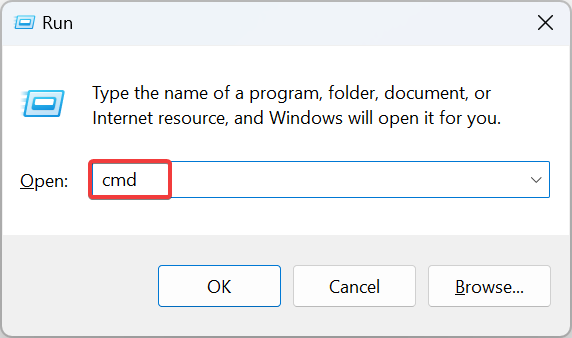
- Click Yes in the UAC prompt.
- Paste the following DISM commands individually and hit Enter after each:
DISM /Online /Cleanup-Image /CheckHealthDISM /Online /Cleanup-Image /ScanHealthDISM /Online /Cleanup-Image /RestoreHealth - Now, execute this command for the SFC scan:
sfc /scannow
- Finally, restart the computer and check whether Windows Settings keep scrolling down.
You are likely to face software-related issues on a PC with corrupt system files. In this case, running the DISM commands and SFC scans should replace all such files with their cached copy.
Doing this also helps when the Start Menu is scrolling up automatically.
5. Uninstall conflicting applications
- Press Windows + R to open Run, type appwiz.cpl in the text field, and click OK.
- Select any application(s) installed around the same time the error first appeared, primarily key mapping or mouse control programs, and click Uninstall.
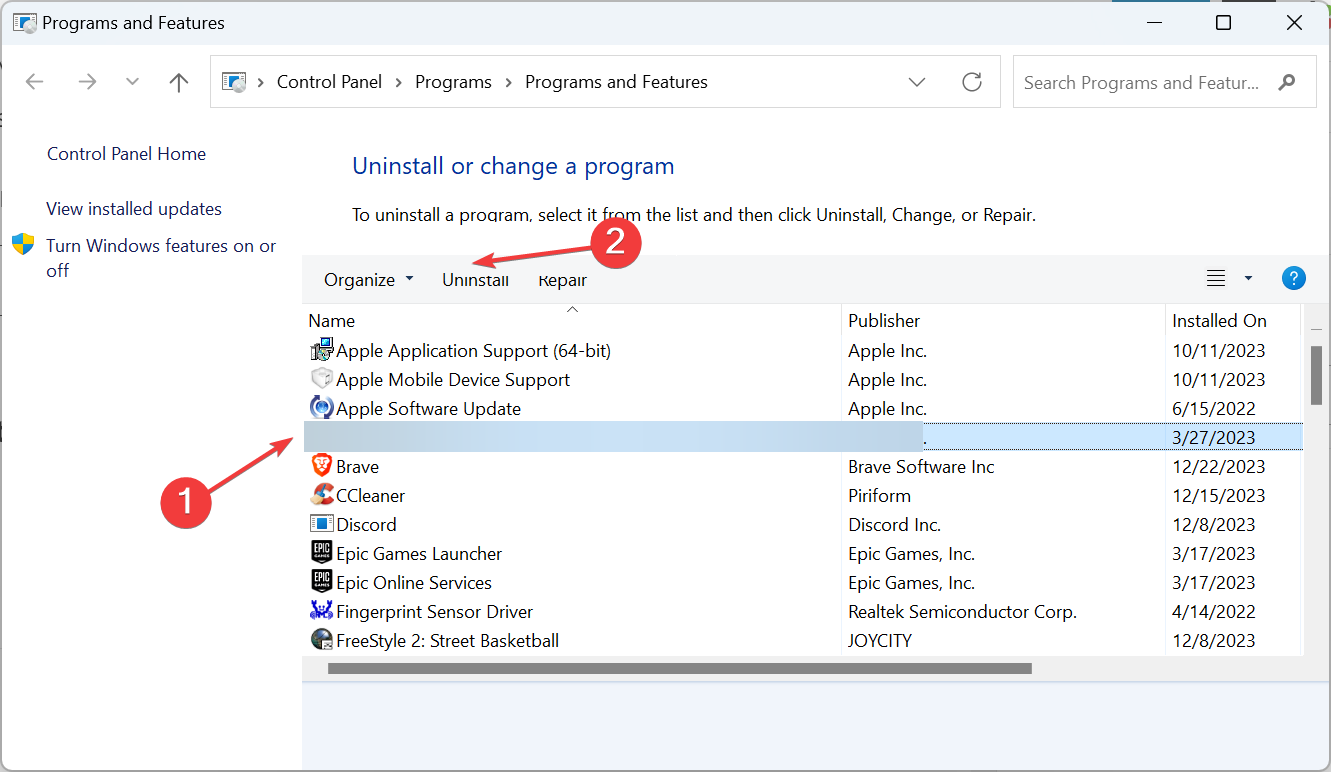
- Follow the on-screen instructions to complete the process.
If that doesn’t work, use an effective software uninstaller to clear all leftover files and Registry entries.
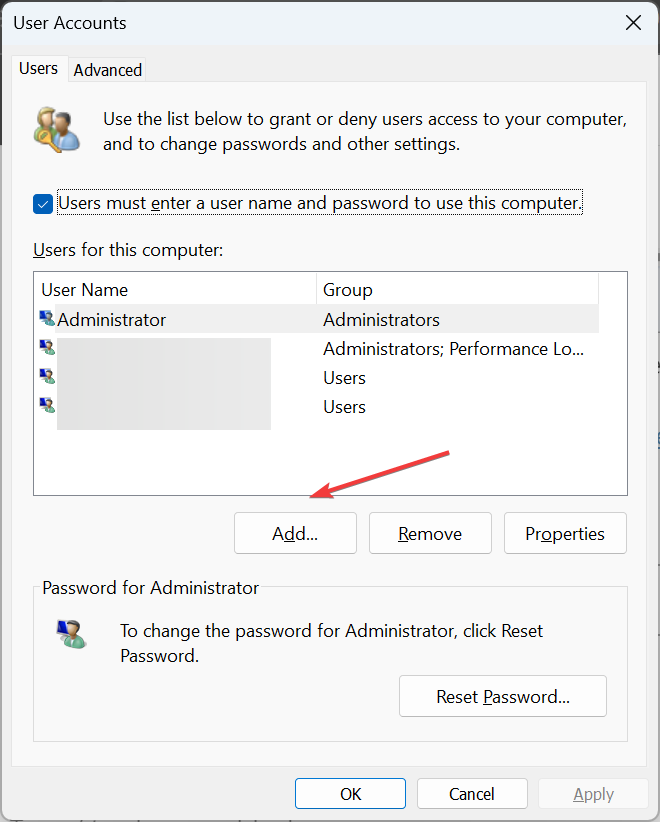
6. Create a local user account
- Press Windows + R to open Run, type netplwiz in the text field, and click OK.
- Click the Add button to create a new local user profile.
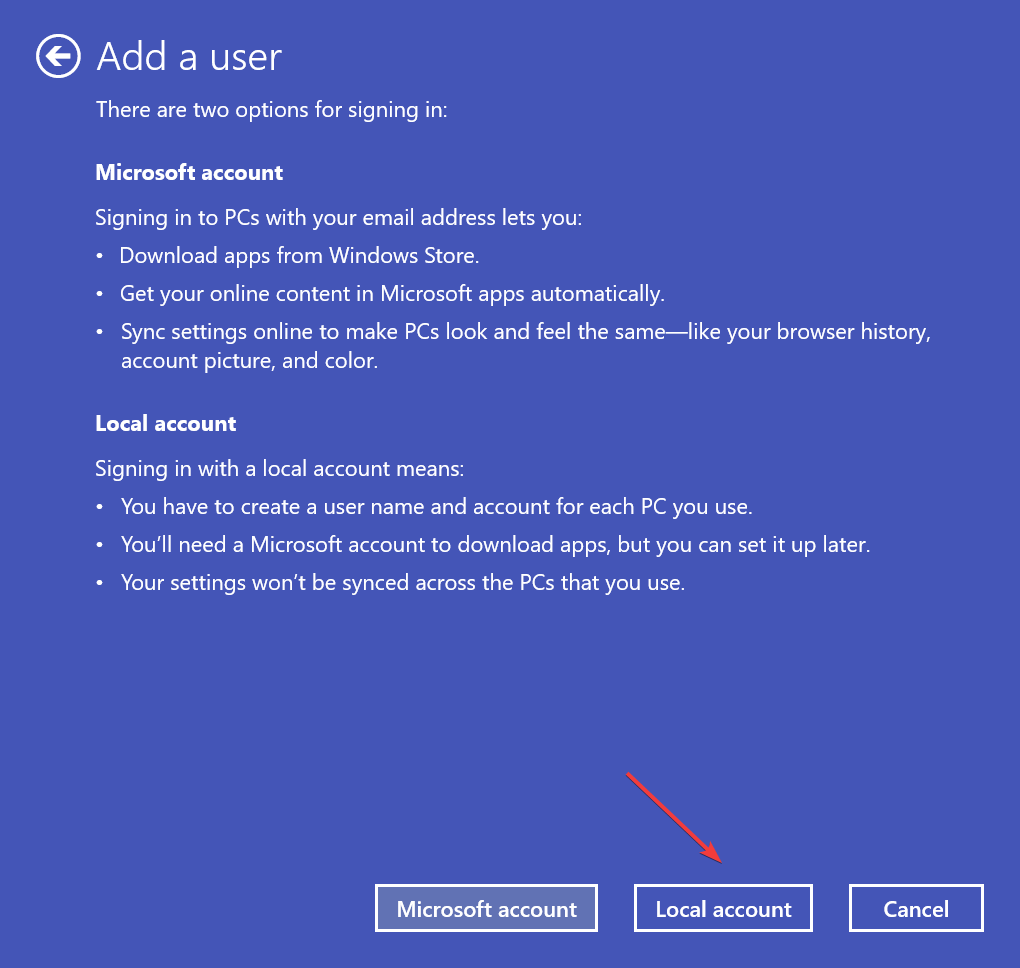
- Choose Sign in without a Microsoft account.
- Click on Local Account.
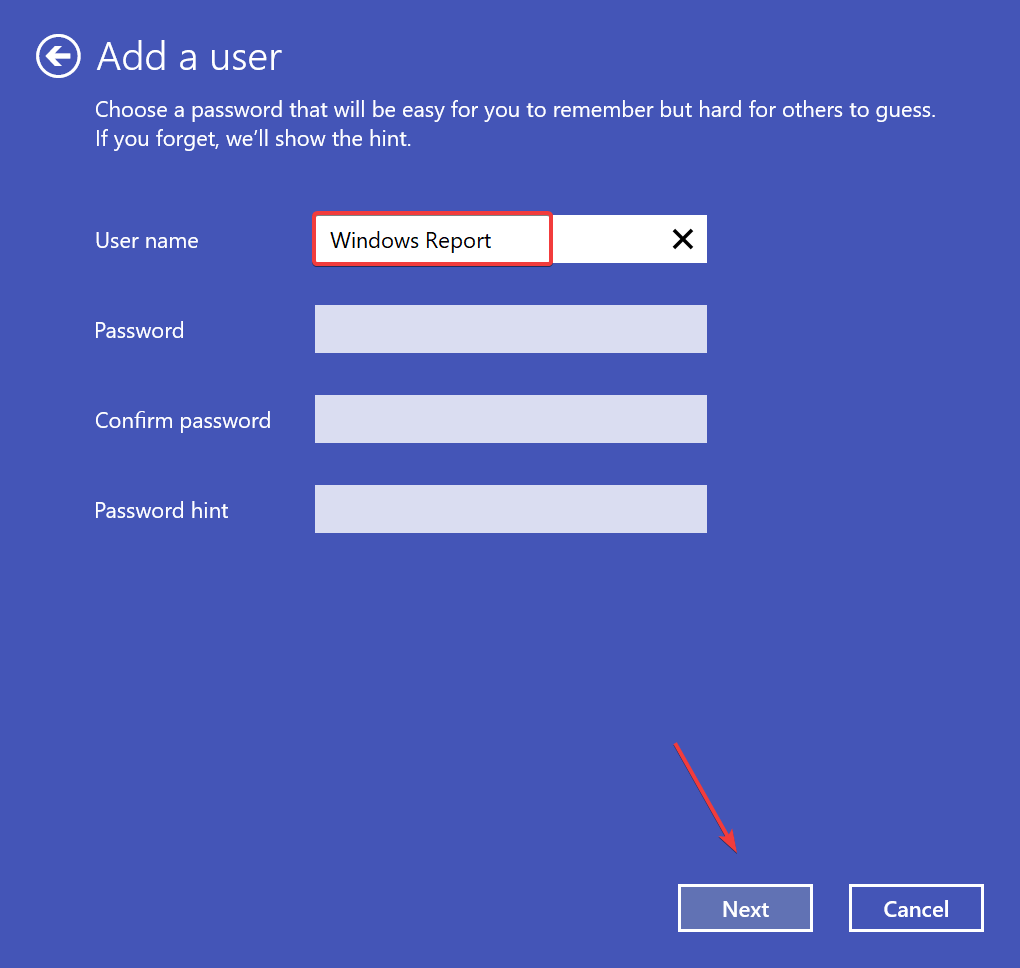
- Now, enter the username and password (optional), and click Next to complete the profile creation.
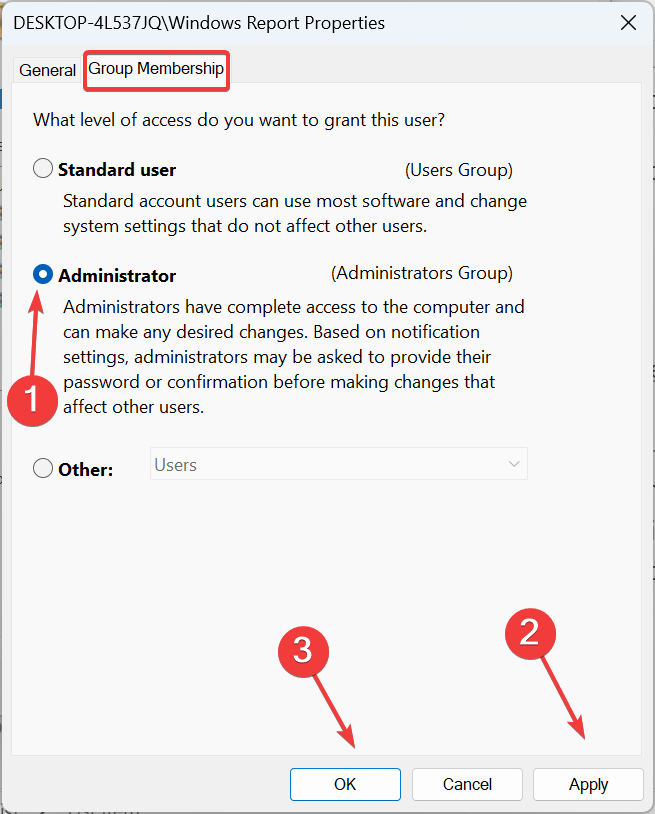
- Select the user profile from the list, and click Properties.
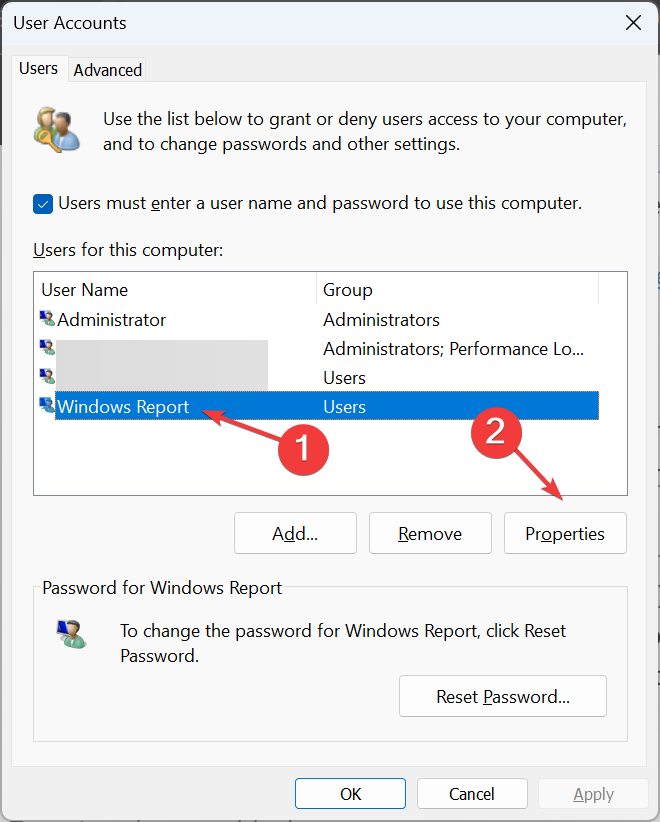
- Go to the Group Membership tab, select Administrator, and click Apply and OK to save the changes.
For many, the Windows Settings automatically scrolling down problem didn’t appear in a new local user account. So you can continue using it. As for the files, transfer them using a USB storage device, and you can always share apps between user accounts.
7. Perform a repair upgrade
 NOTE
NOTE
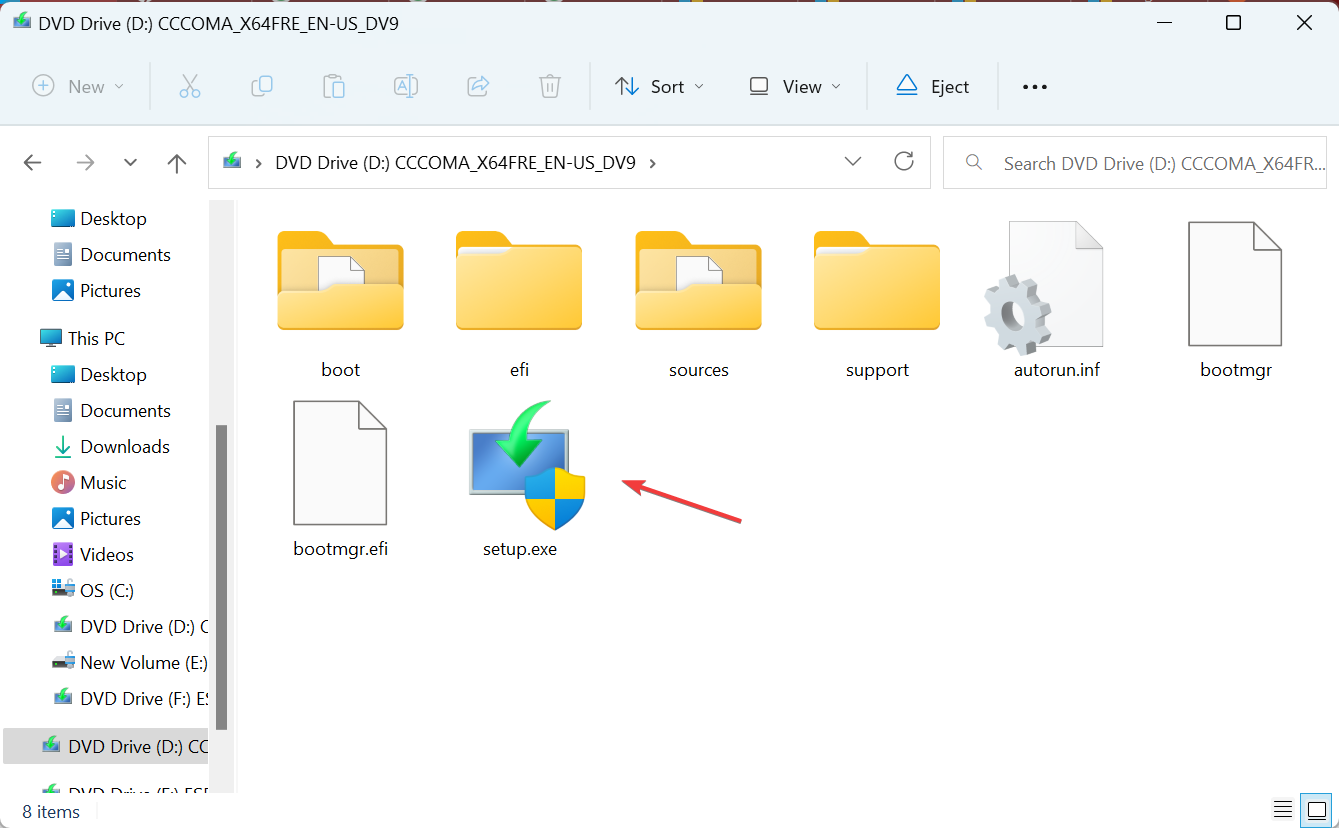
- Go to Microsoft’s official website, select the OS edition and product language, then download the Windows 11 ISO.

- Double-click the ISO file, and select Open in the prompt.
- Run the setup.exe file.
- Click Yes in the UAC prompt.
- Click Next to proceed.
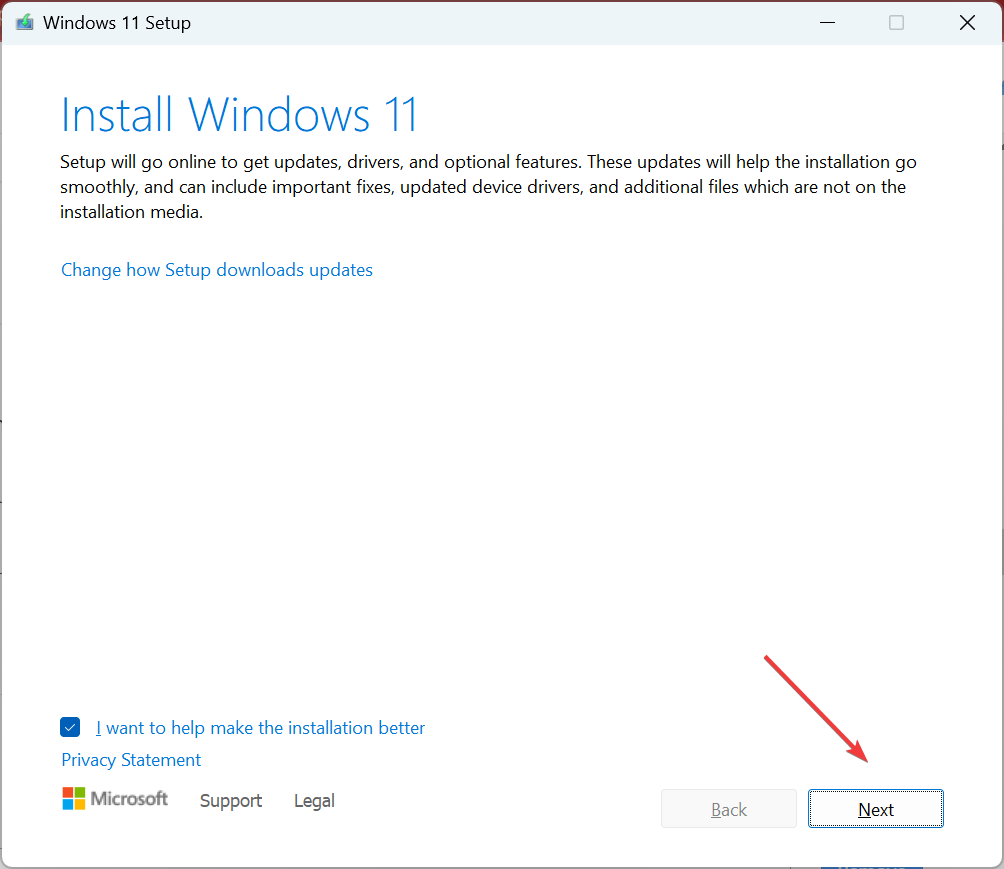
- Check Microsoft’s license terms and click the Accept button.
- Make sure the setup reads, Keep personal files and apps, and click on Install.
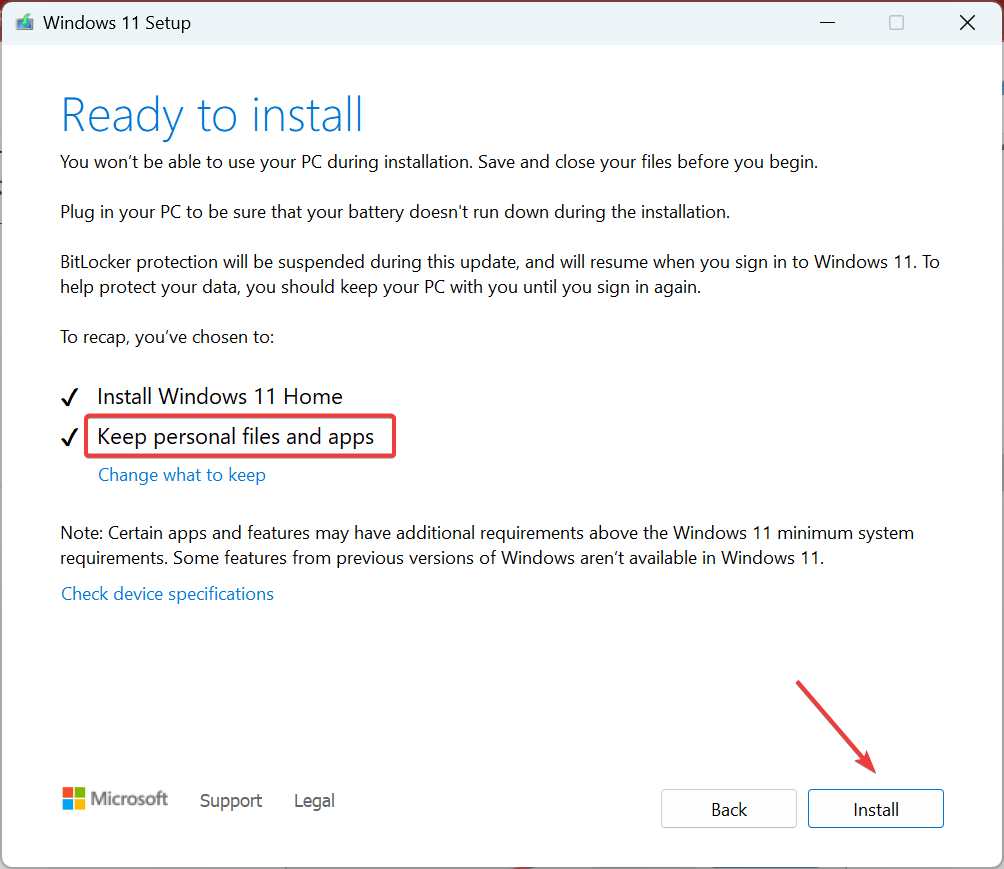
- Wait for the repair upgrade to complete. It may take 1-3 hours.
When nothing else works and Windows Settings keep scrolling down, you can always do an in-place upgrade. It’s the same as reinstalling Windows, except for the fact that you don’t lose any files or apps.
Remember, the problem can arise due to several reasons, but more often than not, it was either an Xbox controller or ghost devices to blame. Start with those, and then move your way down the list of fixes.
Before you leave, find out how to personalize the mouse cursor in Windows for a lively experience!
For any queries or to share which fix worked for you, drop a comment below.
Read our disclosure page to find out how can you help Windows Report sustain the editorial team. Read more


Improve this guide


User forum
0 messages