Windows Subsystem for Linux Optional Component Is Not Enabled
Easily enable the Windows Subsystem for Linux
Key notes
- When you try to launch something that requires Windows Subsystem for Linux, you may get an error indicating that this optional feature is not enabled.
- Enabling this feature can be necessary and will not slow down your PC's performance.
- To turn on this feature on Windows, you can use PowerShell and another method described in this article.

Usually, when you try to run any software, service, or app that requires the Linux environment, you may get an error.
In most cases, if you install the Ubuntu app from the Microsoft Store and open it, this problem will appear. When it occurs, you get the following message: The Windows Subsystem for Linux optional component is not enabled. Please enable it and try again.
It also may show an error code 0x8007019e. But don’t worry, you can easily fix this problem if you take the proper steps.
Does the Windows Subsystem for Linux slow down a PC?
To make your development work much more pleasant, you may enable WSL. It does not hurt Windows performance.
Any services in the background take a few computing resources. The WSL is not different. However, according to the users, it doesn’t slow down the PC.
We have tested it by ourselves. Our research also has found that modern computers can easily handle Windows Subsystem for Linux without negatively affecting performance.
Moreover, it can be an essential feature for some users. So, you may need to turn it on, particularly when you face the error mentioned in this article.
How do I enable Windows Subsystem for Linux on Windows?
If you want to enable WSL on your PC, you can easily do it. But, before that, we suggest you do the following things:
- Update Windows to the latest version.
- Ensure you are using Windows 11 or 10, as other versions don’t support this feature.
Now, you can follow the methods mentioned below to enable Windows Subsystem for Linux.
1. Install the optional feature
- Press Win + I on the keyboard to open Windows Settings.
- Go to Apps and click on Optional features.

- Click on More Windows features to open the Windows Features window.

- Tick Windows Subsystem for Linux and click on OK.
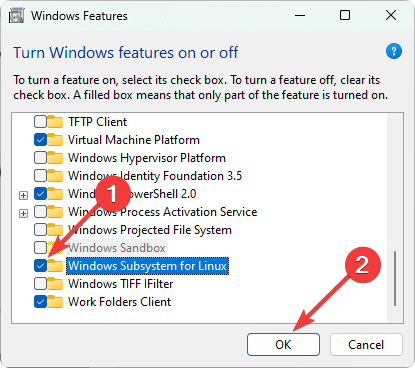
- It will install the required components.
- Restart your PC after completing the process.
Alternatively, you also can search for the optionalfeatures on the Start Menu to find and open the Windows Features window. It can be necessary if you don’t find the exact options shown in the above steps.
After enabling the WSL, you can try to open the Ubuntu terminal or any other app or service that was showing the error. Hopefully, you will not see the same again.
2. Use the PowerShell command
- Open the Start Menu, type PowerShell, and hit Enter.
- Now, type the following command and press Enter to execute it:
Enable-WindowsOptionalFeature -Online -FeatureName Microsoft-Windows-Subsystem-Linux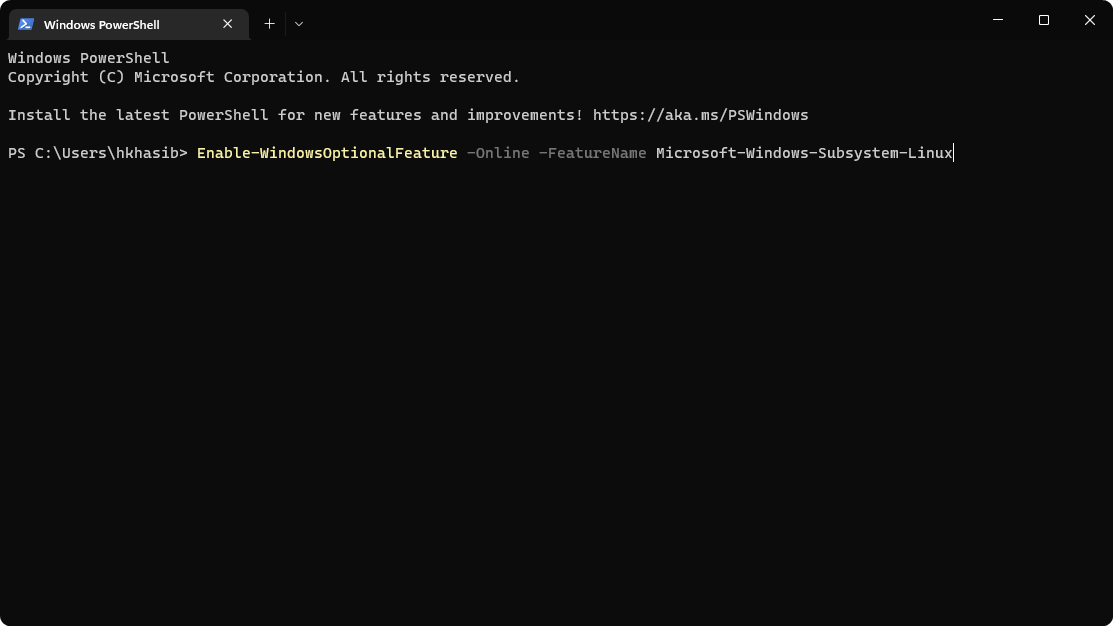
- Wait for a while.
- Restart your PC after PowerShell installs the required features.
Now, verify if it has solved the problem or not. If PowerShell can successfully enable this optional feature, you can use the Ubuntu terminal or any other app that requires WSL without any error.
3. Enable Developer Mode
 NOTE
NOTE
- Open Windows Settings.
- Go to Privacy & security and click on For developers.

- Turn the Developer Mode by tweaking the appropriate switch.

- Click on Yes on the popup window.
- Restart your PC.
For more detailed steps, learn how to enable Windows 11 Developer Mode. If the Developer Mode is a requirement, try to enable the latest WSL again and see if it works.
This article has explained how to fix Windows Subsystem for Linux is not enabled. If you have any opinions or suggestions, feel free to let us know in the comments box.
Read our disclosure page to find out how can you help Windows Report sustain the editorial team. Read more


Improve this guide


User forum
0 messages