0x80240438: What is It & How to Quickly Fix It
Run Windows Store apps troubleshooter first
4 min. read
Updated on
Read our disclosure page to find out how can you help Windows Report sustain the editorial team. Read more
Key notes
- The Windows Store update error could have occurred if the IPV6 is enabled but not supported by your ISP.
- This guide will cover all the potential fixes to resolve the issue.

Many users have reported that they faced this issue while updating Windows OS or apps on Microsoft Store.
In this guide, we will discuss some expert-recommended solutions to fix the issue right after talking about the causes.
What is 0x80240438?
0x80240438 is a Windows Update error code that typically indicates a problem with the Windows Update service or the associated software components.
What causes the Windows Store error 0x80240438?
There are various reasons why you see 0x80240438 while updating the computer; some of the common ones are mentioned here:
- Network connectivity issues – If your internet connection is slow or has a weak signal, it could prevent you from updating Windows apps, hence the error.
- Third-party security software interference – Third-party antivirus software can interfere with normal Windows functioning, including the update process. Therefore, you get this error.
- Damaged system files – If system files are corrupt or missing, it can prevent the Windows update service from running correctly. Hence you get this error.
- Old or incompatible drivers – If your device drivers are outdated or incompatible with your Windows version, it could cause all kinds of issues.
- Windows update service issue – If there are problems such as incorrect configuration, outdated components, or corrupted files, it can cause an error.
What can I do to fix the Windows Store error 0x80240438?
Before engaging in advanced troubleshooting steps, you should consider performing the following checks:
- Disable the firewall temporarily.
- Restart your computer.
1. Disable IPV6
- Press the Windows key, type Control Panel, and click Open.
- Select Category as View by and click Network & Internet.
- Double-click the network connection, and on the next page, select Properties.
- Remove the checkmark next to Internet Protocol Version 6 (TCP / IPv6).
- Click OK to confirm the changes.
2. Rename the Windows Store cache folder
- Press Windows + R to open the Run dialog box.
- Type the following command, replace the username with the user account name, and click OK:
C:\Users\username\AppData\Local\Packages\Microsoft.WindowsStore_8wekyb3d8bbwe\LocalState - Locate and select the Cache folder, and rename it to Cache.old.
- If you don’t find the folder, create a folder and name it Cache.
- Press Windows + I to open Settings.
- Go to System, and click Troubleshoot.
- Now select Other troubleshooters.
- Go to the Windows Store Apps and click Run.
- Follow the onscreen instructions to complete the process.
3. Run the Windows Store Apps troubleshooter
- Press Windows + I to open the Settings app.
- Go to System, and click Troubleshoot.
- Now select Other troubleshooters.
- Go to the Windows Store Apps and click Run.
- Follow the onscreen instructions to complete the process.
4. Disable BITS and delete the SoftwareDistribution folder
- Press Windows + R to open the Run console.
- Type services.msc and click OK to open the Services app.
- Locate and right-click Background Intelligent Transfer Service and select Stop.
- Press Windows + E to open Windows Explorer.
- Navigate to this path:
C:\Windows\SoftwareDistribution - Select all the content in the SoftwareDistribution folder and click the Delete icon.
- Now go to the Services app, right-click Background Intelligent Transfer Service, and select Start.
5. Clear Windows cache
- Press Windows + R to open the Run console.
- Type wsreset.exe and click OK to reset the Windows Store cache.
- Once the process is finished, your Microsoft Store app will restart.
6. Use the Registry Editor
- Press Windows + R to open the Run box.
- Type Regedit and click OK to open Registry Editor.
- Navigate to this path:
Computer\HKEY_CURRENT_USER \Software \Microsoft \Windows \CurrentVersion \Policies\WindowsUpdate - Locate DisableWindowsUpdateAccess, and double-click it.
- Change the Value data from 1 to 0.
- Restart your computer to let the changes take effect.
7. Use the Command Prompt
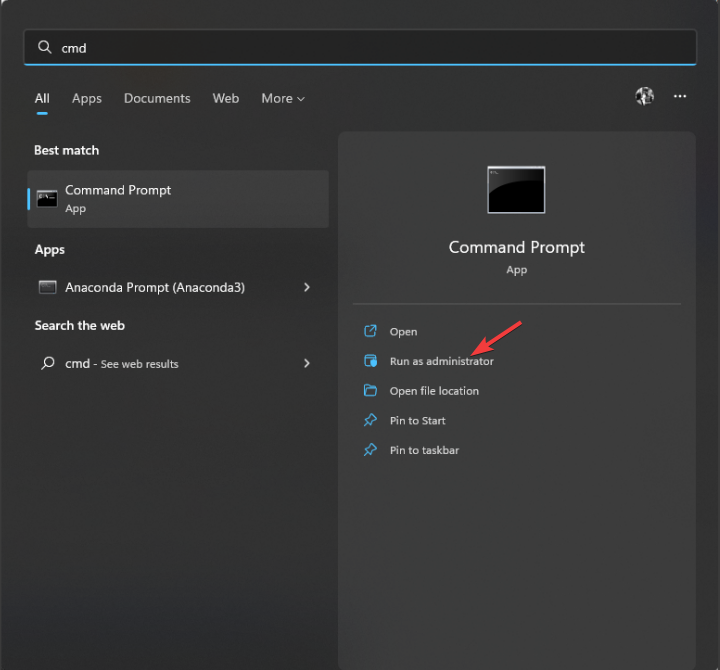
- Press the Windows key, type CMD, and click Run as administrator.
- Type the following commands one by one and press Enter after every command:
sfc\scannowDISM /online /cleanup-image /restorehealth - Copy and paste the following commands one by one and press Enter after every command:
netsh winhttp reset proxynet stop wuauservnet start wuauserv - Restart your computer and check if the issue persists.
So, these are methods you can follow to fix the 0x80240438 error on your Windows computer. Try them and let us know what worked in the comments section below.


User forum
0 messages