Fix: Can't Turn Off Real-Time Protection on Windows 11
Running an expired version of third-party antivirus could be the reason
5 min. read
Updated on
Read our disclosure page to find out how can you help Windows Report sustain the editorial team. Read more
Key notes
- If you can't turn off real-time protection on Windows 11, it could be due to the Tamper protection feature or an expired third-party application.
- Keep reading to learn the reasons and methods to fix it!

Many users have complained that they couldn’t keep the real-time protection turned off on Windows 11. It could be very frustrating as it can impact system performance, cause compatibility issues, and disrupt workflows.
This guide will explore possible reasons for the issue and discuss practical solutions to address it effectively.
Why you can’t turn off real-time protection on Windows 11?
- The Tamper Protection feature is enabled.
- Have an expired or outdated security software.
- If you have recently installed a security update for Windows.
- Don’t have any other antivirus software in place.
How do I fix real-time protection not turning off in Windows 11?
Before moving to the detailed troubleshooting steps, make sure you follow these preliminary checks:
- Try restarting your computer.
- Ensure your third-party antivirus software subscription is active and the app is updated.
- Create a restore point and backup your important data.
- Disable the Antimalware Service executable.
1. Disable the Tamper protection feature
- Press the Windows key, type windows security, and click Open.
- On the Windows Security app, click the Virus & threat protection option from the left pane.
- Select Manage settings under Virus & threat protection settings.
- Ensure Real-time protection is turned off.
- Scroll down and toggle off the switch next to Tamper Protection.
- Click Yes on the UAC prompt.
- Restart your PC to save the changes and check if the real-time protection is disabled.
2. Using the Registry Editor
First, ensure you disable Tamper Protection from Windows Security, then boot your computer into safe mode; to do that, follow these steps:
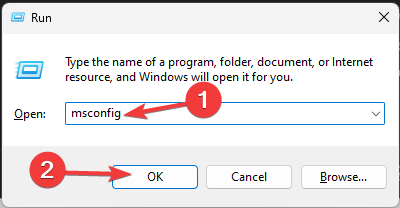
- Press Windows+ R to open the Run window.
- Type msconfig to open System Configuration.
- Switch to the Boot tab, locate the Boot options, and place a checkmark next to Safe boot and Minimal.
- Click Apply and OK.
- Now select Restart to reboot your PC in safe mode.
Once your system starts in Safe mode, you need to edit a few registry entries; for that, follow these steps:
- Press Windows + R to open the Run dialog box.
- Type regedit and click OK to open the Registry Editor.
- First, create a backup of registries; for that, go to File, then select Export. Save the .reg file at an accessible location.
- Go to the address bar and copy & paste these paths one by one, and for the DWORD Start, change the Value data to 4 and click OK to disable Windows Defender permanently.
Computer\HKEY_LOCAL_MACHINE\SYSTEM\CurrentControlSet\Services\Sense
Computer\HKEY_LOCAL_MACHINE\SYSTEM\CurrentControlSet\Services\WdNisDrv
Computer\HKEY_LOCAL_MACHINE\SYSTEM\CurrentControlSet\Services\WdNisSvc
Computer\HKEY_LOCAL_MACHINE\SYSTEM\CurrentControlSet\Services\WdBoot
Computer\HKEY_LOCAL_MACHINE\SYSTEM\CurrentControlSet\Services\WinDefend
Computer\HKEY_LOCAL_MACHINE\SYSTEM\CurrentControlSet\Services\WdFilter
- Close Registry Editor.
Next, reverse engineer the steps above for a safe boot to restart your computer in normal mode.
3. Using the Group Policy Editor
 NOTE
NOTE
- First, ensure Tamper Protection is off, then press Windows + R to open the Run dialog box.
- Type gpedit.msc and click OK to open the Group Policy Editor.
- Navigate to this path:
Computer Configuration\Administrative Templates\Windows Components\ Microsoft Defender Antivirus - Locate the Turn off Microsoft Defender Antivirus option and double-click it.
- Select the radio button next to Enabled, click Apply, then OK.
- Close Group Policy Editor.
4. Disable the Windows Updates
- Press Windows + R to open the Run window.
- Type services.msc and click OK to open the Services app.
- Locate the Windows Update option and double-click to open the properties window.
- Navigate to Startup type and select Disabled from the drop-down menu.
- Click Apply and OK to save changes.
- Restart your computer.
This will disable Windows Update, and it won’t run and install updates until you enable the service again. However, disabling this service might make your system vulnerable, so proceed with this method after calculating the risks.
Additional tips to keep your system secure while turning off real-time protection
- Make sure you are using a premium version of the VPN.
- Enable BitLocker to encrypt your hard drive if available.
- Use strong passwords, avoid visiting suspicious websites, clicking unknown links, or downloading files from unreliable sources.
- Regularly backup your important data to a cloud or an external drive.
- Keep your third-party antivirus program current and enable all its security features.
- Use Safe Boot while applying major changes to your Windows.
That being said, disabling real-time protection should always be exercised with caution and done when necessary.
Finding a balance between addressing specific needs and maintaining security standards is key for a safe and customizable computing experience.
On the contrary, if you want to turn on Windows Defender real-time protection but it keeps turning off, it could be due to corrupted system files; read this guide to know more.
Besides, if you can’t turn on Tamper Protection, it’s just as easy to fix!
If you have any questions or suggestions, don’t hesitate to mention your thoughts in the comments section below.


User forum
0 messages