Shenzhen Device Connected to My WiFi - What Does It Mean?
Why is a Shenzhen device connected to your WiFi? If you discover a new addition to your network, don’t panic – it could be one of your smart devices.
Still, unrecognized WiFi devices are the most common source of privacy intrusion that may trigger a ransomware attack or personal information breach. Not to mention, they can siphon off your WiFi bandwidth for unauthorized cryptocurrency mining, pirated content downloading, and other activities.
I’ve explained below what to do if you detect an unknown WiFi device in your router, so let’s jump right in!
Why Is a Shenzhen Device Connected to My WiFi?
Many tech devices, like smartphones, routers, optical network terminals (ONTs), IoT devices, home appliances, and more, are made in the Shenzhen city of the Guangdong province of China.
Additionally, most manufacturers in Shenzhen use their own business names to identify them.
So, when you connect one such smart device to your WiFi network, you may see any of the following notifications in the router app:

- Shenzhen Hualistone Technology.
- Shenzhen RF-Link Technology Co., Ltd.
- Shenzhen ViewAt.
- Shenzhen Bilian Electronic Limited.
- Shenzhen Sed Industry Co., Ltd.
- Shenzhen SOF Lighting Technology Co., Ltd.
- Shenzhen Inovance Technology Co., Ltd.
- Shenzhen Skyworth-RGB Electronics Co., Ltd.
This is highly common with IoT devices, like smart lights, air purifiers, humidifiers, kitchen appliances, electric sockets, ceiling fans, etc.
So, let’s say you’ve plugged in a new smart light in your living room. You’ve installed the required mobile app, which automatically connects it with the home WiFi.
Later, when you log into the router app, you’ll see an “unknown” WiFi device with a generic name beginning or ending in the word Shenzhen.
What To Do When a Shenzhen Device Is Connected to Your WiFi
Find below various proven ways to verify if a Shenzhen-branded smart device is yours:
Perform These Basic Checks
Before trying anything advanced, do these quick checks first:
- Reboot the WiFi router: Restart the router and check if the device is still there.
- Change the WiFi router’s SSID: You can change it using the router app. After logging in, go to Basic > Wireless and you’ll see the field for Network Name (SSID). Delete the existing name and enter a new one. Now, connect to this new network from all of the known WiFi devices. If you find a home appliance or IoT device not working, that’s the one with the generic name Shenzhen.

- Reset the WiFi network password: You’ll also see the WiFi network password field just below the SSID box. Enter the new password on all devices except your smartphone. Now, if you see a smart light isn’t working or the thermostat isn’t connecting, those are the devices with Shenzhen in their name.
- Reset the WiFi router log-in password: Go to the System Tools, Settings, or a relevant menu in the left-side navigation panel. Now, navigate to the Advanced tab to find the Account Management menu. Here, you can enter the old router console password to change it. Click Save to implement this modification.

- Check the WPA2 encryption status: Go to Wireless > Advanced > Wireless Settings section. Click on the Security drop-down menu and choose WPA/WPA2-Personal, WPA2/WPA3-Personal, or a better encryption system. Now, restart the router. All connected devices will ask for the WPA/WPA2 encryption pass key (WiFi password) for reconnecting.

- Deactivate UPnP: Go to Advanced > NAT Forwarding > UPnP > toggle off the UPnP button.

- Deactivate WPS: Visit the Advanced tab and select System Tools or Settings from the left-side navigation panel. Select the System Parameters option to see more items on the right side menu. Scroll down until you find the WPS section. Uncheck the WPS checkbox and click Save.

- Disable guest access to WiFi: Go to the Advanced tab and click on the Guest Network tab in the left-side navigation panel. Now, uncheck the boxes for the Enable Guest Network for both the 2.4 GHz and 5.0 GHz WiFi radio transmitters. Click the Save button.

Seeing a smart bulb show up as a Shenzhen device and it will not respond? Follow this guide on Sengled not working to fix pairing and Wi-Fi issues quickly.
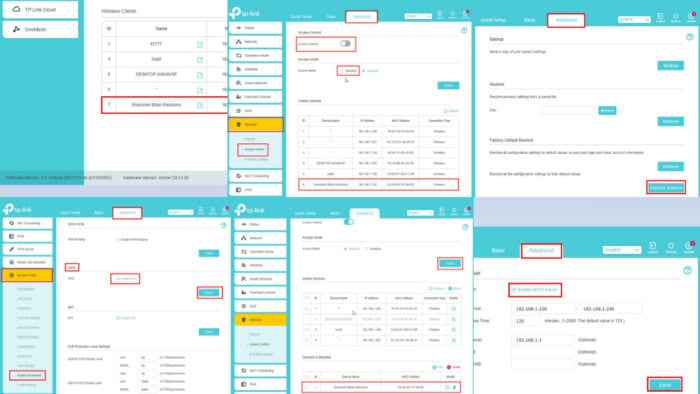
Block the Rogue Device’s MAC Address
- Open the router configuration console on your PC or smartphone.
- Navigate to the Advanced tab and select Security from the left-side navigation panel.
- Now, go to the Access Control menu.
- Enable the Access Control toggle button.
- Set Access Mode to Blacklist.

- Block the target device from the table of Online Devices.
- You should now see the its Mac Address in the Devices in Blacklist table.
- Click the Save button to apply the changes.

Now, even if the device still stays in the network, it won’t be able to access any bandwidth as you’ve blocked its MAC address.
Disable DHCP on the Router
By default, a WiFi router will assign an IP address to a new device due to the DHCP server configuration. So, you can disable this to ensure no new rogue WiFi devices can connect.
- Click on the Advanced tab and choose Network from the left-side panel.
- Now, click on the DHCP Server option.
- Uncheck the Enable DHCP Server box on the right.
- Hit the Save button.

Factory Reset the WiFi Router
Ensure you know the appropriate ISP-side configurations before trying the following steps. If you don’t talk to the ISP’s support team first, collect configuration data, and then proceed with resetting the router.
- Select the Advanced tab in the router configuration console.
- Find and access the Settings or System Tools menu on the left side navigation panel.
- In System Settings, select the Backup & Restore option.
- You’ll see the Restore section and its options on the right.
- Click the Factory Restore button and follow the onscreen instructions to complete the reset process.

Update the Router Firmware
Sometimes, a router might show phantom devices due to corrupted or outdated firmware versions.
Before performing any firmware upgrade, connect the PC and WiFi router to an uninterrupted power supply. If there are any interruptions between firmware flashing, the router might get bricked and function no more. Here’s how you can do that:
- Go to the Firmware Update menu from Advanced > System Tools.
- Most modern routers come with an automatic firmware update option.
- You should see the latest version below the Online Upgrade section.
- This is an over-the-air (OTA) firmware updating system managed and provided by the router manufacturer.
- Click the Upgrade button.

If you don’t see the Online Upgrade option, you can perform a Local Upgrade. Download the latest firmware file from the manufacturer’s website. Now, use the Browse button to select the firmware and click Upgrade to start the process.
Use a WiFi Security Tool to Prevent Reaver Attacks
Hackers and bots might use the Reaver attack to exploit weaknesses in the WPA/WPA2 encryption system. By an extremely fast trial and error method, attackers discover the WiFi encryption key or password to gain access to your network.
To defeat such hacking attempts, you can use antiviruses with WiFi protection features like Panda Antivirus.
Disable Private WiFi Addresses of Apple Devices
If you use the Private Wi-Fi Address feature on your Apple devices, you’ll see many unknown MAC addresses on the router console.
Here’s how you can disable this feature on an iPhone. Please note that an active Private Wi-Fi Address functionality is the default setting for all Apple-shipped iOS devices.
- Open the iOS Settings app.
- Tap on the Wi-Fi setting menu.

- Inside Wi-Fi settings, you’ll see the active network name or SSID.
- Tap on the (i) icon on the right edge of the SSID.

- Toggle off the Private Wi-Fi Address button.

- Tap Continue on the confirmation pop-up.

Contact the Technical Support Team
If none of the above helps, it’s time to contact the technical support team of the router or ISP. Since most ISPs ship a router with the internet subscription plan, sometimes you only need to contact them. Here are the customer support resources for popular ISPs in the US:
Summary
So far, you’ve learned what to do if you see a Shenzhen device connected to your WiFi.
For more security measures, you can also read about protecting your Windows 10 device on public WiFi, fixing WiFi not asking for passwords, and fixing Network security key mismatch issues.
Moreover, here’s how to deal with unknown Espressif devices.
Read our disclosure page to find out how can you help Windows Report sustain the editorial team. Read more


Improve this guide


User forum
0 messages