Wi-Fi not Asking for Password: 6 Quick Solutions to Fix This
Turning off the antivirus and firewall temporarily will solve this issue
Key notes
- Your Wi-Fi is something that you need to secure unless you want to risk privacy issues.
- The guide below will help you fix a Wi-Fi that doesn't ask for a password to connect.

If your Wi-Fi is not asking for password on Windows 10, you’re in the right place. This is quite a common problem among users, so we decided to help you out and look for some solutions.
Setting a Wi-Fi password is crucial if you want to block strangers from accessing your Internet connection whenever they want. In this manner, you can control who and when uses your bandwidth.
However, from time to time your modem/router may behave erratically and fail to ask users for a password as they try to access your Wi-Fi connection. Sometimes, your computer may be the culprit.
What to do if Wi-Fi is not asking for password
- Temporarily turn off antivirus and firewall
- Update your computer
- Restart your modem/ router
- Change your Wi-Fi password
- Delete your WLAN profile
- Ask your computer to forget the network
1. Temporarily turn off antivirus and firewall
Some users reported that disabling antivirus and firewall software fixed the problem.
In other words, temporarily disable your antivirus protection, wait for a couple of minutes and then try to connect to your Wi-Fi network and see if your computer prompts you to enter any password.
Don’t forget to enable antivirus protection as soon as the test is over.
Additionally, you could also try an antivirus tool that offers maximum protection with minimum system interference.
Viruses and cyber crooks are continually emerging as online dangers. Many well-known organizations and home users have been the victims of internet assaults in recent years.
It is true that leaving your Wi-Fi connections unencrypted is not a wise decision so we strongly recommend switching to a different antivirus solution. Thus, is critical to have antivirus software that protects against assaults via Wi-Fi networks.
2. Update your computer
Make sure that your machine is running the latest Windows 10 OS version and driver updates.
Wi-Fi issues are very common when running outdated software versions. Checking for updates and installing the latest patches may fix this issue, so give it a try.

Go to Settings > Update & Security > click on the Check for updates button.
Additionally, you can do this much faster if you use Outbyte Driver Updater. All you need to do is download it, run it, and it will search for missing, broken, or outdated drivers all by itself.
The program is portable, lightweight, works fast, and has a library of pretty much all drivers that are in use today. Thus, if you have drivers that need fixing fast, this is the way to go.
3. Restart your modem/ router
Obviously, restarting your modem is the first workaround on the list. This simple action often works wonders and could quickly solve your Wi-Fi problem in less than five minutes.
Simply unplug the power cable from the electrical outlet and wait a couple of minutes. Then plug your modem back into the electrical outlet, press the power button to turn on the device, and check if the problem persists.
4. Change your Wi-Fi password
- Go to Start > type ‘control panel’ > double click the first result
- Go to Network and Sharing Center > Change adapter settings

- Right-click on your wireless network > select Status

- Go to Wireless Properties

- Click on the Security tab and change the password

If you can’t change your password, go to your modem’s user interface and set the new password from there.
5. Delete your WLAN profile
- Launch Command Prompt as an administrator and run the following commands:
- netsh wlan show profile
- netsh wlan profile
- Add the profile name of the network you wish to delete.
- If you want to delete all profiles, then run this command: netsh wlan delete profile *
- Restart your computer and check if Windows 10 asks you to enter your Wi-Fi password.
Also, keep in mind that if you want Windows 10 to prompt you for the password every time, you need to uncheck the “Connect Automatically” option when connecting through the network.
- Click on the Wi-Fi icon on the taskbar > click on Properties

- Toggle off the option to connect automatically.

Now, if Windows 10 won’t prompt you for credentials for your Wi-Fi connection, it’s possible that the network profile is stored by the WLAN auto-configuration service.
To fix this issue, you need to delete the stored profile.
6. Ask your computer to forget the network
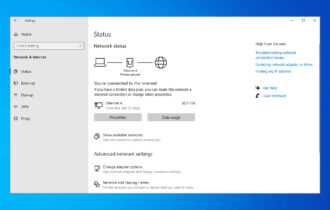
- Go to Start > Settings > Network & Internet > Manage Wi-Fi settings
- Scroll down to Manage known networks

- Left click on your network > select Forget

- Now, search for the network and enter your password.
There you go, we hope that these quick solutions helped you fix the problem. Let us know which one worked for you.
Read our disclosure page to find out how can you help Windows Report sustain the editorial team. Read more


Improve this guide
User forum
0 messages