Fix: Automatic Repair Couldn't Repair Your PC

If you’re getting an error that says “Automatic Repair Couldn’t Repair Your PC” or “Automatic Repair Failed”, stick around. We’ll help you fix it. Sometimes, the built-in Automatic Repair tool in Windows fails. Most commonly, this annoying issue happens when your PC shuts down unexpectedly or you have corrupt system files.
Here are some more error messages and codes you may encounter:
- Windows 10 automatic repair failed
- log file c /windows/system32/logfiles/srt/srttrail.txt Windows 10
- bootrec.exe /fixboot access is denied Windows 10
- Windows 10 automatic repair your pc did not start correctly
Follow below to address these and other underlying issues that stop automatic repair from working.
Table of contents
How do I fix Windows 10 automatic repair couldn’t repair your PC?
1. Run fixboot and/or chkdsk command
- Restart your PC and repeatedly press F8 before the Windows logo appears.
- Choose Troubleshoot > Advanced Options.
- Select Command Prompt from the list of options.
- Write the following lines and press Enter after each line to run it:
bootrec.exe /rebuildbcd
bootrec.exe /fixmbrbootrec.exe /fixboot - Additionally, you can also run a chkdsk commands as well.
- Type the commands below in Command Prompt and hit Enter after each.
chkdsk /r c:
chkdsk /r d: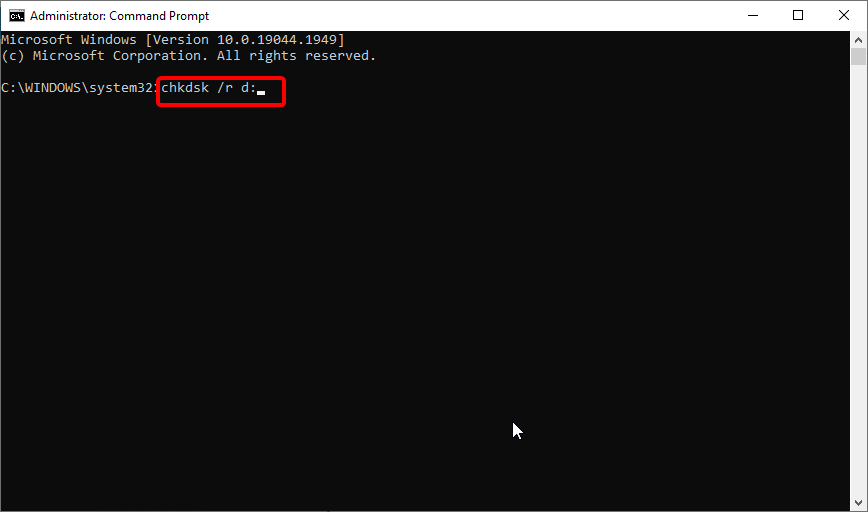
- To perform these commands, you need to know the drive letters for all your hard drive partitions. So, remember to use the letters that match your hard drive partitions on your PC instead of the C and D in the commands above.
- Restart your computer and check if the issue is resolved.
This solution is a bit tricky because you need to know which driver is causing you this problem. Even if you don’t know, you can still try this solution and stop at Step 4.
If you encounter any issues or your chkdsk gets stuck, check this guide to solve the problem.
2. Run DISM
- Enter the Boot Options menu like in the previous solution.
- Choose Troubleshoot > Advanced options > Startup Repair.
- Click the Restart button.
- Choose Enable Safe Mode with Networking from the list of options after your computer restarts.
- When Safe Mode starts, you need to download an updated version of the driver that’s giving you trouble. You can download the driver from the manufacturer’s website and save it to your USB flash drive.
- Press Windows key + X and choose Command Prompt (Admin) from the list.
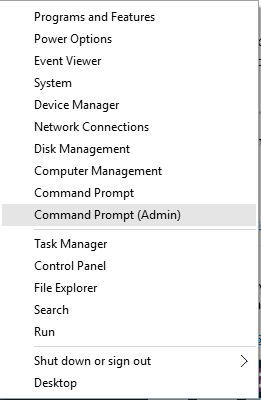
- Copy and paste the command below and press Enter to run it:
DISM /Online /Cleanup-Image /RestoreHealth
- After the process is done, restart your computer.
- When Windows 10 starts, install the driver that you’ve downloaded and the issue should be resolved.
Note that the DISM scan takes up to 15 minutes. So, you need to be patient till the process is complete.
If, for some reason, you can’t boot into Safe Mode, take a look at our troubleshooting guide on how to properly access Safe Mode.
The Windows 10 Automatic Repair couldn’t repair your PC error is one of the harder errors to fix and it can make your computer almost unusable.
We hope you’ve managed to fix it using one solution. If not, do not hesitate to choose one of the best PC repair tools and give it a try.
Tell us how your fix ended up below in our comments section!
FAQs
You can use practical methods to handle the automatic repair loop on your Windows 10, which proved helpful for other users.
After the automatic repair message, you can hold the power button to force shut down your PC.
After the restart, you should get the Troubleshoot option to repair the system and update or reset your device.
If this method doesn’t suit you, it’s possible to resolve the issue using Safe Mode, which can offer repairing tools like Startup Settings and Windows startup options.
In addition, this stuck preparing automatic repair for Windows 10 is a common problem for Windows 10 Lenovo, HP, Dell, and ASUS.
This operation usually happens on your Windows 10 PC when you run into different errors that completely shut down your system.
The automatic repair process will start when you power on and try to diagnose the cause of this unpleasant crash on your computer.
There are various reasons you might be getting the Automatic repair couldn’t repair your PC, press advanced options to try other options error message.
Below are some of the prevalent causes:
Problematic Windows update
Broken or corrupt system files
Incompatible hard drive
Corrupt Window Boot Manager file
The automatic repair process on your Windows 10 device will last, depending on your needs. It can take a few minutes to a couple of hours if you require time-consuming tasks.
For example, it can last about 30 minutes in case you perform a fresh install without keeping any programs. In the other case, it can take up to 3 or 4 hours if you want to repair it and keep your files.
You can use this feature for various issues that generate booting problems on your PC, so consider it if you can’t correctly boot your device.
Read our disclosure page to find out how can you help Windows Report sustain the editorial team. Read more


Improve this guide


User forum
81 messages