3 Ways to Fix Second Hard Drive Not Showing on Windows 10
Give a try to these confirmed solutions right away
6 min. read
Updated on
Read our disclosure page to find out how can you help Windows Report sustain the editorial team Read more
Key notes
- Secondary hard drives are an excellent way to extend your PC's storage capacity without having to replace your main one.
- Issues with unrecognized secondary hard drives are not uncommon.
- This guide explains all the practical solutions that you can apply to fix the second hard drive not showing up problem.
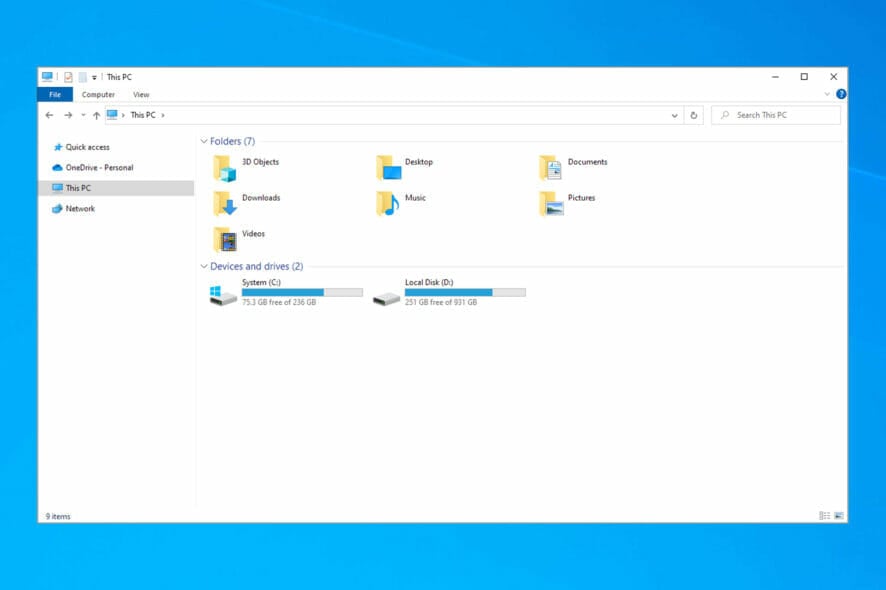
Most of us probably use only one hard disk drive in the computer, but some people who need more space also tend to use two.
Some users using a second hard drive have reported that their computer can’t detect the second one after Windows 10 upgrade.
Therefore, we came up with some solutions to solve the problem.
First, you should reopen your computer and check if your hard disk is connected correctly. Check out this guide for additional info if you’re unsure what to do.
If everything is connected right, but you’re still facing the issue with detecting your second hard disk drive, try one of the following solutions.
Why is my second hard drive not showing up in File Explorer?
If your second hard drive is not detected in Windows 11 or 11, it’s possible that the second hard drive is unallocated and can’t be accessed.
If your new hard drive is not showing up, it’s possibly not connected correctly or not configured in BIOS, so be sure to check that.
Driver issues or problems with a USB cable or port can cause an external hard drive to not show up on Windows, so ensure everything is connected correctly and working.
How do I access my secondary hard drive?
There are several ways to access the secondary hard drive in Windows. If you want to view or modify the files stored on the drive, press Windows + E and locate the hard drive here, provided it’s connected to the PC.
To make changes to it, create partitions, or format the drive, you can access it via the Disk Management utility that comes pre-installed in Windows.
How can I use two hard drives on one computer?
You can opt for two options to use two hard drives on one computer. You can choose either the external hard drive or the internal one.
If you go ahead with the external hard drive option, all you need to do is plug in the external HDD to your USB or serial port, and that’s it. You are all set to use it, save your files, move files to and fro, etc.
The best part of the external hard drive is that it is movable, and you can detach it and keep it with you, making sharing files more convenient.
Regarding the internal hard drive, you need to open up a few screws on your laptop, find a vacant slot, attach the external HDD to it, and boot your PC to work.
How can I fix the secondary hard drive if it’s not showing up on Windows 10?
1. Check for the driver updates
- Open the Start menu.
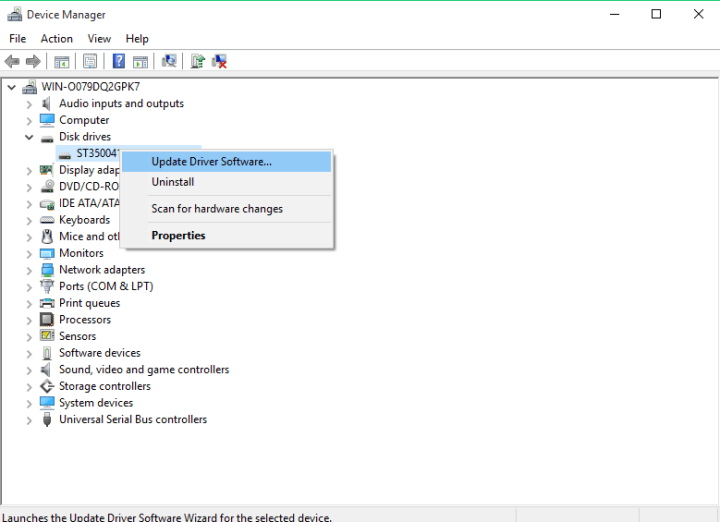
- Type device manager and open it.
- Expand Disk drives.
- Find the second disk drive, right-click on it and select Update driver software.
- If there are any updates, follow further instructions, and your hard disk drive will be updated.
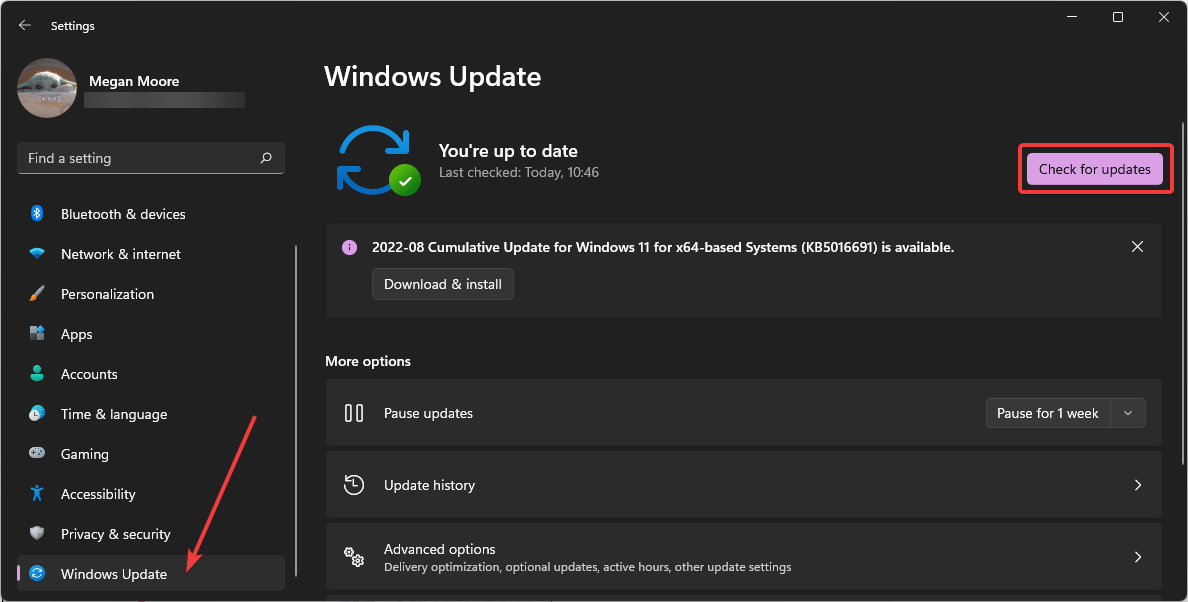
- You can also go to Settings.
- Select Windows Update from the left pane, and check for updates that will allow you to see if overall updates offer something for your hard drive.
If your computer could recognize the second hard disk before the Windows 10 upgrade, there’s a possibility that your current hard disk drivers are not compatible with Windows 10.
However, downloading drivers manually can be a long and tedious process that might affect your PC (if you hit the wrong button). Using specific software to keep drivers up to date is the most efficient method.
One cutting-edge solution is Outbyte Driver Updater, which will scan your Windows PC and warn you of any device drivers that are outdated, damaged, or missing.
Outbyte Driver Updater updates are released regularly to fix errors, enhance communication, and provide new features and stability to the PC.

Outbyte Driver Updater
Drivers will no longer create problems if you download and use this powerful software.2. Change driver letter and path
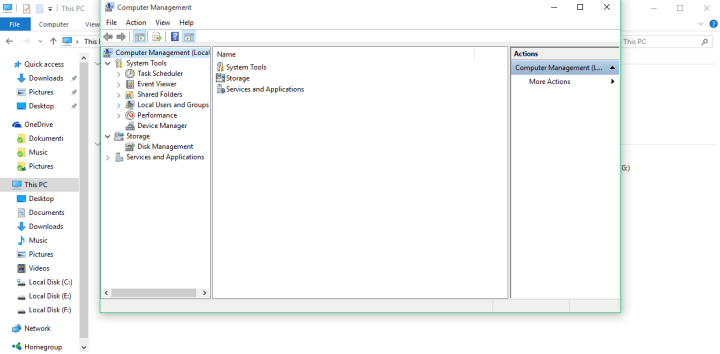
- Right-click on This PC.
- Click on Manage.
- The Computer Management window will show up.
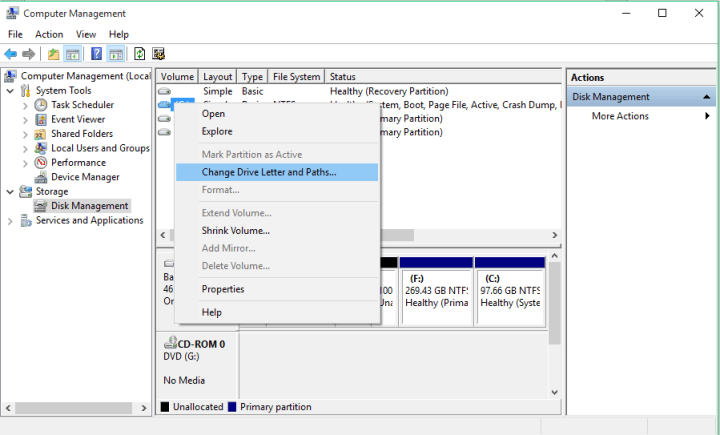
- Go to Disk Management.
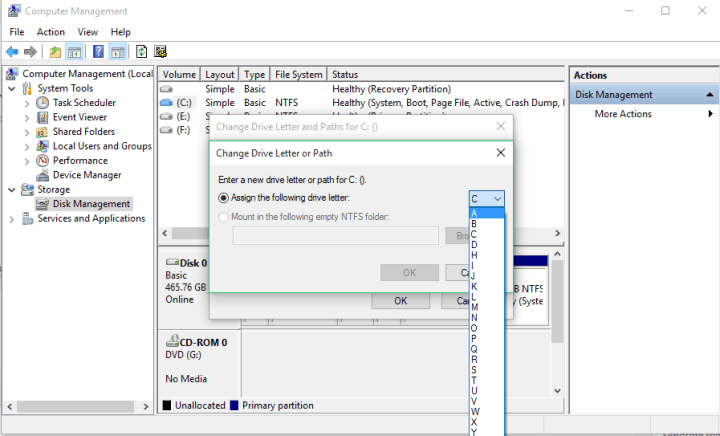
- Find your second hard disk drive, right-click on it and go to Change Drive Letter and Paths.
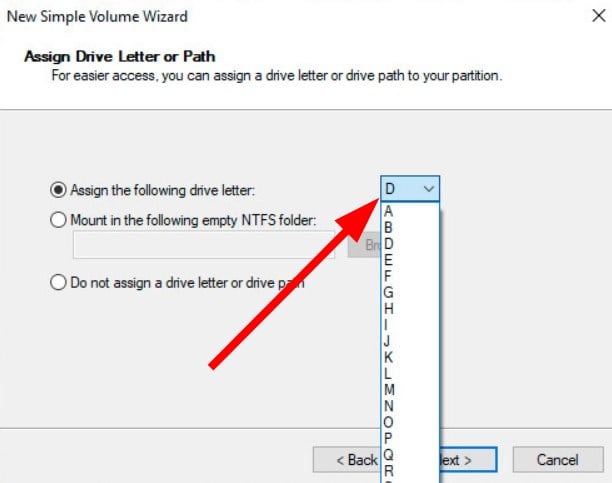
- Go to Change and choose the letter for your partition from Assign the following drive letter:.
- Click OK.
- Restart your computer.
Maybe your hard disk is connected correctly and works well, but if it doesn’t have a letter by its name, you won’t be able to access it from This PC.
So, we’ll change the drive letter, and hopefully, the hard disk will reappear.
3. Recover damaged Windows hard drive
Users often need their second hard drive to recover their data from it. If it is not detected, we recommend you use data recovery software.
Stellar Data Recovery is an advanced backup and recovery software that allows users to perform complex recovery tasks efficiently.
With cross-platform compatibility to match all storage devices, a convenient Scan & Resume Recovery option for extra flexibility, and all the features you could dream of, this tool does more than your average app.
And we mean it – the stellar recovery power spreads beyond easy file recovery. With unparalleled accuracy, it retrieves your data from the most unfortunate scenarios, including formatted, corrupted, and encrypted drives.
Try one of these tools if you have some necessary data on your external HDD.
What can I do if the second hard drive does not show up on Windows 11?
Here are a few things apart from the ones mentioned above that you can do to fix the second hard drive not showing up on Windows 11 issue.
- Check if the hard drive connection is proper.
- Wait for the hard drive files to load or install properly before using them.
- Check whether the hard drive is partitioned or formatted.
- You need to assign a hard drive letter to your hard drive.
- Fix system file errors using SFC Scan and DISM tools.
- Try a different USB port to connect your external hard drive.
How do I activate my second hard drive?
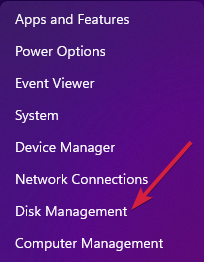
- Right-click on the Start menu.
- Select Disk Management.
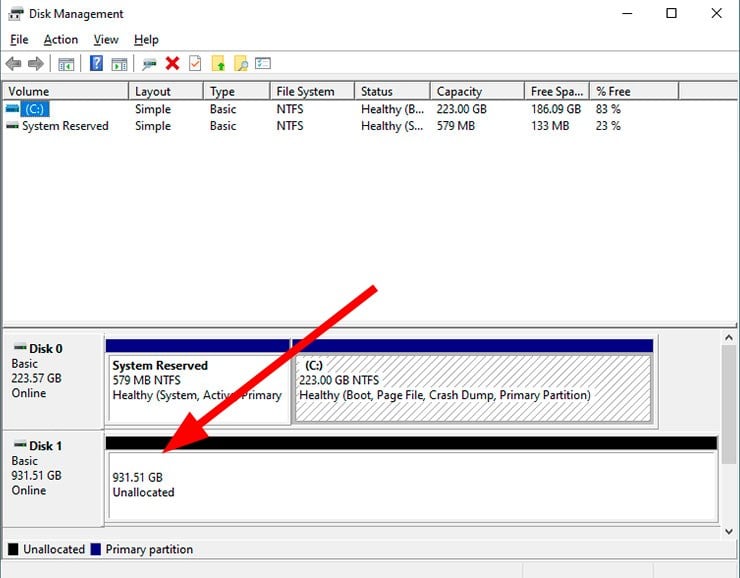
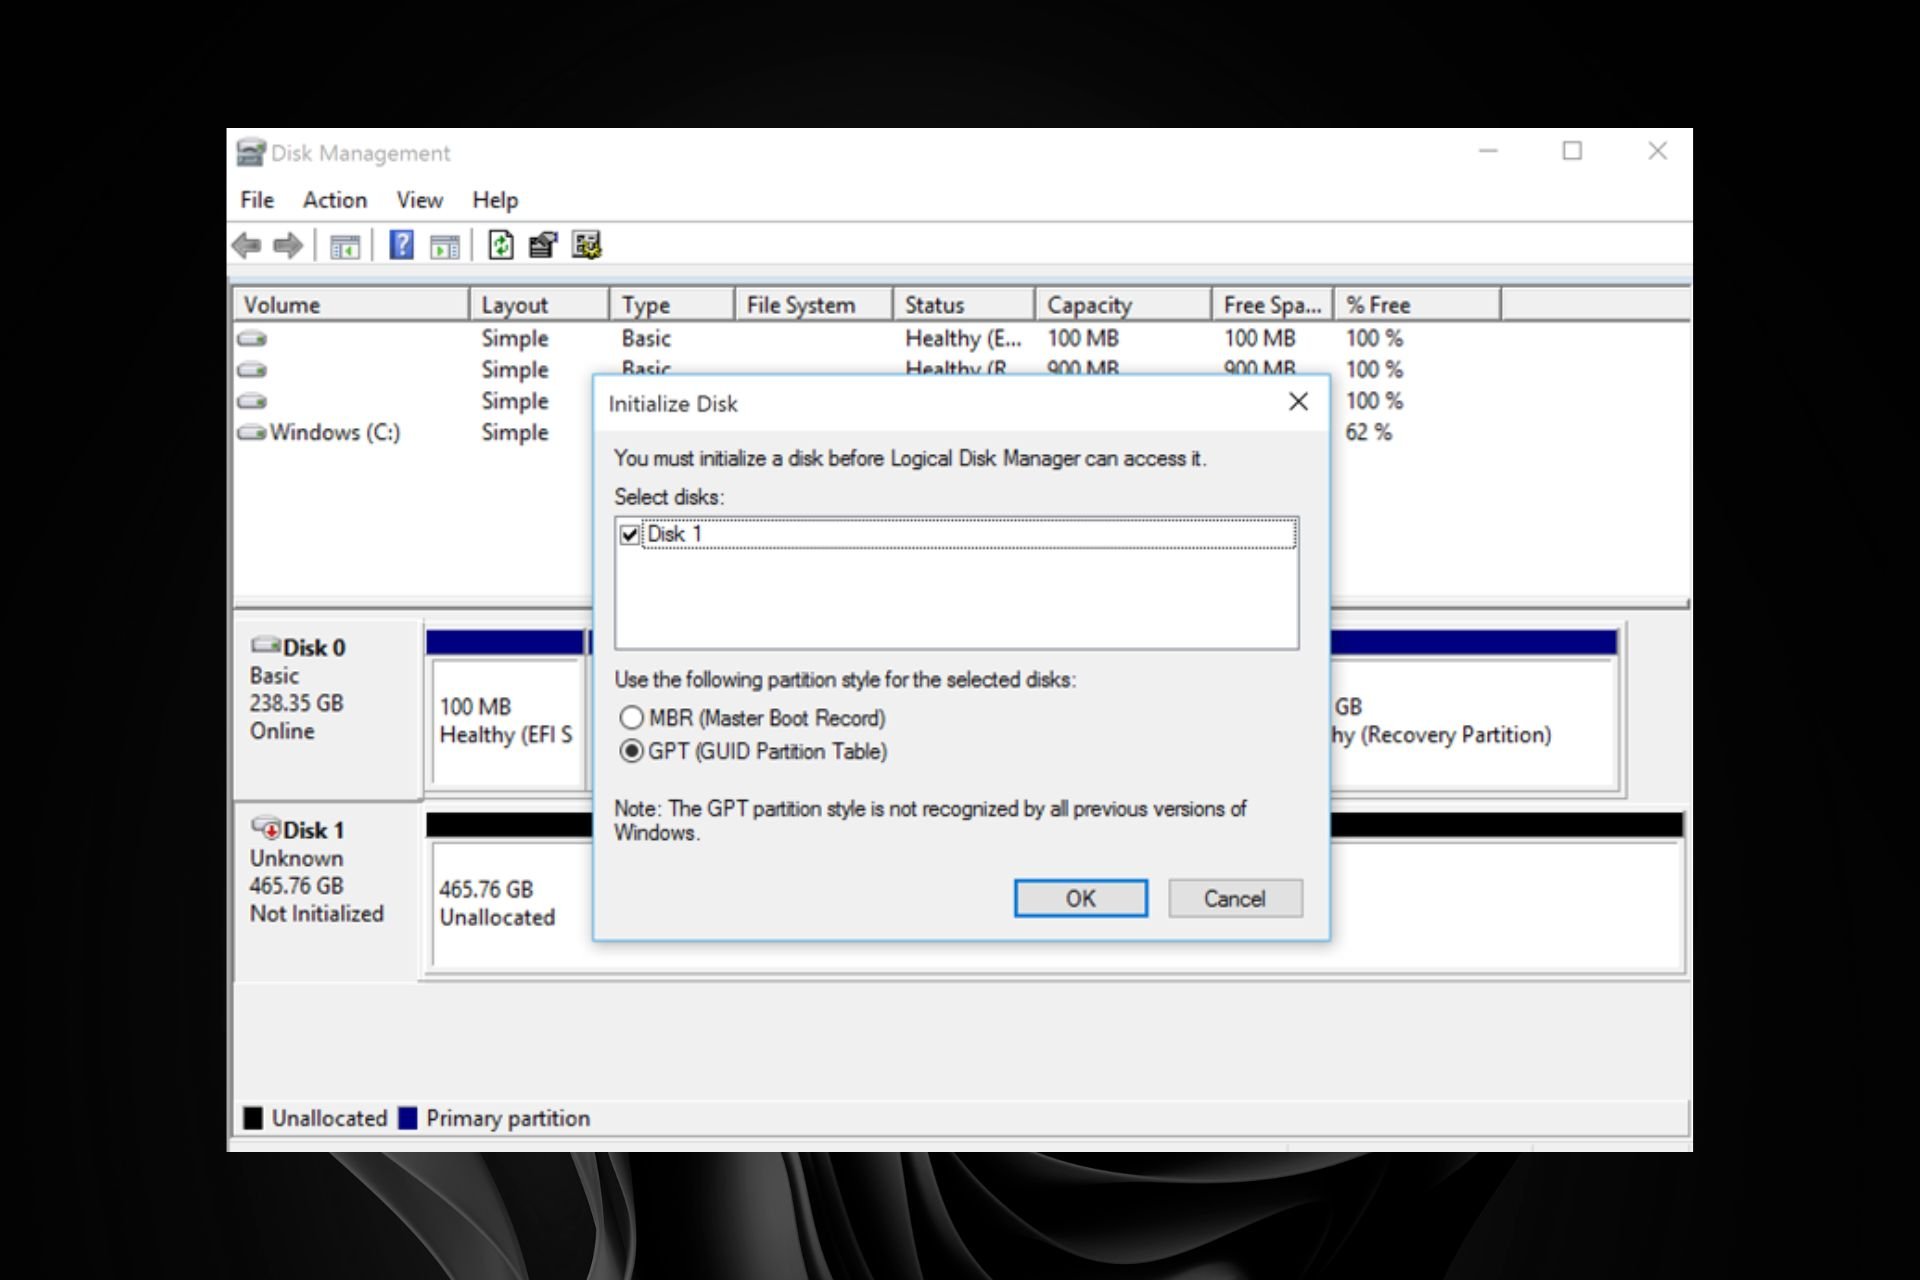
- The unactivated hard drive will show up at the bottom of the window with a black bar on top of it. Notably, a blue bar indicates that the hard drive is activated.
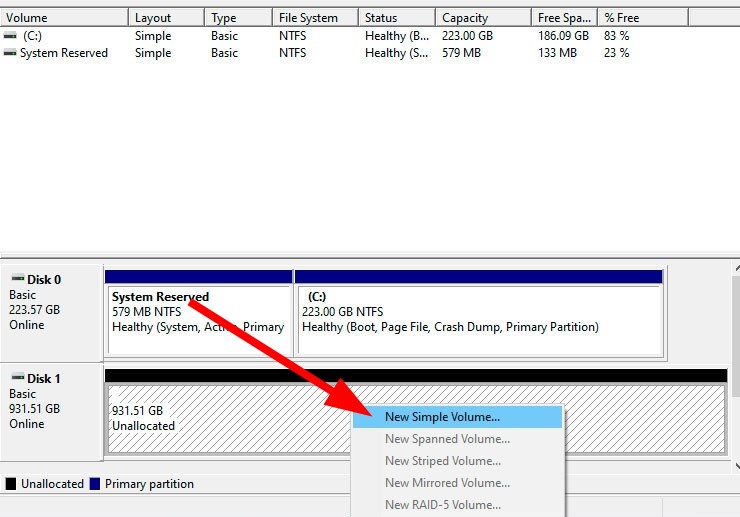
- Right-click on your hard drive and select New Simple Volume.
- Follow the on-screen prompts in the New Simple Volume Wizard window to activate your hard drive.
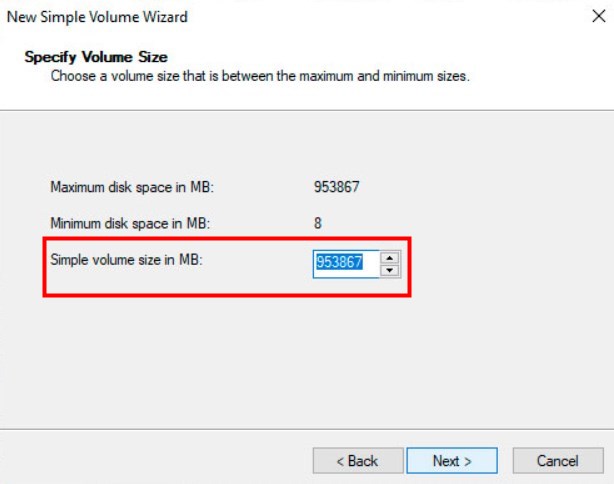
- You will be asked to allocate the maximum space you would like the second hard drive to use.
- After confirming the size, select the Drive Letter for the second hard drive.
- Press Next.
- Click Finish.
- The computer will format your drive.
We also have a useful guide on what to do if the ATA/SATA hard drive is not detected in BIOS.
Besides, if you can’t change the hard disk serial number, our solutions will help!
That would be all. Feel free to reach out in the comments section below if you have any comments or suggestions.


