FIX: Microsoft Office Picture Manager not printing
![]() 4 min. read
4 min. read
![]() Updated on
Updated on
Share this article
Improve this guide
Read our disclosure page to find out how can you help Windows Report sustain the editorial team. Read more
Key notes
- Users often complain that their Microsoft picture manager is not printing due to errors.
- We strongly recommend using third-party photo manager software to solve the issue.
- Try changing your default printer with our method below to quickly get rid of the problem.
- One other thing you could do is updating your printer drivers by following our solution.
All the photo viewer apps offer printing functionality. However, some users have reported Microsoft Office Picture Manager not printing issues on their computers.
One user reported in the Microsoft Community explaining a similar issue:
Three days ago Office Picture Manager stopped printing pictures (HP laptop/HP C4450 Photosmart printer/Windows7). I can still download and edit the pictures. I CAN print the pictures in Picasa.
This error can occur due to incorrect printer setting configuration or outdated printer drivers. Some users have also searched for the following error message:
Print pictures error windows can’t find this picture
In this article, we discuss a couple of troubleshooting tips to help you resolve the Microsoft Office Picture Manager is not printing error in Windows 10.
How can I fix Microsoft Office Picture Manager?
1. Use photo editing software
There’s no doubt that you usually see Microsoft Office Picture Manager as a flexible way to manage your pictures. However, there are better tools out there that may handle all your picture printing tasks with ease.
Adobe Photoshop is a great example. You can do so much more than you’re used to from Picture Manager with any of them.
Besides directly printing photos, do note that those easy-to-use tools available in Photoshop are suitable for web and mobile too.
As for the intuitive Adobe Sensei machine learning, it always recognizes people and themes, so that creating an organized album is a matter of mere minutes.
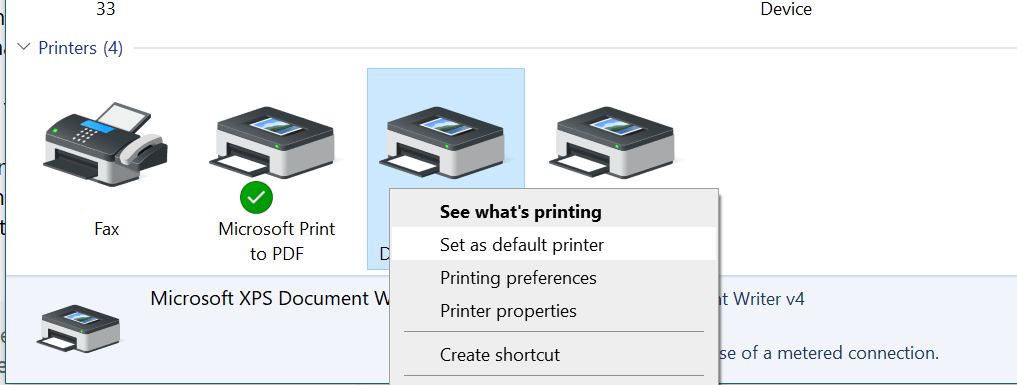
2. Change the default printer
- Press Windows Key + R to open Run.
- Type control and click OK to open Control Panel.
- Click on Hardware and Sound.
- Click on Device and Printers.
- Right-click on the printer and select Set as default printer.

- Open Microsoft Office Picture Manager.
- Proceed to print the image you want to print.
- Make sure you select your default printer in the Print to option.
- Click on Print and check for any improvements.
If the issue persists, open Device and Printers again and set Microsoft XPS as the default printer. Try to print again and check for any improvement.
3. Update printer drivers
- Press Windows Key + R to open Run.
- Type devmgmt.msc and click OK to open the Device Manager.
- On the Device Manager, expand the Print Queues option.
- Right-click on the printer you are having issues with and select Update Driver.

- Select Search automatically for updated driver software option.

- Windows will now scan the internet for any pending update and download and install the update if found.
- Close the Device Manager and reboot the computer.
- After the restart, open Microsoft Office Picture Manager and try to print the document.


Windows can’t automatically find and download new drivers? Don’t worry, we’ve got the right guide for you.
4. Check your antivirus program
- If you have a third-party antivirus installed, check if it has the Application and Device Control option enabled.
- If enabled, the antivirus program can block and disable the functionalities of your printer and other devices.
- Open your antivirus program and check the Device Control logs.
- If any file is blocked by the application, a file like dllhost.exe, remove it from the list.
- Open Microsoft Office Picture Manager and check if you can print now.
Depending on the antivirus you are using, the settings to access the Application and Device Control option may vary.
As the feature can block certain apps from running in a certain location, disabling the feature or removing the file from the blocked app list can help.
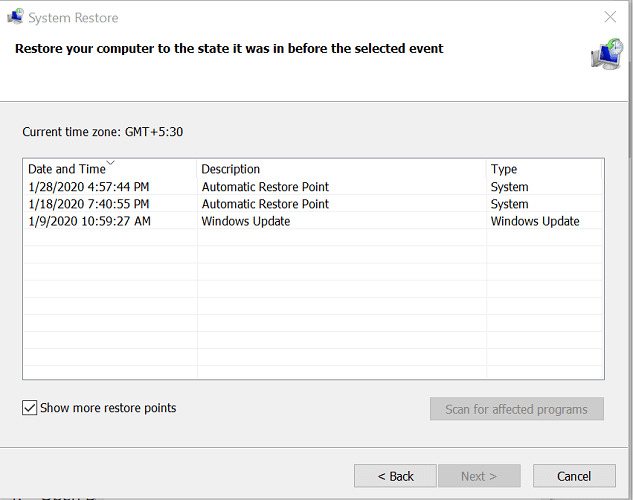
5. Use a Restore Point
- Click on Start and type create a restore in the search bar.
- Click on Create a Restore Point option.
- In the System Properties window, click on the System Restore button.
- Click Next.
- Check the box Show more restore points. This will show all the available restore points.

- Select the most recently created Restore Point and click Next.
- Confirm the action and click Finish.
- System Restore will now restore your PC to an earlier point where it was working fine.
- Once the PC is restored, open the Picture Manager and check for any improvements.
If System Restore isn’t working, don’t panic. Check this useful guide and set things right once again.
This option is particularly helpful if the Picture Manager stopped printing after a power outrage or completing the installation of a new program.
Note that, while the Restore Point does not affect your personal files and data, it will remove any programs installed after the restore point was created.
If you still have problems, you might need to reinstall and download Microsoft Office Picture Manager to fix them permanently.
For any other questions or suggestions, feel free to reach in the comments section below.

User forum
0 messages