How to Automatically Accept or Decline Meetings in Outlook?
Take full control of your Outlook appointments
8 min. read
Updated on
Read our disclosure page to find out how can you help Windows Report sustain the editorial team Read more
Key notes
- To accept/decline a meeting invite, enable the Auto Accept/Decline option from Outlook Options.
- Setting a rule or running VBA scripts are some other popular ways to do it.
- Keep reading to know the detailed steps for each method.
If you often have to accept or decline meeting invites but don’t like doing it manually, you can set them to be accepted or rejected automatically.
This will help you set a clash-free meeting schedule and minimize distractions so that you can focus on what’s important.
In this guide, we will explore detailed steps to auto accept or decline incoming meeting requests on Outlook so that a timely response is sent to the meeting organizer.
How do I automatically accept a meeting without sending response in Outlook?
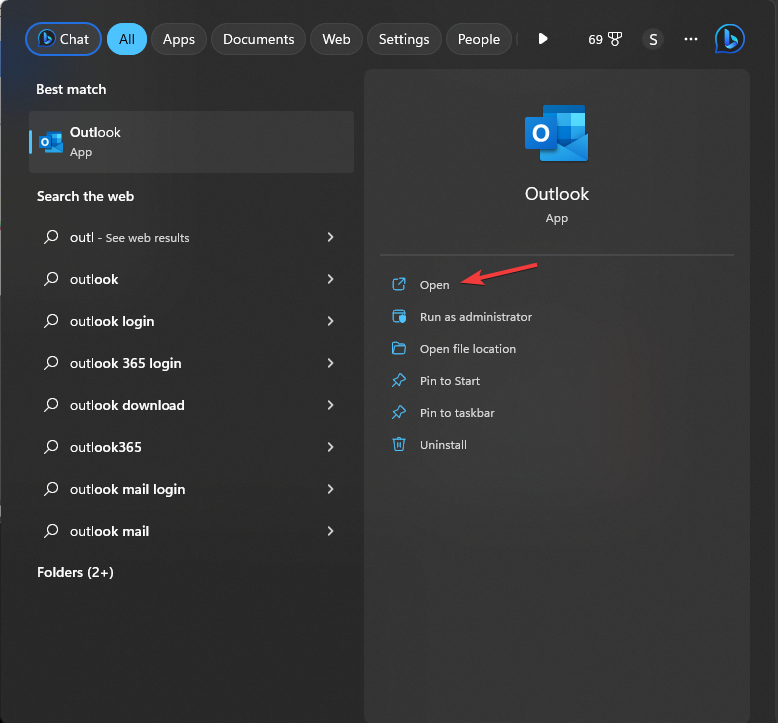
- Press the Windows key, type outlook and click Open.
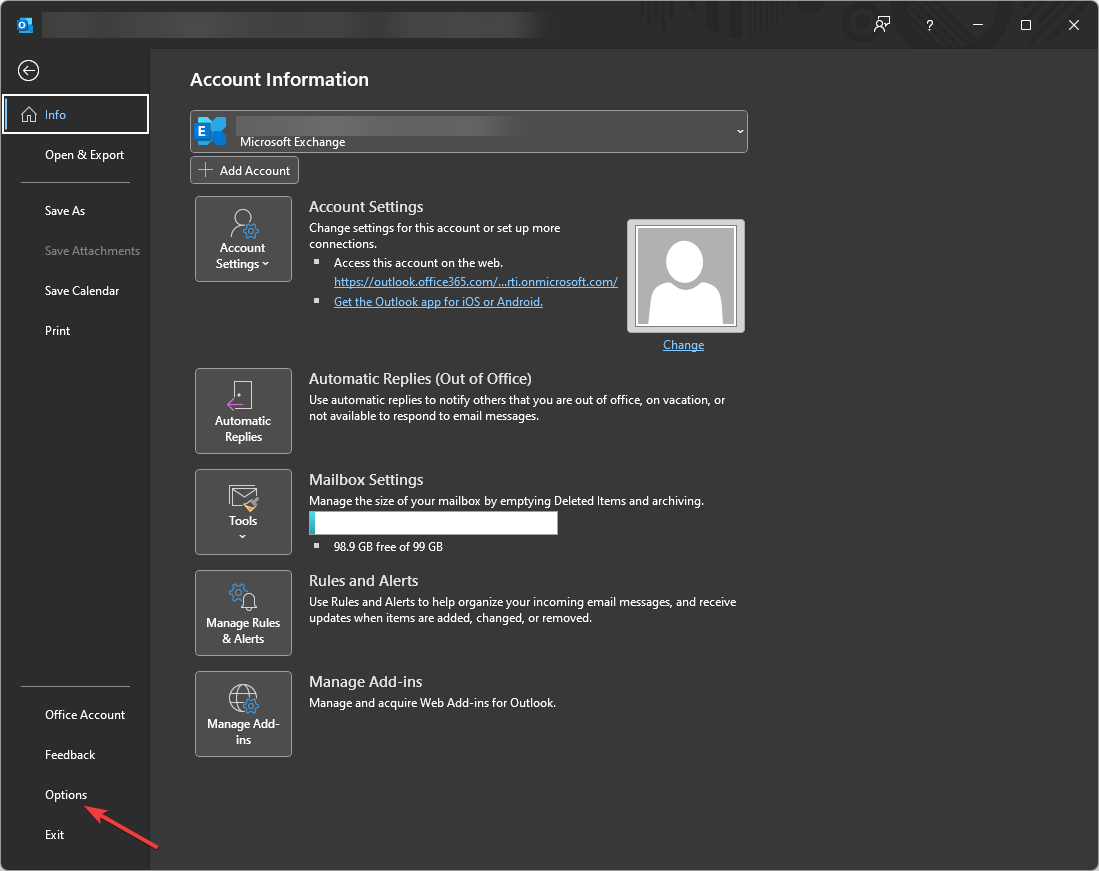
- On the Outlook main window, go to the File tab.
- Select Options to open Outlook Options.
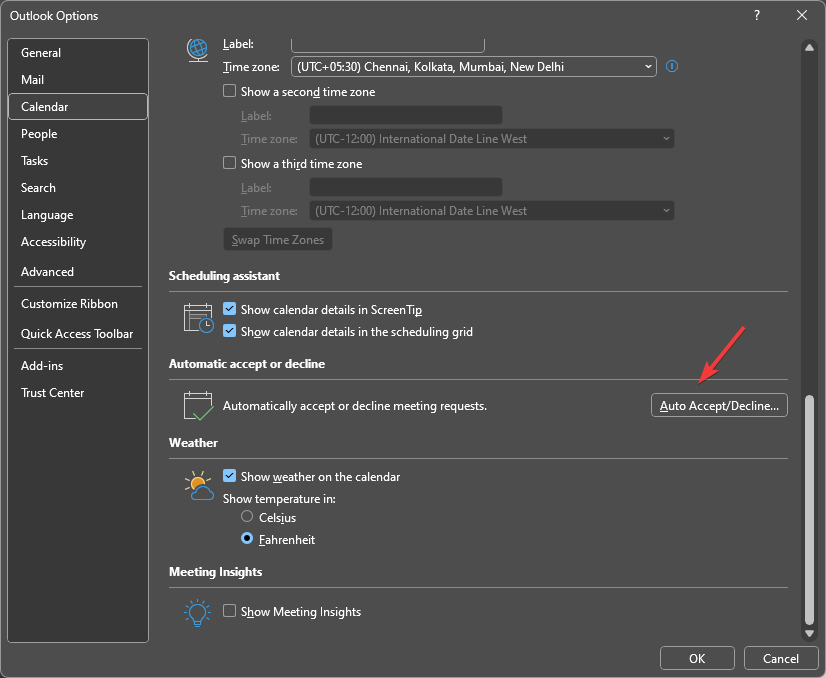
- Go to Calendar from the left pane, locate Automatic accept or decline, then click the Auto Accept/Decline button.
- On the Automatic Accept or Decline window, to accept a meeting, place a checkmark next to Automatically accept meeting requests and remove canceled meetings and click OK.
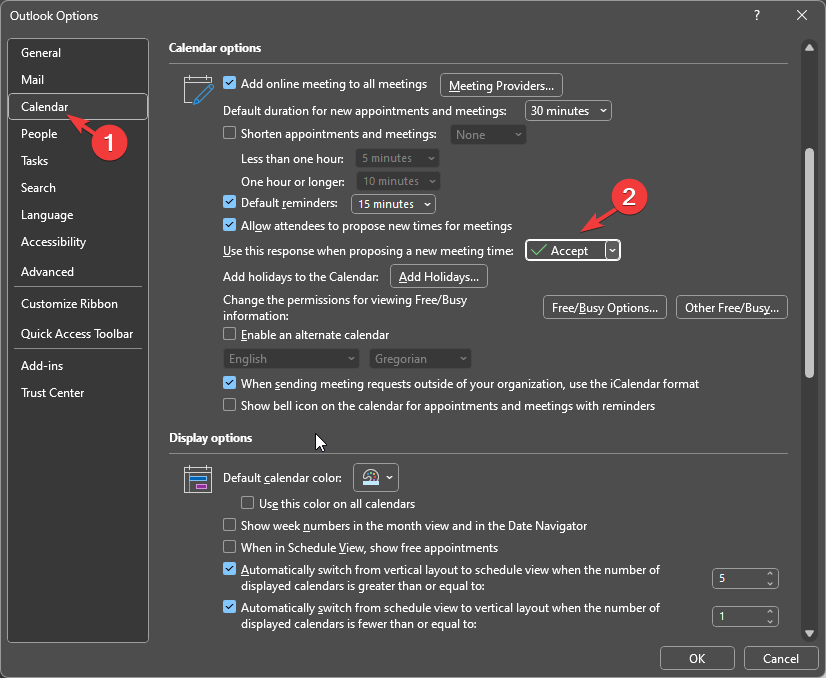
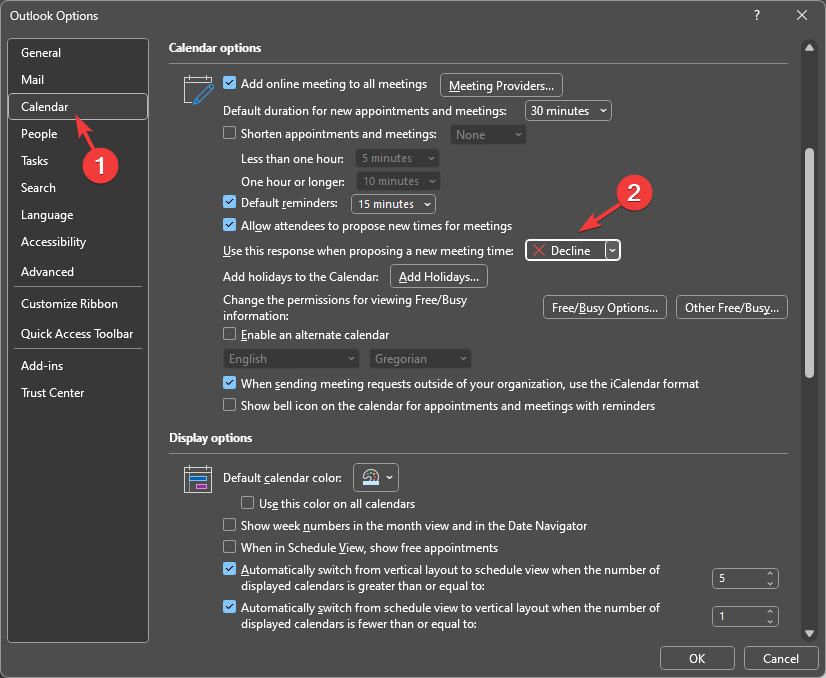
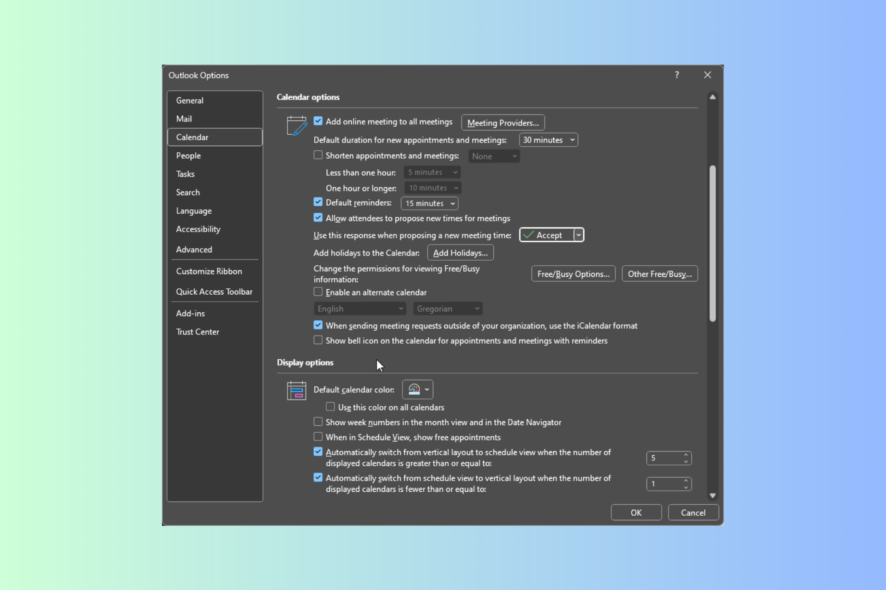
- Next, on the Outlook Options window, Calendar pane, locate Calendar options and select Accept for the Use this response when proposing a new meeting time option.
- Click OK and relaunch Outlook to save the changes.
If you use Outlook 2010 or an older version, look for the Resource Scheduling option instead of Automatic accept or decline. Click the Resource Scheduling button to get the Automatic Accept or Decline window, and change the meeting request settings on Outlook.
How do I automatically accept meetings with a response in Outlook?
1. By setting a rule
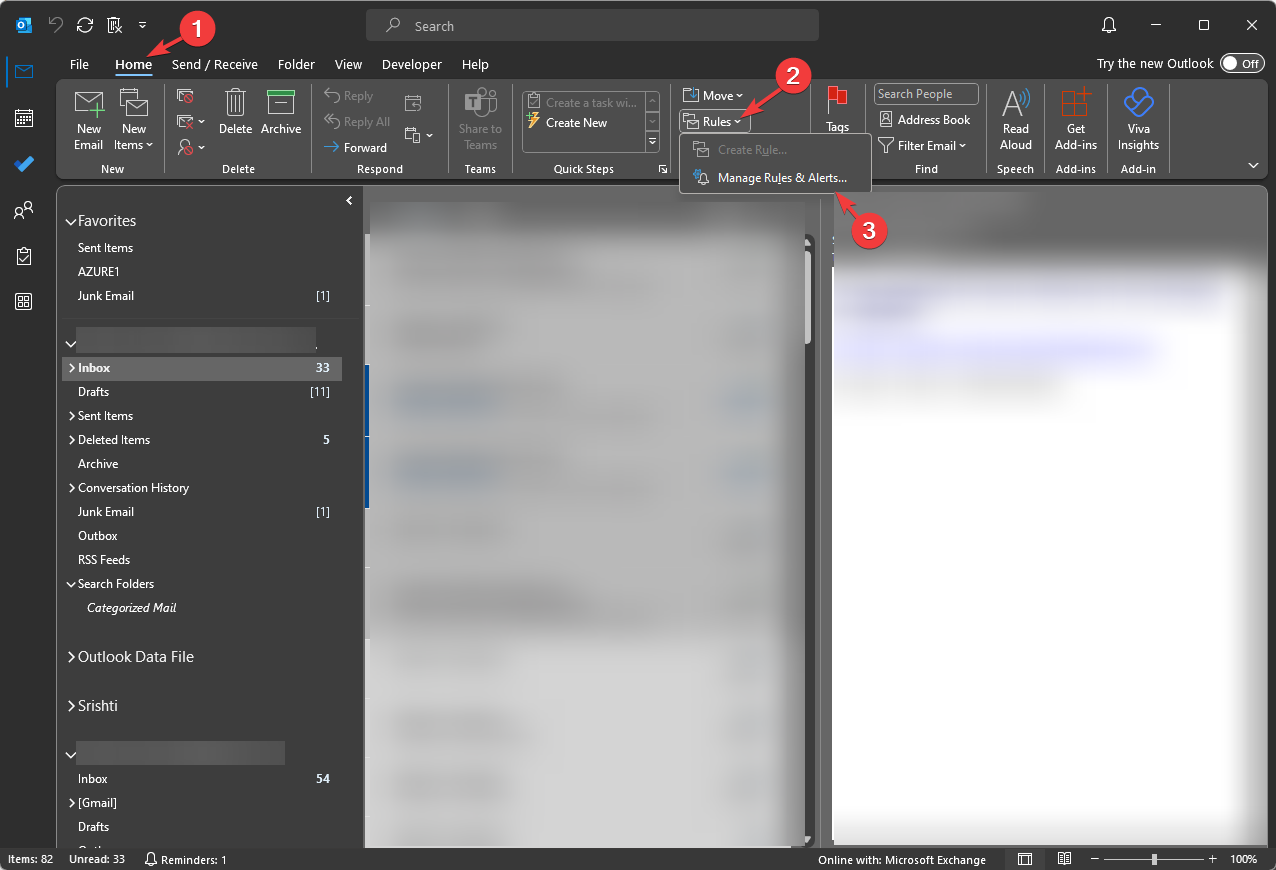
- Launch Outlook and go to the Home tab.
- Click Rules, then select Manage Rules and Alerts from the drop-down list.
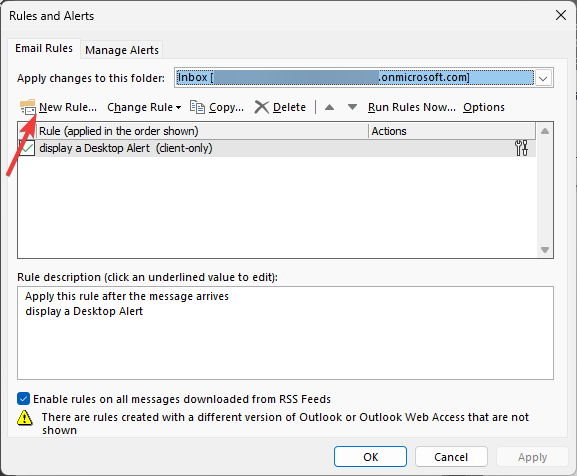
- Click New Rule.
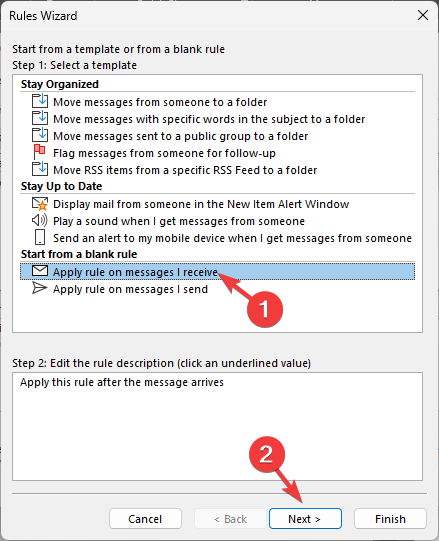
- On the Rules Wizard dialog box, select Apply rule on messages i receive and click Next.
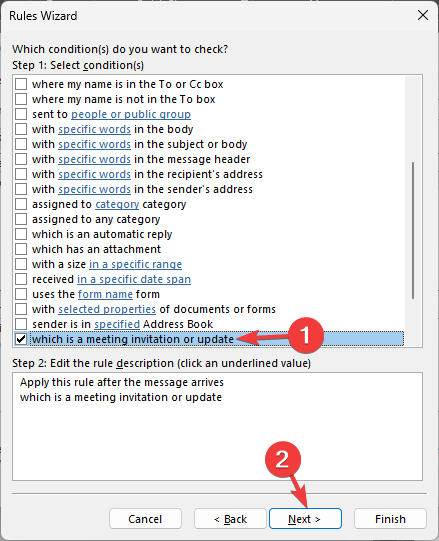
- On the next page, select which is a meeting invitation or update and click Next.
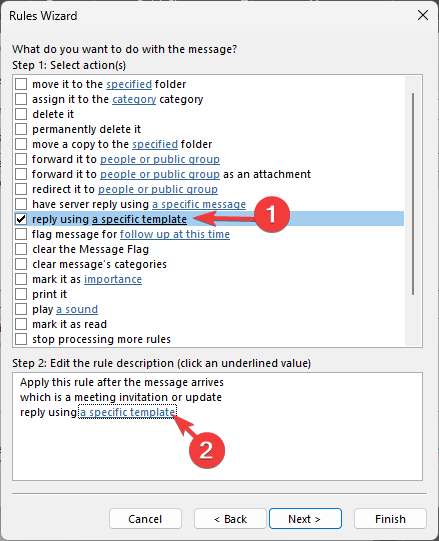
- From the Step 1 box, select reply using a specific template, then go to the Step 2 box and click the specific template hyperlink.
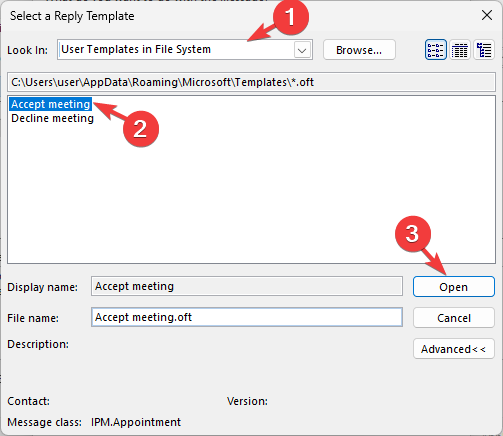
- On Select a Reply template window, for Look In, choose Standard Template or User Templates in File System; you will see the meeting response template in the box below. If there are multiple options, choose one and click Open.
- Click Next, then click Next.
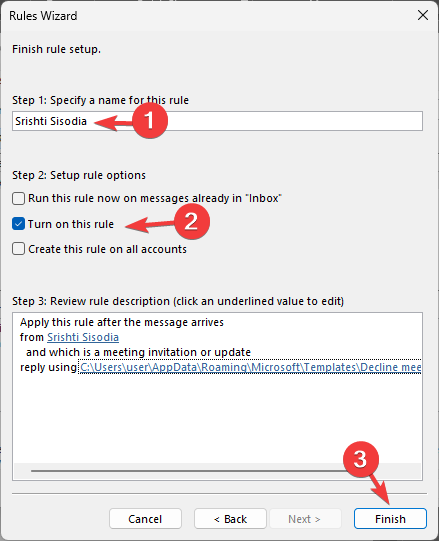
- Now name the Rule if you want and click Finish.
You can also select Create this rule on all accounts to auto accept the meeting invite on all your email addresses on Outlook.
2. By running a VBA script
First, you need to save the script in VBA; for that, follow these steps:
- On the Outlook window, press Alt + F11 to open the Visual Basic Application (VBA) for Outlook.
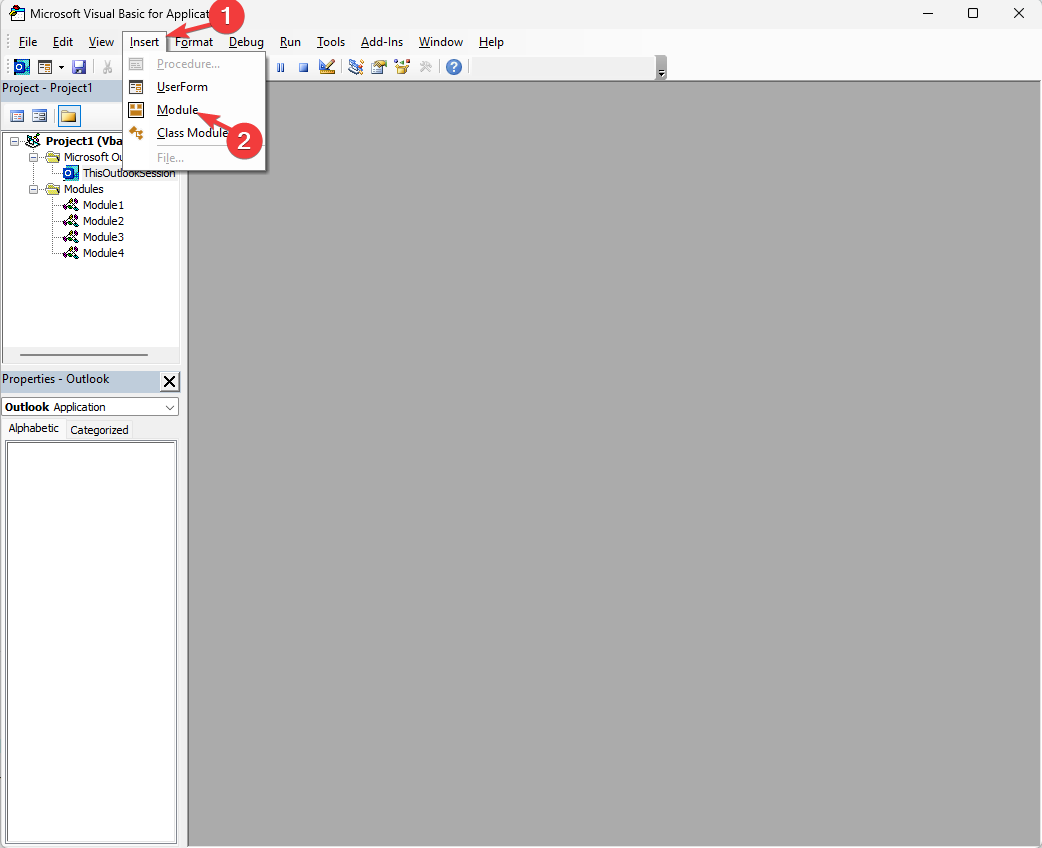
- Go to Insert, then select Module.
- When the new module opens, copy & paste the following script to auto accept the meeting invitations on Outlook and press Ctrl + S to save it:
Sub AutoAcceptMeetingRequests()
    Dim objNamespace As Outlook.NameSpace
    Dim objFolder As Outlook.MAPIFolder
    Dim objItem As Object
    Dim objMeetingRequest As Outlook.MeetingItem

    ' Set up Outlook objects
    Set objNamespace = Application.GetNamespace("MAPI")
    Set objFolder = objNamespace.GetDefaultFolder(olFolderInbox)

    ' Loop through inbox items
    For Each objItem In objFolder.Items
        If objItem.Class = olMeetingRequest Then
            Set objMeetingRequest = objItem
            objMeetingRequest.GetAssociatedAppointment(True).Respond olMeetingAccepted, True ' olMeetingAccepted for acceptance, True to send no response
        End If
    Next objItem

    ' Clean up objects
    Set objMeetingRequest = Nothing
    Set objItem = Nothing
    Set objFolder = Nothing
    Set objNamespace = Nothing
End Sub
Once you have the script in VBA, you need to run it; follow these steps to do that:
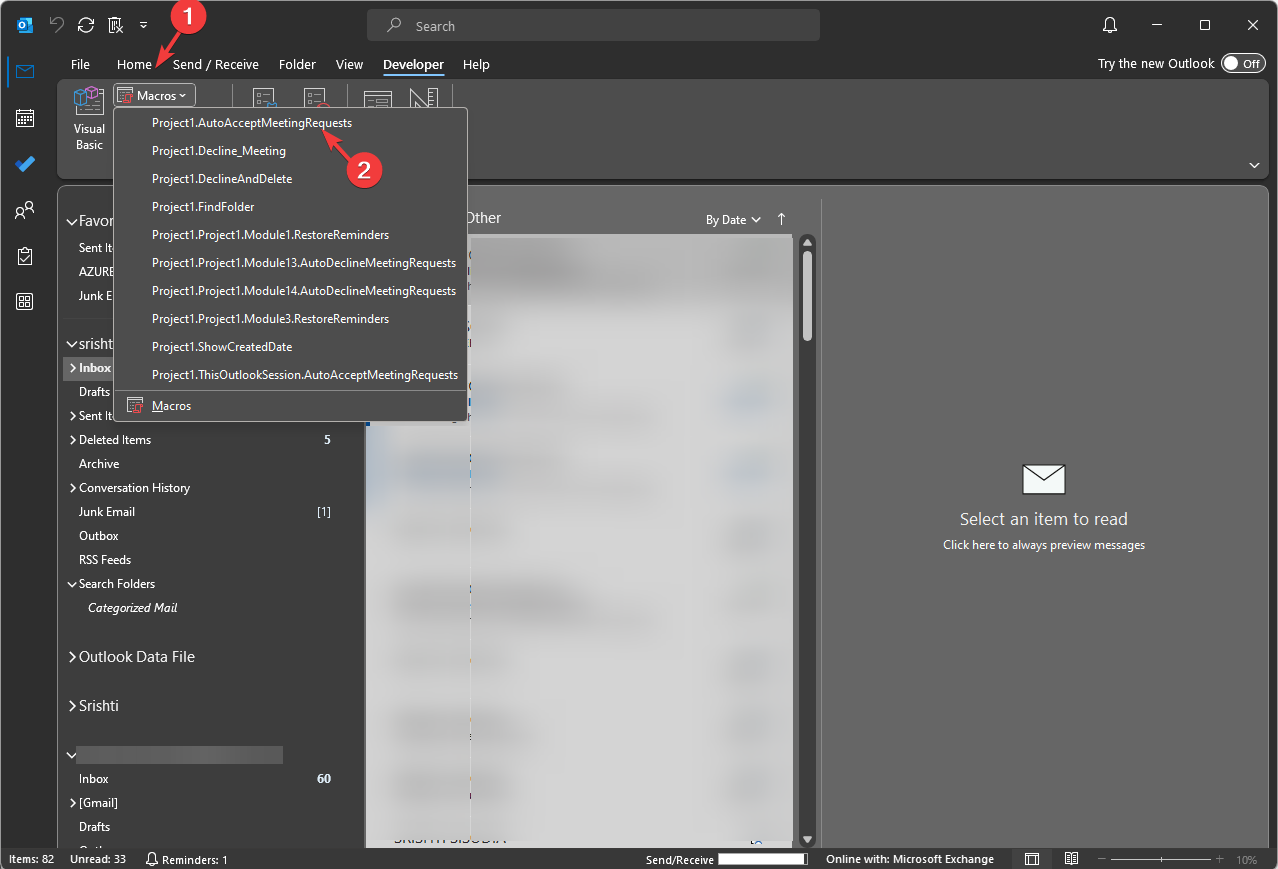
- Go to the Outlook window and go to the Developers tab.
- Select Macros, and from the drop-down list, choose the Macros you created to run it.
Before using VBA scripts on Outlook, create a backup of your data and configuration settings, and always test the script on a small scale before running it for the entire mailbox.
Auto-responding to meeting invitations in Outlook saves you time. It is a hassle-free way to inform the meeting organizer about your attendance. However, always check the meeting request to know your fellow attendees to ensure you are aligned with the participants on the meeting agenda.
How do I automatically decline meetings in Outlook?
1. Use Outlook Options to decline all meeting invites
- Launch Outlook and go to the File tab.
- Select Options to open Outlook Options.
- Go to Calendar, locate Automatic accept or decline & click the Auto Accept/Decline button.
- Select Automatically decline meeting requests that conflict with an existing appointment or meeting to decline a meeting.
- Next, Select Decline for the Use this response when proposing a new meeting time option under Calendar options and click OK.
- Relaunch Outlook to save the changes.
2. Set a rule to decline meeting invites from a specific email address
First, you have to create a response and save the template to reject the meeting; for that, follow these steps:
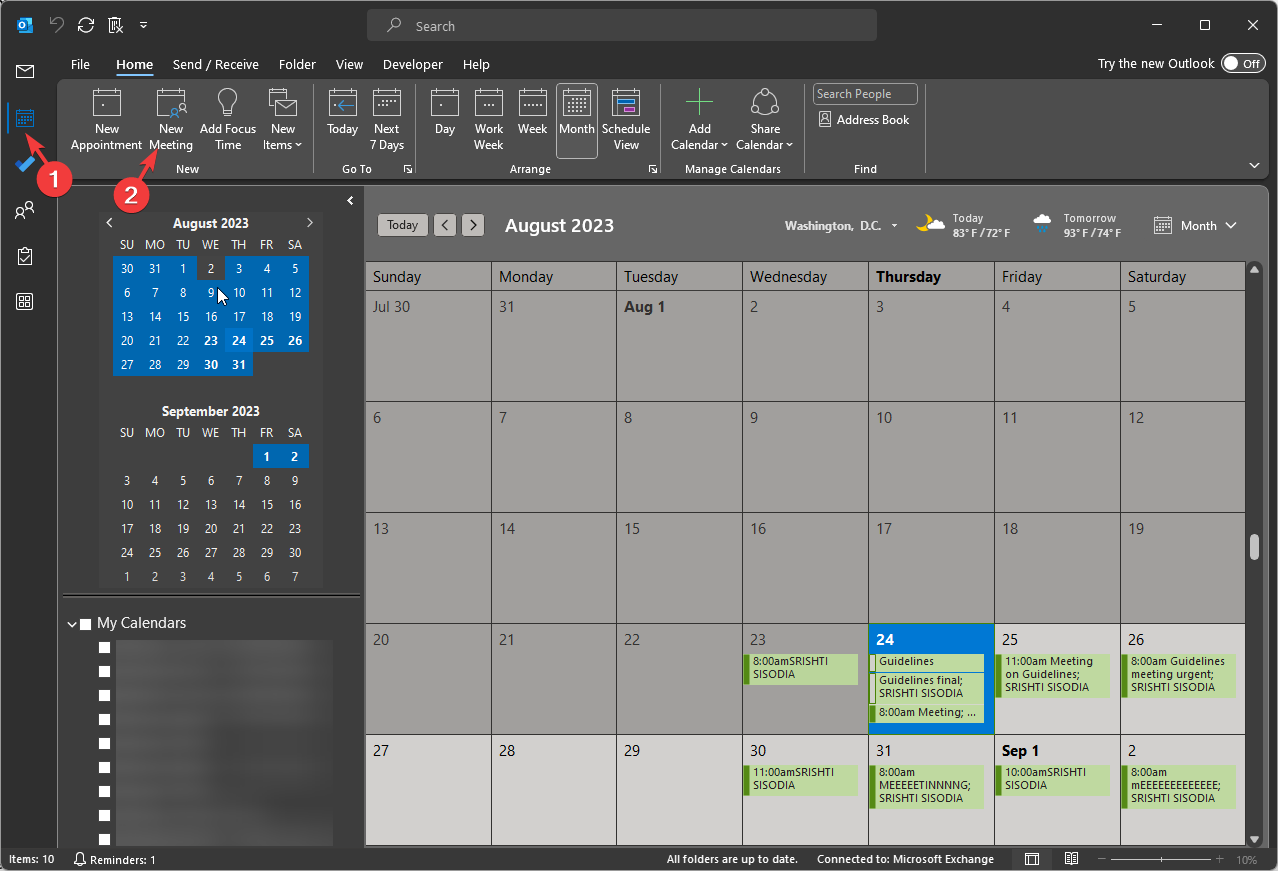
- On the Outlook main window, go to Calendar and select New Meeting.
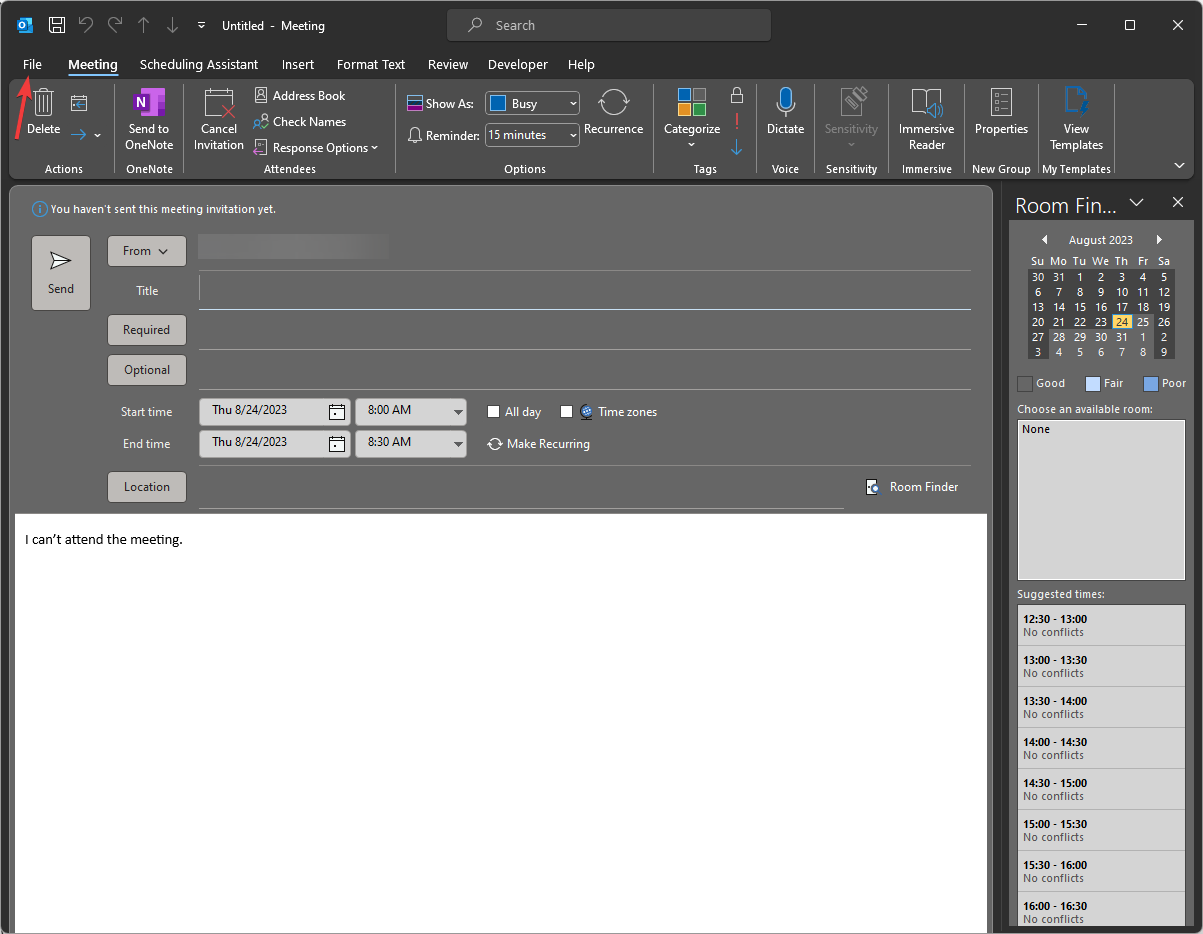
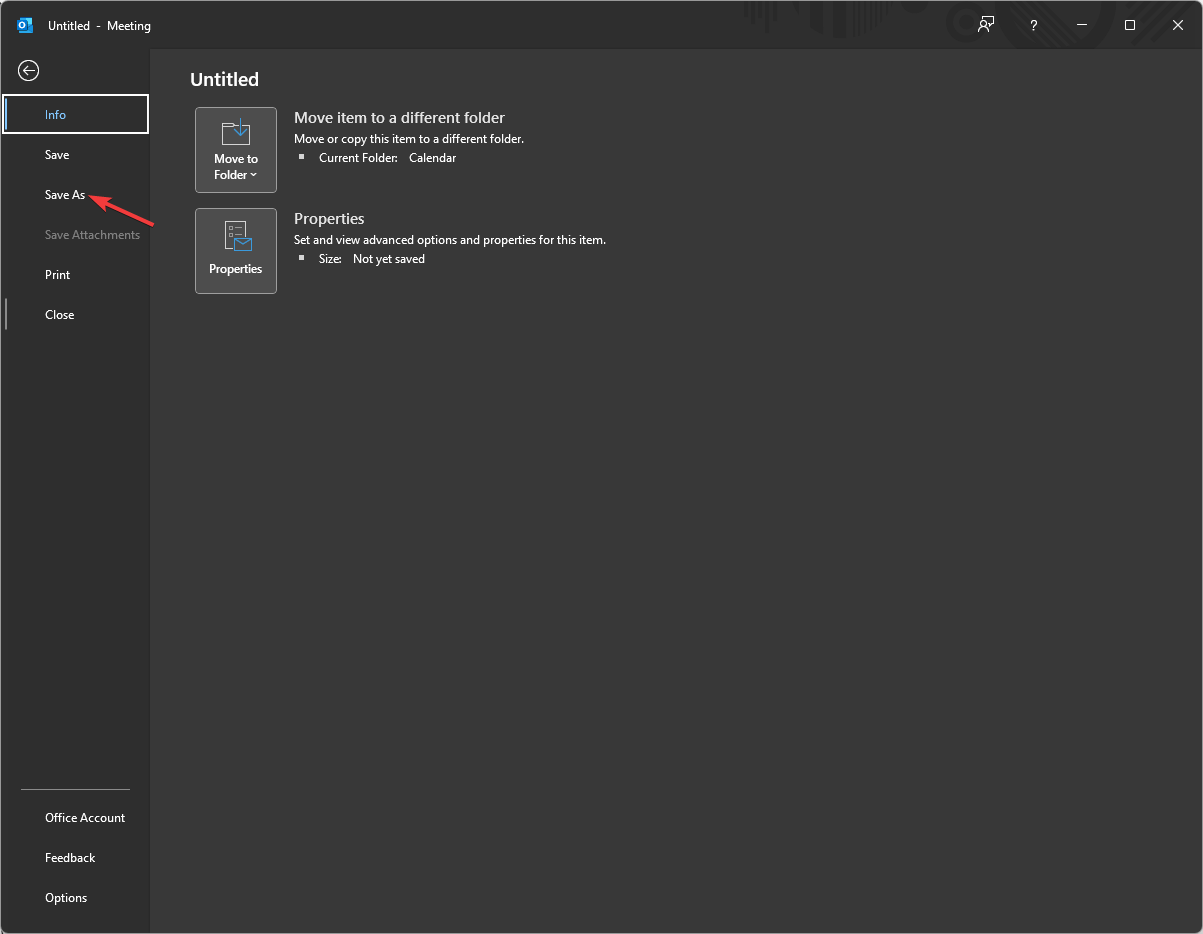
- In the Meeting window, enter the text in the body you want to send to decline a meeting invite and go to the File tab.
- Now click Save as.
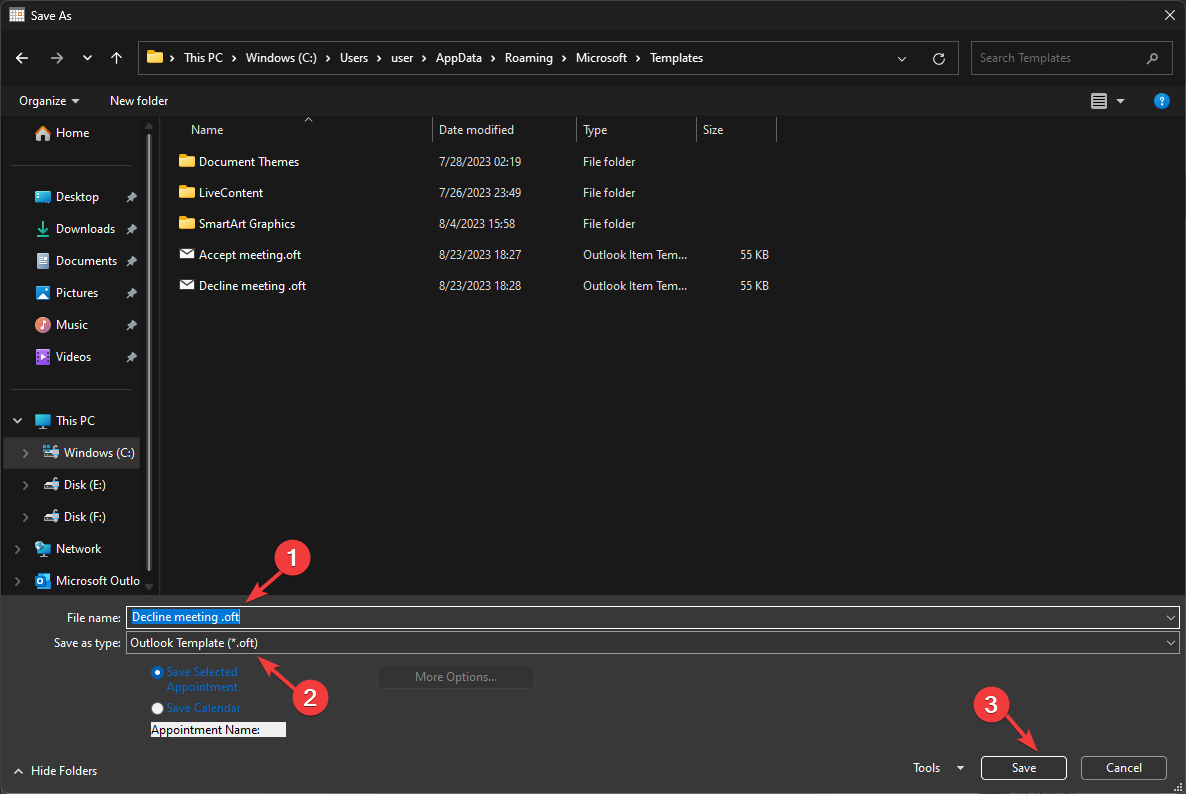
- On the Save As window, for Save as type, select Outlook Template (.oft), and for the File name, input a name and click Save.
Now that you have a customized template let us create a rule to decline the meeting.
- Launch Outlook and go to the Home tab.
- Click Rules, then choose Manage Rules and Alerts from the drop-down list.
- On the Rules and Alerts window, select New Rule.
- On the Rules Wizard dialog box, select Apply rule on messages i receive and click Next.
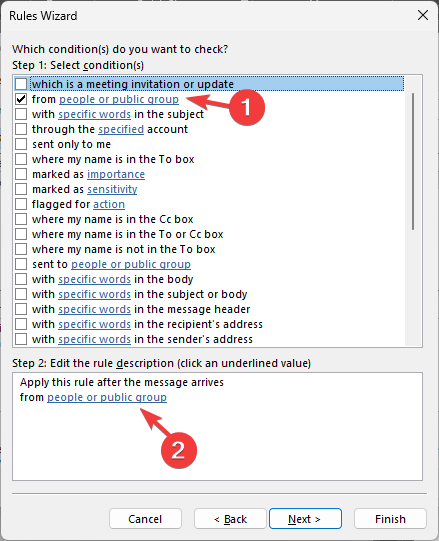
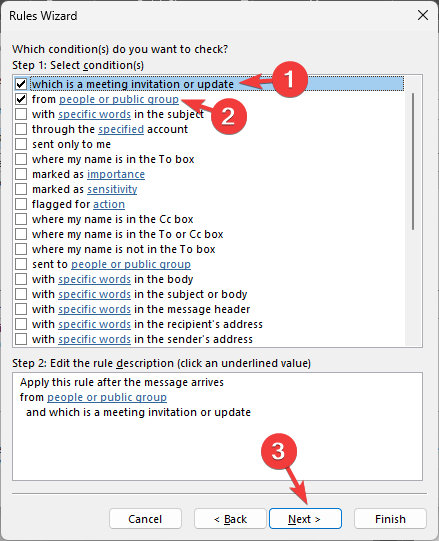
- From the Step 1 box, Select the from people or public group option, then move to Step 2, and click the people or public group hyperlink.
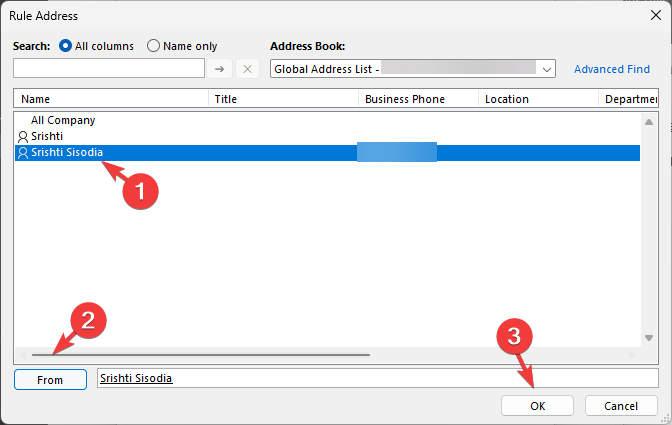
- It will open the Rule Address window; select the username whose meeting invite you want to reject, click From, and then OK.
- Now select which is a meeting invitation or update and click Next.
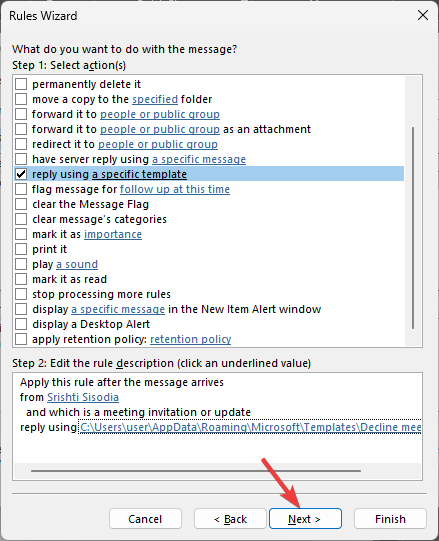
- On the following page, choose the reply using a specific template option from the Step 1 box and in Step 2, click the specific template hyperlink.
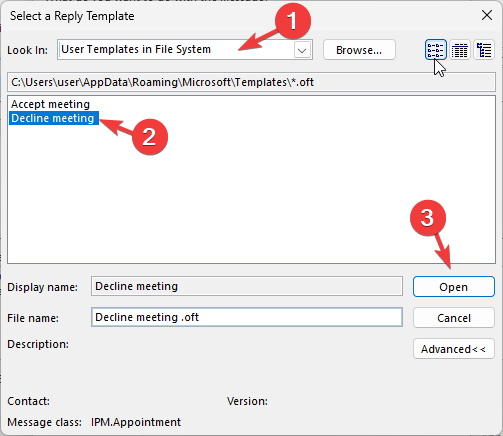
- On Select a Reply template window, for Look In, choose User Templates in File System; you will see the meeting response template in the box below. Select the one you created and click Open.
- Click Next, then click Next.
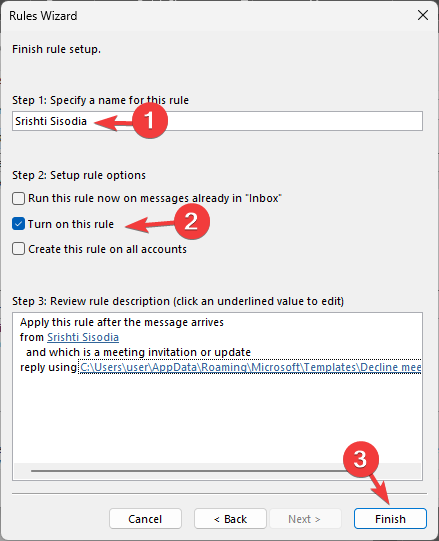
- Now name the Rule and click Finish.
Select Create this rule on all accounts if you want to respond automatically to meeting requests on the other email accounts.
3. Use a VBA script to reject multiple meeting invites
First, you need to add and save the script to VBA, here’s how you can do that:
- Launch Outlook, and on the main window, press Alt + F11 to open VBA.
- Go to Insert, and click Module.
- Copy & paste the following script to delete the meeting request in the module and press Ctrl + S to save it:
Function GetCurrentItem() As Object
    Dim objApp As Outlook.Application
    Set objApp = Application
    On Error Resume Next
    Select Case TypeName(objApp.ActiveWindow)
        Case "Explorer"
            Set GetCurrentItem = objApp.ActiveExplorer.Selection.Item(1)
        Case "Inspector"
            Set GetCurrentItem = objApp.ActiveInspector.CurrentItem
    End Select

    Set objApp = Nothing
End Function

Sub Decline_Meeting()
    Dim oAppt As AppointmentItem
    Dim cAppt As AppointmentItem
    Dim num_declines As Integer
    Dim oResponse

    Set cAppt = GetCurrentItem.GetAssociatedAppointment(True)
    Set oAppt = Application.CreateItem(olAppointmentItem)

    num_declines = InputBox(Prompt:="How many declines?", Title:="Decline It")

    If num_declines < 0 Then
        MsgBox "Nope."
    ElseIf num_declines > 40 Then
        MsgBox "Too far. Be nice."
    Else
        While num_declines > 0
            Set cAppt = GetCurrentItem.GetAssociatedAppointment(True)
            Set oResponse = cAppt.Respond(olMeetingDeclined, True)
            oResponse.Send
            num_declines = num_declines - 1
        Wend
    End If

    Set cAppt = Nothing
    Set oAppt = Nothing
End Sub
Now that you have saved the script, close the VBA window. To run the script, follow these steps:
- On the Outlook window, select the meeting invites that you want to decline, then press Alt + F8.
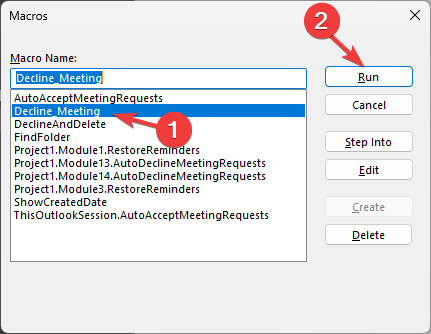
- You will get the Macros window, select the Decline_Requests module and click Run.
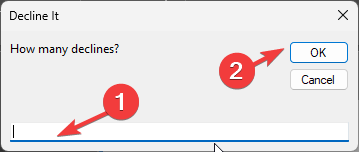
- On the next window, enter the number of declines and click OK. Here, enter the number of meeting requests you have selected.
If you are unavailable at the same time slot, the script will automatically decline the meeting but will not delete the email message from Outlook, so you can forward the meeting invite to someone to attend it on your behalf.
Also, to avoid back-and-forth emails about the meeting logistics, you can use Bcc to add the person to the meeting.
Automating the response for a meeting invite can increase your scheduling efficiency by letting you know which time slots are free, streamlining your workflow.
Tell us how auto-responding to the meeting request has helped you in the comments section below.

