How to Calibrate Laptop Battery Easily [3 Tested Methods]
Calibration is an easy solution to extend the life of your laptop's battery.
Key notes
- Below, you can find three simple ways for battery calibration in Windows 10.
- You can easily calibrate your laptop battery manually or by accessing the BIOS.
- We also recommend dedicated tools to rely on when it comes to battery lifespan.

A typical laptop battery becomes weakened over time. This is especially common to laptops that are used rigorously on a daily basis.
One key indicator of a weakening laptop battery is the discrepancy between battery life readings and actual battery life.
To correct this discrepancy and extend the lifespan of your battery, the simple solution is battery calibration. And we’ll be showing you how to calibrate laptop batteries in this article.
However, a weakened laptop battery (that has not been calibrated) could cause serious confusion.
For instance, on a typical laptop, the remaining battery life could read 2 hours, which, in actual sense, is only 30 minutes or thereabout.
Hence, while your laptop battery is showing you 2 hours remaining, you get stunned after only 30 minutes – when your battery suddenly drops to 10%, and eventually powers off.
To avoid such confusion and ensure accurate readings of battery life (on a laptop), the ultimate solution is to calibrate your laptop battery.
Follow this article, as the Windows Report team provides you with tips, tricks, and software solutions, which can be employed to calibrate Windows 10 laptop battery.
How do I calibrate the battery on my Windows 10 laptop?
Some high-performance laptops come with a built-in battery calibration tool, which can easily be used to calibrate a laptop battery.
However, a number (in fact majority) of laptop brands are not equipped with this calibration tool.
Nevertheless, there is no cause for worry, as there is a simple trick you can adopt to manually calibrate your laptop battery, and boost its lifespan.
There are three solutions that you can use to calibrate your laptop battery: manually, using BIOS, or using third-party software.
For convenience, we’ll be showing you how to execute this manual calibration, in the next section of this article.
1. Calibrate the laptop battery manually
1.1. Modify your power settings
- Navigate to the taskbar on your screen display, and right-click on Battery.
- Select Power Options.
- Under Power Options, select Change when the computer sleeps.

- Click on the Turn off the display drop-down menu, and select Never.
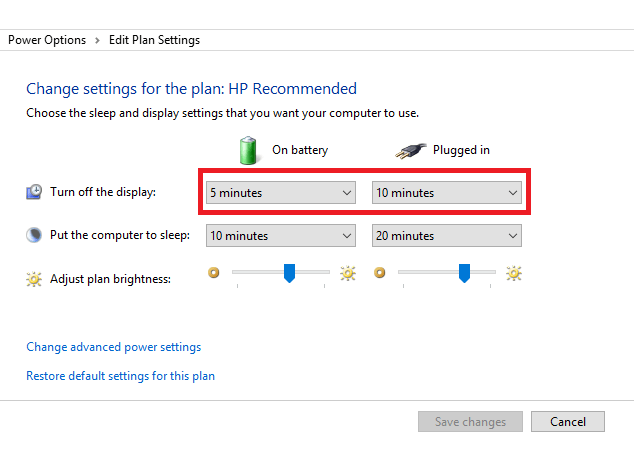
- Select the Put the computer to sleep drop-down menu, and choose Never.
- Press the Change Advanced power setting key.
- Click on the + (expand) symbol under Battery.
- Select the + (expand) icon under Critical battery action, and choose Hibernate.
- Click on the + icon (expand) under Critical battery level.
- Under On Battery, select Percentage.
- Set the percentage to a low value: 1% to 5%.
- Click Apply at the lower right-hand corner of your screen.
- Select OK, and Save Changes.
To manually calibrate a laptop battery, the first line of action entails changing the laptop‘s power settings.
At this point, you would be required to change the power settings. This will prevent your laptop from automatically going into sleep/hibernation/power saving mode, after a few minutes of inactivity.
Once you’ve changed the power settings as appropriate, move to the next stage.
1.2. Connect/Disconnect/Reconnect your charger
Connect the charger and power the battery until it is fully charged. Leave the charger plugged in (after the battery is fully charged) for a few minutes or hours (to enable it to cool down).
Remove the charger from your laptop and allow the battery to drain down (discharge). Once the battery is completely drained, your laptop will go into hibernation or completely power off.
Reconnect your charger, and charge the battery up to 100% again.
Note: You can use your computer during the recharging process, but it is better to leave it still.
1.3. Calibrate the battery
Once your laptop becomes fully charged, the manual calibration process is complete. Your laptop should now show normal battery life readings.
After the whole process, you can reset your laptop‘s power settings (back to the original settings), or if you like, you can leave it as it is.
1. Power off your laptop, and power it on again.
2. The boot menu will appear on the screen.
3. Enter theu003cspanu003e u003c/spanu003eu003cstrongu003eBIOSu003c/strongu003eu003cspanu003e u003c/spanu003eby pressing theu003cspanu003e u003c/spanu003eu003cemu003eF2u003cspanu003e u003c/spanu003eu003c/emu003ekey at the boot menu.
4. Using the keyboard cursor keys, select theu003cspanu003e u003c/spanu003eu003cstrongu003ePoweru003c/strongu003eu003cspanu003e u003c/spanu003emenu.
5. Navigate to theu003cspanu003e u003c/spanu003eu003cstrongu003eStart Battery Calibrationu003c/strongu003eu003cspanu003e u003c/spanu003esection.
6. Click on theu003cspanu003e u003c/spanu003eu003cemu003eEnteru003c/emu003eu003cspanu003e u003c/spanu003ekey. This action will change your screen background to blue.

7. Follow the on-screen command and plug in your laptop charger.
8. Once your laptop‘s fully charged (100%), disconnect the charger.
9. Allow the battery to discharge from 100% to 0% until it automatically powers off.
10. Reconnect the charger (do not boot your system while it is charging).
11. Once it’s fully charged, the calibration process is complete.
12. You can then unplug the charger and reboot your system.
2. Calibrate the laptop battery using BIOS
Some Windows laptops come with a pre-installed battery calibration program, which is embedded in their BIOS.rnrnIf your laptop has a built-in Battery Calibration program (in its BIOS), you can use it to calibrate the battery.
Also, if you encounter a corrupted battery prompt, you should address that quickly.
Seeing a low battery alert while the charger is connected? Get the complete fix in Laptop Low Battery Warning When Plugged In.
3. Calibrate the laptop battery with a third-party tool
There are special software solutions, exclusively designed for calibrating laptop batteries.
In this section of the article, we will be looking at two prominent battery calibration software that is compatible with Windows 10 laptops.
Battery management software can analyze and improve your battery. Many of these tools can give you comprehensive reports regarding the battery temperature, autonomy capacity, and more.
On top of that, you can set them up to help you optimize your settings for longer battery life. They can detect what process in your system is draining your battery the most and find quick and safe fixes for it.
AIDA64 is a popular hardware detection tool for Windows laptops that offers diagnostic functions and support for overclocking.
It can be employed to speed up the discharge process of a laptop battery and facilitate its calibration.
This software is compatible with all 32-bit and 64-bit Windows editions, including Windows 10 and Windows Server 2019.
Aside it is monitoring sensors in real time, it can also gather accurate voltage, temperature, and fan speed readings, while its diagnostic functions help detect and prevent battery issues.
No matter how strong your laptop battery is, it will eventually become weakened, with time.
The battery weakening process is gradual, such that you’ll hardly notice. At this point, battery life readings suddenly become inaccurate, throwing you into a state of confusion.
To prevent/avoid such a situation, you have to calibrate your laptop battery, preferably once every 2/3 months. And we have described, comprehensively, how to calibrate laptop battery in this article.
We hope you found these ways to calibrate your Windows 10 laptop battery useful. For more suggestions or other questions, feel free to visit the comments section below.
Read our disclosure page to find out how can you help Windows Report sustain the editorial team. Read more


Improve this guide


User forum
3 messages