No Option to Turn Off Bitlocker on Windows 11 [Fix]
Key notes
- BitLocker is natively built inside the Windows platform since Windows 8
- Windows 11 by default encrypts your drive to secure your data, but you can turn this off in a couple of simple steps
- BitLocker can be disabled from Settings, Control panel, or even with CMD or Powershell

Most people cannot turn off BitLocker in Windows 11 because they don’t know what it is and how to turn it off.
BitLocker is a feature that encrypts the hard disk, protecting the data and saving it from being stolen and hacked. It is built inside Windows since Windows 8 and is also available for Windows 10, Windows 11 Enterprise editions, Education, and Pro edition, but it is not available in the Home edition.
A BitLocker-encrypted drive can only be unlocked or decrypted with a BitLocker password or the BitLocker Recovery Key set when encrypting. And nobody can access it without proper authentication. BitLocker uses the AES encryption algorithm (Advanced Encryption Standard) with 128-bit or 256-bit keys to encrypt the data on the drive.
BitLocker is automatically enabled in Windows 11, and this can be an issue if you don’t know what you are dealing with. Keep reading to find out how to disable the BitLocker encryption.
What is BitLocker, and how does it work?
BitLocker is an encryption tool built for Windows that encrypts the system drive to protect the data from being stolen. BitLocker uses a hardware element known as TPM (Trusted Platform Module) and generates a recovery key for the encrypted hard drive to use every time you boot up your computer.
You will also be given recovery keys if you forget your password. These recovery keys should be saved somewhere safe to access them at any time in case your PC locks you out.
Why is BitLocker automatically enabled in Windows 11?
PCs with Windows 11 by default encrypt the drive automatically without your knowledge because Microsoft thinks this is best for their users. This means you can lose all your data if you don’t have the recovery keys saved.
Let’s imagine you are updating your PC, and your PC fails due to a flawed update or for some other reason. What you usually would do is you would take it to a PC repair shop recover your data, and copy it to another drive that can be used later when the PC has been fixed.
If your drive is encrypted and you don’t have the keys, there is no way to access and copy your data. While the Bitlocker helps secure your data, it can also pose a threat if you don’t have the keys.
 Tip
Tip
If you are looking to encrypt a particular folder, you should rather choose a Folder Lock application instead of encrypting it with the BitLocker.
Both BitLocker and Folder Lock applications have the same advanced encryption to secure your data. But each one’s purpose is different. The Folder Lock application only encrypts folders that you choose to encrypt, while BitLocker encrypts the whole drive.
⇒ Get Folder Lock
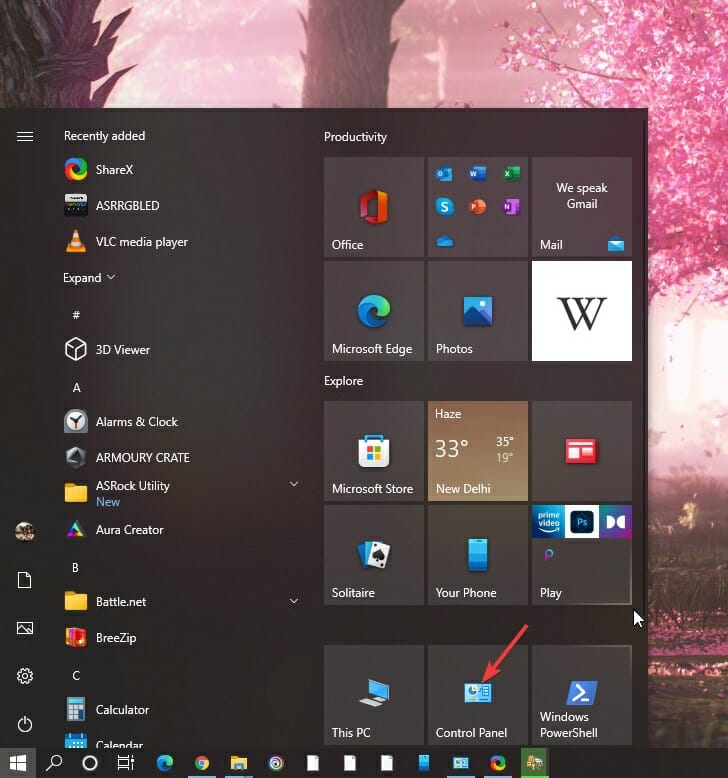
How can I turn off BitLocker in Windows 11?
1. Using This PC to turn off BitLocker
- Open This PC from the desktop or Start menu.

- Select and right-click on the drive you want to disable BitLocker.
- Click on the Manage BitLocker.

- Now, click on the Turn off BitLocker button.
2. Using the Control Panel to turn off BitLocker
- Open the Control panel from the Start menu.
- Select the System and Security option.
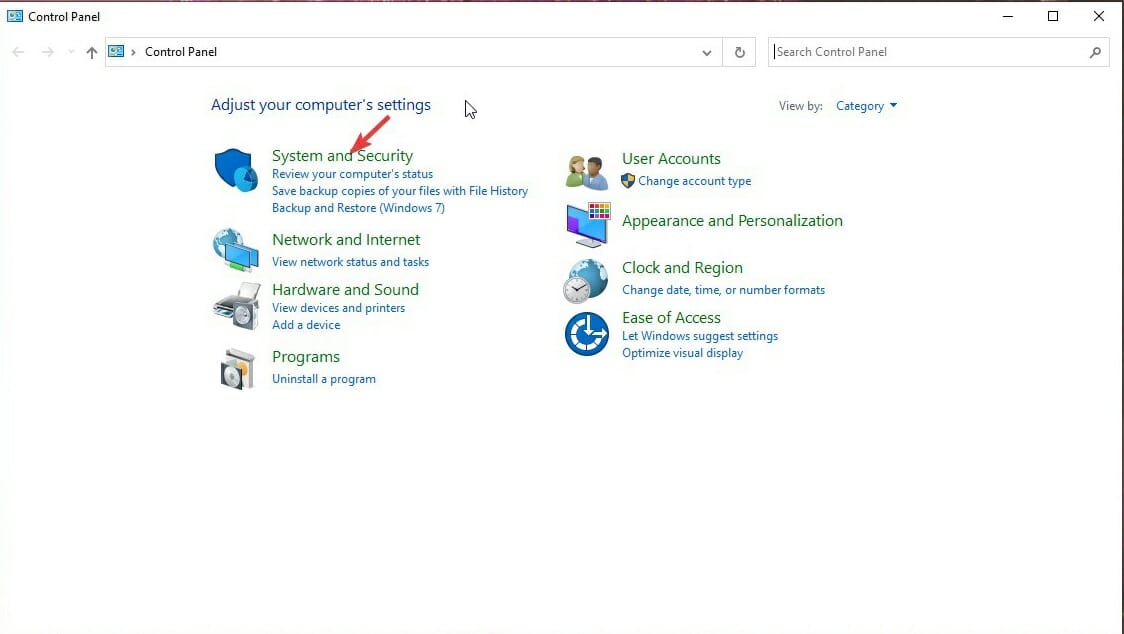
- Select the BitLocker Drive Encryption.
- Click on Turn off BitLocker.

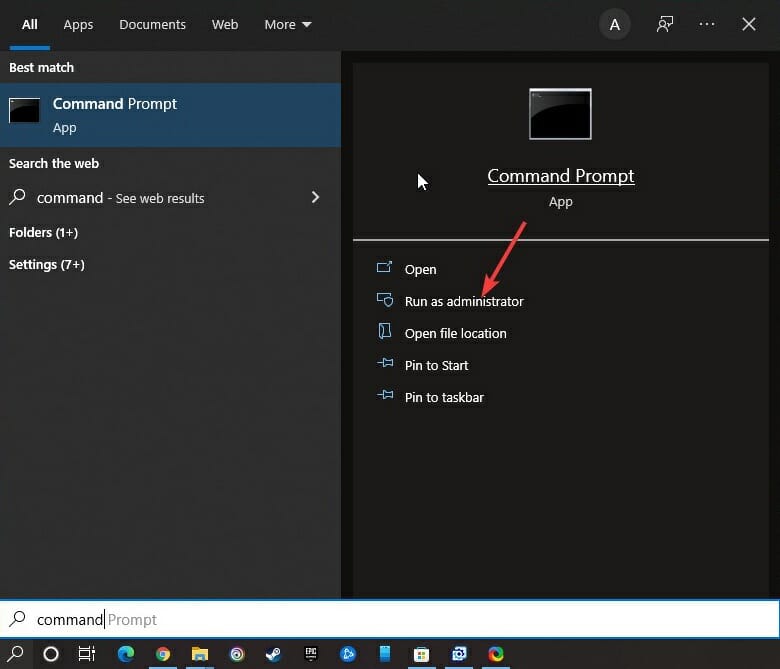
3. Turning off the BitLocker with Command prompt
- Click the magnifying glass (search box) in the taskbar.

- Search for Command prompt.
- Click on Run as administrator.
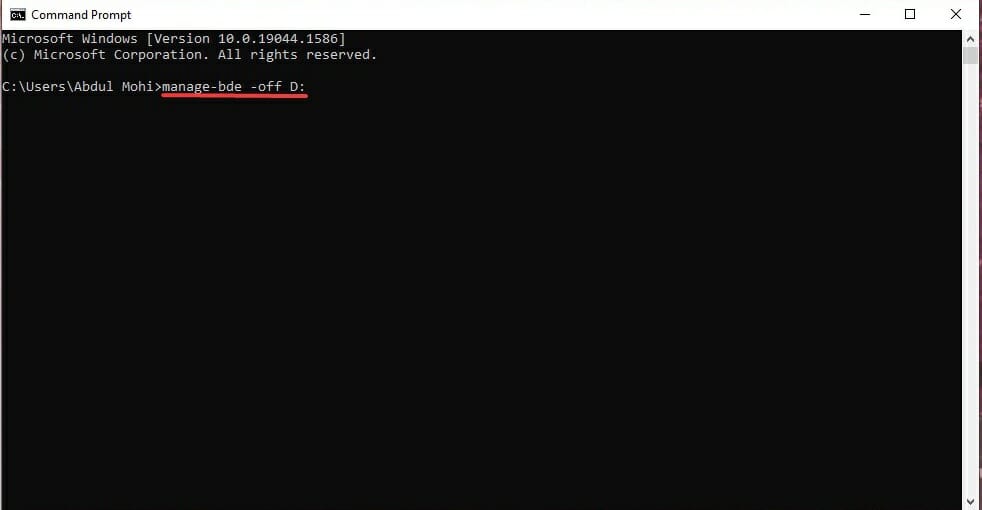
- Type manage-bde -unlock Drive-Name: -RecoveryPassword Recovery-Code to unlock the encrypted drive.
- To disable BitLocker, type manage-bde -off Drive-Name:
 NOTE
NOTE
4. BitLocker disable via using Windows Services
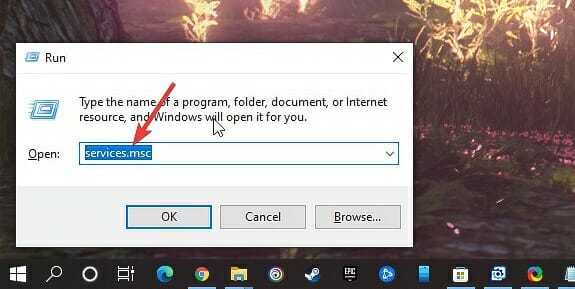
- Press the Win+R key.
- Type services.msc inside Windows Run and click on the Ok button.
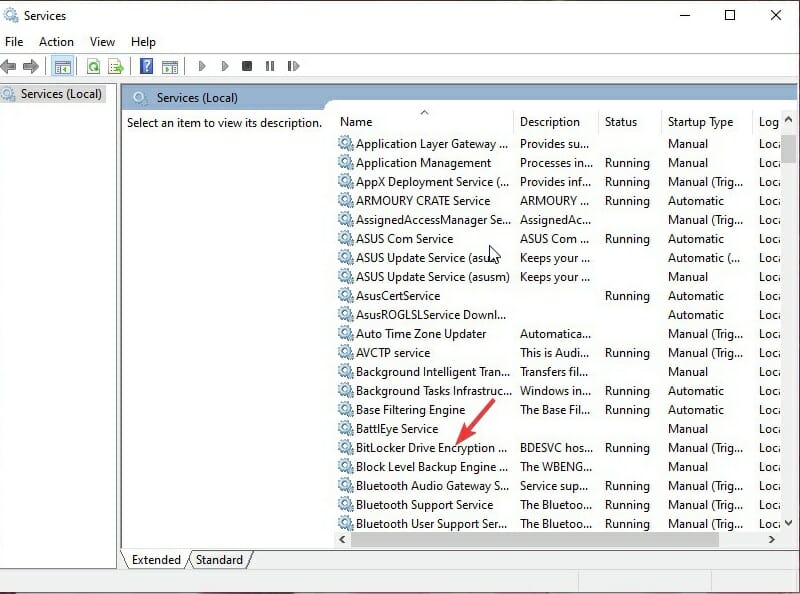
- Locate BitLocker Drive Encryption Service and double-click on it.
- Inside the pop-up window, select Disabled in the Startup type and click on Apply.
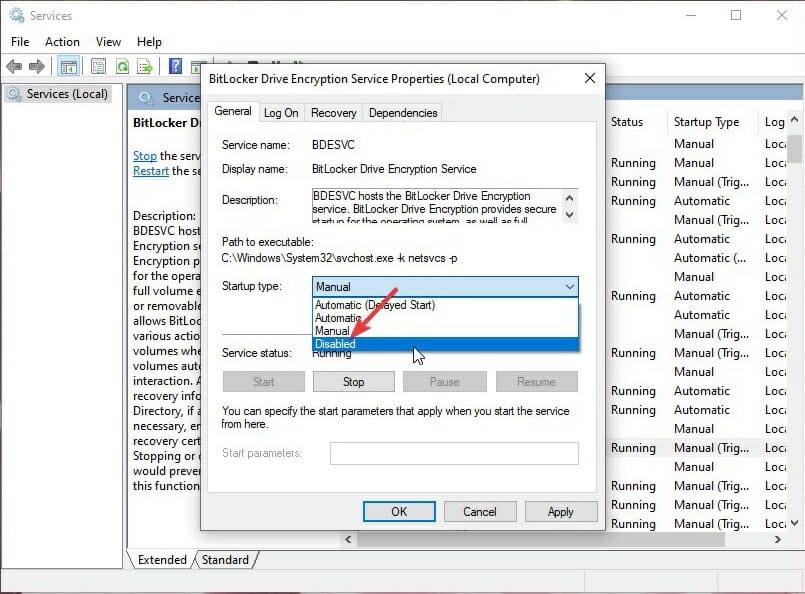
- Restart the computer for the changes to take effect.
5. Disabling BitLocker using System Configuration
- Press Win+R to open the run dialog box.
- Type msconfig and hit Enter.

- Click on the Services tab on the top bar.
- Untick BitLocker Drive Encryption Service and click Apply.
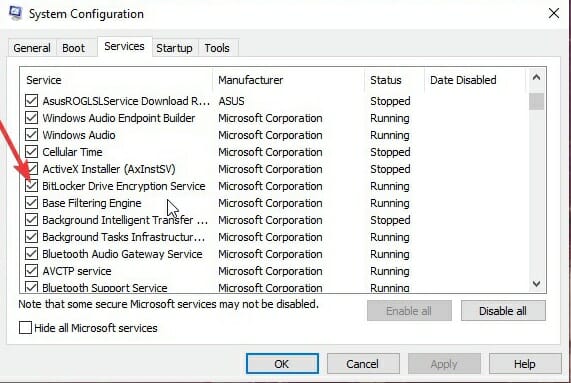
- Reboot your computer.
6. Turn off BitLocker with PowerShell
- From the Start menu, run PowerShell as an administrator.
- Using PowerShell, disable the BitLocker by typing the command Disable-BitLocker -MountPoint Drive_Name:
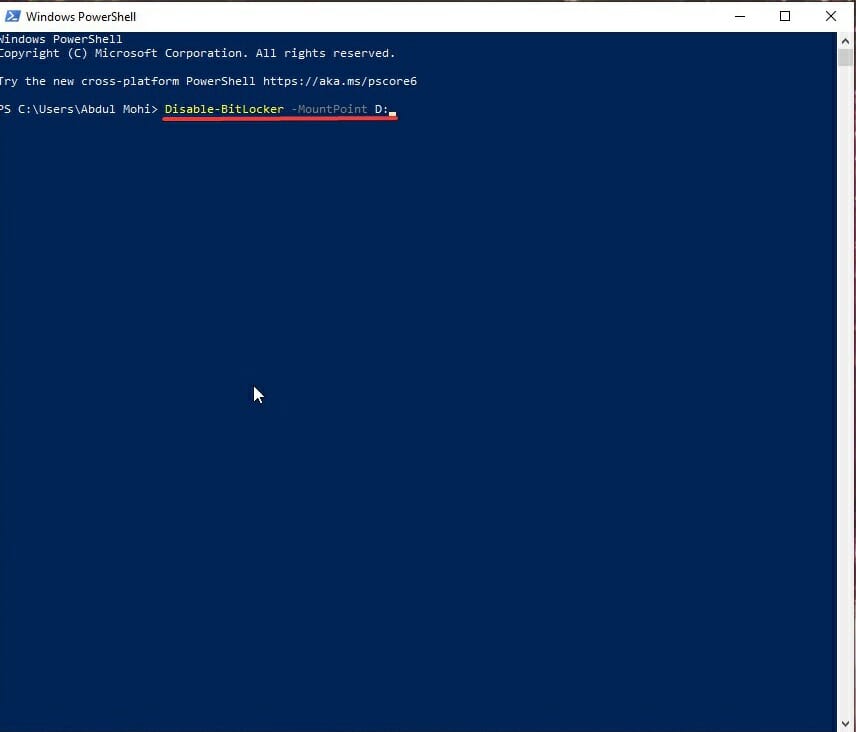
- Replace Drive_Name with the BitLocker encrypted drive’s drive letter.
7. Group Policy Editor to turn off BitLocker
- Type Group Policy Editor in the start menu and hit enter key.

- Go to the location: Computer Configuration > Administrative Templates > Windows Components > BitLocker Drive Encryption > Removable Data Drives.

- Double-click on the Control use of BitLocker on removable drives.
- Click on Disabled, and then click OK.
This policy setting controls the use of BitLocker on removable data drives. When you enable BitLocker, this policy is applied.
Users can use BitLocker on removable disk drives if this policy setting is not configured. Users cannot use BitLocker on removable disk drives if this policy setting is disabled.
8. Registry Editor to disable BitLocker
- Go to the Start menu.
- Open Registry Editor.
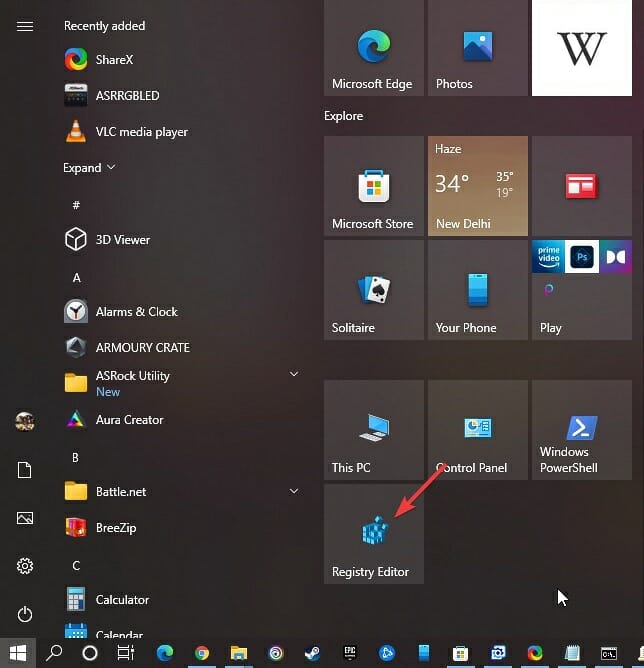
- Go to the following path: Computer\HKEY_LOCAL_MACHINE\SYSTEM\CurrentControlSet\Control\BitLocker

- On the right pane, right-click > click on the DWORD (32-bit) value and name it PreventDeviceEncryption.

- Open the DWORD value and set the value to 1 in hexadecimal format.

- Click on Ok
- Restart the computer
BitLocker is an encryption feature that comes baked inside Windows. It restricts your data from being accessed by unauthorized users. This feature can be helpful for journalists, entrepreneurs, or anyone who thinks they need strong encryption for their hard drive to protect confidential information.
Windows 11 automatically encrypts your data, and if you want your data to be accessible in case of any failure, disabling BitLocker is the way to go.
Also, note that BitLocker supports automatic unlocking, which comes in handy if you frequently forget your passwords.
If you have any other questions or suggestions, feel free to leave them in the comments section below, and we’ll be sure to check them out.
Read our disclosure page to find out how can you help Windows Report sustain the editorial team. Read more


Improve this guide


User forum
0 messages