Windows 11 Adaptive Brightness Missing: How to Enable it
Key notes
- Adaptive brightness is a neat feature that automatically changes the brightness of a display accordingly.
- However, the feature can be distracting, annoying, or in some cases, detrimental to work.
- This guide shows you multiple ways to turn off adaptive brightness if one way doesn't work.

Adaptive brightness is a feature on Windows 11 computers that adjusts the screen’s level of brightness based on what’s being shown or lighting conditions.
Because some users are still getting used to the new interface of Windows 11, they can’t find adaptive brightness with ease, and some even say that the adaptive brightness feature on Windows 11 is missing, so this guide will clear everything up.
For example, if you’re watching a YouTube video and the video suddenly shows a dark scene, adaptive brightness will make the screen brighter and increase the contrast level.
This is different from auto-brightness, which is a screen setting that causes the computer, smartphone, or device to adjust the level of brightness according to the ambient lighting.
There’s a special sensor in the front-facing camera that detects the light. Adaptive brightness uses machine learning to learn how you or a user adjusts the brightness level and change automatically if it ever encounters the same conditions again.
On Windows 11, it has a special name which is content-adaptive brightness control or CABC. Windows 11 computers are typically really good at adaptive brightness, changing to suit your needs.
It can even improve battery life, but sometimes you want to have further control of your computer’s brightness and turn off adaptive brightness.
Why would it be necessary to turn off or configure adaptive brightness?
Simply put, it can be kind of annoying and distracting. There’s also the issue with decreasing image quality on stuff that requires color accuracy. Graphic designers and artists need to have displays that accurately show off what they’re working on or else risk producing the wrong thing.

People who work with photo and video apps require the same level of accuracy. Now if you’re something who uses a desktop version of Windows 11, then batteries are not an issue for you. But if you have a laptop with Windows 11 as the operating system, do note that turning off adaptive brightness will drain the battery much faster.
This guide will show you how to turn off and adjust adaptive brightness on your Windows 11 computer. It will show you multiple methods on how to turn it off from going to the Settings menu or adjusting your graphics card. The guide will also mention how to turn it back on.
How do I configure adaptive brightness on Windows 11?
1. Changing via the Settings menu
- Click on the Start menu in the bottom left corner and click on the Settings icon.

- Click on the System tab on the left hand corner.

- Click Display in the System section.

- Under Brightness & color, adjust the brightness meter by moving the slide left or right.

- In some versions of Windows 11, there may be an option that reads “Automatically adjust contrast based on the display content to help improve battery.”
- If that option is there, click the box next to it to turn it off.
- Conversely, you can do the same by clicking on the battery icon in the bottom right hand corner to bring up the Quick Access menu.

- In the Quick Access menu, adjust the brightness level by moving the slider just like in the Settings menu.

2. Configuring via Power & battery
- Open the Settings menu by clicking on the icon in the Start menu.

- Under the System tab, click on Power & battery.

- Under the Power & battery section, click Battery saver to make the drop down menu appear.

- Click the menu next to Turn battery saver on autimatically at and select a lower percentage for when adaptive brightness kicks in.

- Or if you want it completely off, toggle the switch to turn off Lower screen brightness when using battery saver.

How can I turn off adaptive brightness on Windows 11?
If you find that you can’t turn off adaptive brightness on Windows 11 for any reason, the steps below will ensure that you manage to do so successfully, so make sure to follow the steps exactly.
1. Disable via Registry Editor
- Click on the magnifying glass icon to bring up the search bar.
- Search for the Windows 11 Registry Editor.

- Click on the first entry you see.
- In Registry Editor, click on HKEY_LOCAL_MACHINE.

- Click SOFTWARE.

- Under SOFTWARE, locate and click on the entry of your computer’s graphics card. In this guide, Intel is the processor being used.

- Click on Display.

- Click igfxcui to bring down another menu.

- Select MediaKeys and a bunch of entries appear on the right.

- Locate ProcAmpBrightness.

- Right-click to bring up a menu. Select Modify.

- Set the Value data to “0”.

- Click OK and then close the Registry Editor.

- Restart your PC.
2. Disable via the Intel Graphics Command Center
- Click on the magnifying glass icon and search for the Intel Graphics Command Center.
- Click the first entry that appears.

- In the Graphics Command Center, select System on the left hand side menu.

- In the System section, click on Power in the top menu bar.

- In the Power section, go to the Power Settings.
- Make sure that Display Power Savings is turned off. If it’s on, click on the toggle switch to turn it off.

3. Disable via the Control Panel
- Bring up the search bar and search for the Windows 11 Control Panel.
- Click on the first entry that appears.

- In the Control Panel, click on View by.

- Select Large icons.

- In this new window, select Power Options.

- Select Change plan settings in the middle of the window next to Balanced (recommended). Or you can create your own power plan.

- Click Change advanced power settings.

- In the new small window, scroll down and locate Display.

- Click the plus sign to bring down the menu.

- Click on Enable adaptive brightness.

- Click on On next to Settings, if on desktop. For laptop owners, it’ll say On battery and Plugged in.

- Select Off in the drop down menu to turn off adaptive brightness.

How can I make my interaction with my Windows 11 computer even easier?
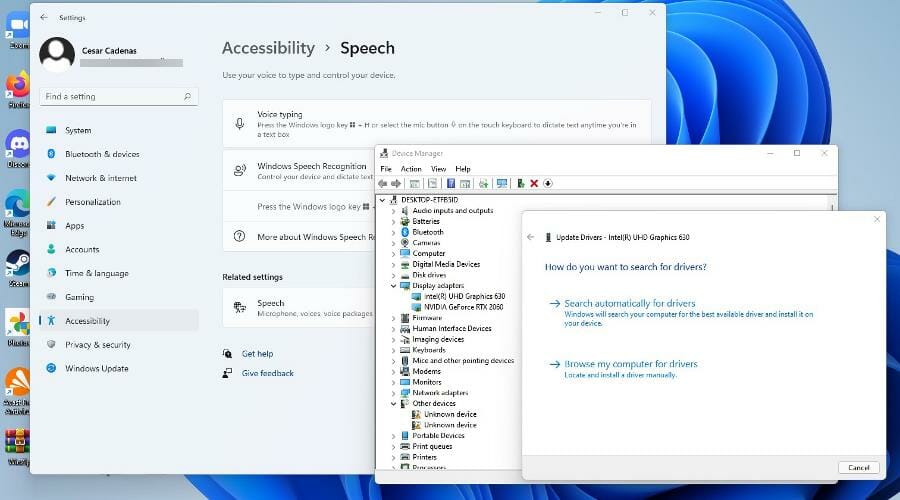
An interesting feature that you may not be aware of is text-to-speech and voice recognition on Windows 11. They’re tools that allow you to use your very own voice to write, and this can be useful if you’re someone who struggles with getting their thought down on the screen.
Writer’s block is a terrible thing to deal with as a writer and something like voice recognition can help you. Conversely, if you want a tool that helps guide you through steps or you can’t see the screen well, then text-to-speech is fantastic.
If you’re a big PC gamer, then you should learn how to update your graphics drivers, which are the software that allows your computer to use the GPU.
A lot of modern video games require the best possible standards to play them and set a high bar for system requirements. Performance boosts and new features are often included in driver updates, so if you want to stay good at Call of Duty, download them.
Read our disclosure page to find out how can you help Windows Report sustain the editorial team. Read more


Improve this guide


User forum
0 messages