Fix: Core Isolation Page Not Available on Windows 11
Quick ways to enable core isolation on Windows 11
Key notes
- Core isolation is a security feature that protects against certain types of ransomware. When enabled, it prevents processes from tampering with other processes' data.
- This makes it more difficult for hackers to install or run programs on your computer without your knowledge.
- The feature is not available in every version of Windows so ensure your PC meets the minimum system requirements.

Core isolation is an additional security feature in Windows 11 that adds an extra layer of protection. Although Windows Defender has its own set of features that make the OS secure, Core isolation offers more. However, you may find that the core isolation page is not available in Windows 11.
With core isolation enabled, if a malicious program tries to take over your system by exploiting a vulnerability in Windows, it won’t have access to other parts of the operating system, such as your files or network connections. Given its importance, let’s look at how to enable it.
Why is Core isolation page not available?
To use Core isolation, you need to upgrade your device to a newer version of Windows. You already know the stringent system requirements for Windows 11, so if your device doesn’t meet them, this feature will be unavailable.
Although you may be able to bypass some of the system requirements and install Windows 11 on unsupported devices, some of the consequences are missing out on critical features, such as the Core isolation page not being available.
Some of the must-have features include:
- TPM – TPM stands for Trusted Platform Module. It’s a hardware chip that acts as a computer’s central security system and uses encryption to protect data stored on your hard drive and other devices connected to your computer. It also has its unique keys embedded in the hardware that allows you to access your PC without relying on passwords or other authentication methods.
- UEFI – UEFI can be seen as a replacement for legacy BIOS functionality. It offers a more secure way to boot your Windows computer than booting in legacy mode. Legacy mode is the old style of BIOS.
- Secure boot – Secure Boot is a security feature that helps prevent malicious software from modifying the boot process. The secure boot mechanism can be used to verify that an operating system is authentic, and it can refuse to load an operating system if it isn’t signed by a trusted certificate authority, such as Microsoft.
- DEP – DEP is an important security feature in Windows. It helps protect your PC by preventing the execution of code that runs in the memory reserved for the kernel, the core of the operating system.
How do I enable Core isolation in Windows 11?
Before you enable Core isolation, ensure you do the following first:
- Verify that your PC meets the minimum system requirements for running Windows 11.
- Check that you have enabled both TPM and Secure Boot. Sometimes, your TPM cannot be detected.
- Ensure your drivers are up-to-date.
- Enable virtualization on your PC if it is disabled on your motherboard BIOS.
- Update your OS to the latest version available.
1. Use Windows Security
- Hit the Windows key, type Windows Security in the search bar, and click Open.

- Navigate to Device security on the left pane.

- Next, select Core isolation details on the right.

- Go to Memory integrity and toggle it On.

If you want to disable the feature, go through the same steps, but this time, toggle Off Memory integrity. In case memory integrity is greyed out, check out our article on how to fix it.
2. Use Windows Registry
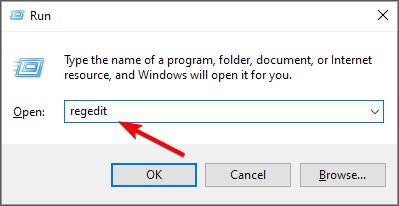
- Hit the Windows + R keys to open the Run command.
- Type regedit in the dialog box and hit Enter.
- Navigate to the following location:
HKEY_LOCAL_MACHINE\SYSTEM\CurrentControlSet\Control\DeviceGuard\Scenarios\HypervisorEnforcedCodeIntegrity - In case HypervisorEnforcedCodeIntegrity is not available, right-click on Scenarios, select New Key, and rename it as HypervisorEnforcedCodeIntegrity.
- Also, proceed to do so on the right pane by right-clicking on a space and select New DWORD (32-bit) Value and name it as Enabled.

- Double-click on Enabled, and under Value data enter 1, then click OK to save changes.

- Restart your PC. To turn off Core isolation, simply change the Value data to 0 and save the changes.
The registry is a vital part of Windows, and editing it can cause serious problems if you don’t know what you’re doing. If you make a mistake, you could end up with a corrupted registry and lose data.
This is why it’s strongly recommended that you back up your computer before making any changes to the registry.
Should I turn on Core isolation in Windows 11?
Core isolation and Memory integrity protection are two security features that have been available on recent versions of Windows.
While these features can provide added protection for your system, they are not enabled by default because enabling them may degrade system performance. In addition, there are some cases where the features do not work properly or cause problems.
Still, there are convincing reasons why you should enable Core isolation in Windows 11:
- An extra layer of protection – Memory Integrity helps reduce the risk of a memory corruption attack. It ensures that all changes to memory are validated before they are committed.
- Block unwanted connections between processes or applications – This prevents unwanted connections between processes or applications. In turn, it reduces the risk of data theft or corruption if one process becomes corrupted or damaged by a virus or malware infection.
- Prevent malicious software from accessing/modifying protected files – Core isolation also isolates the app’s memory space so that it doesn’t share memory with other processes on your device. This helps prevent any malware from accessing sensitive data stored elsewhere.
Hopefully, your Core isolation page is now back up if it was unavailable. If your PC didn’t cut, we have an awesome recommendation for Windows 11 PCs that you should consider.
Also, check out some of the best Windows 11 security settings you need to enable on your PC to keep your system protected. For an additional layer of protection, we recommend installing third-party antivirus.
That’s all we had for this article, but keep us engaged by sharing any thoughts you may have in the comment section below.
Read our disclosure page to find out how can you help Windows Report sustain the editorial team. Read more


Improve this guide

User forum
0 messages