How to Fix Creative Cloud Desktop High CPU Usage [3 Ways]
![]() 3 min. read
3 min. read
![]() Updated on
Updated on
Share this article

Improve this guide
Read our disclosure page to find out how can you help Windows Report sustain the editorial team Read more
Adobe’s Creative Cloud is a proprietary platform off of which you can download, install, manage, launch and uninstall Adobe products. This means everything from Photoshop to Lightroom, all from one unique platform.
When you first install it, it will sit idly in the background, performing routine checks to see if the programs you have are of the latest version or not.
However, it would seem that some users are having issues with the Adobe Creative Cloud. They have been reporting on forums that the desktop app is sometimes using a lot of CPU resources, even when it is simply sitting idly.
The CPU usage is 113% mainly due to creative cloud -> Adobe Service Desktop.exe. This has been so for almost half an hour, but when I stop the service, CPU usage drops immediately. When I restart the computer, nothing changes, high CPU usage again.
As far as users describe the issue, even high-end PCs seem to be having this problem.
That is why we’ve made this step-by-step guide so that you can work on your PC efficiently, without Creative Cloud taking up all of your CPU resources.
How can I stop Creative Cloud from using too much CPU?
1. Disable font syncing and file syncing
- Open Creative Cloud
- Go to the Preferences Panel
- Select the Creative Cloud tab
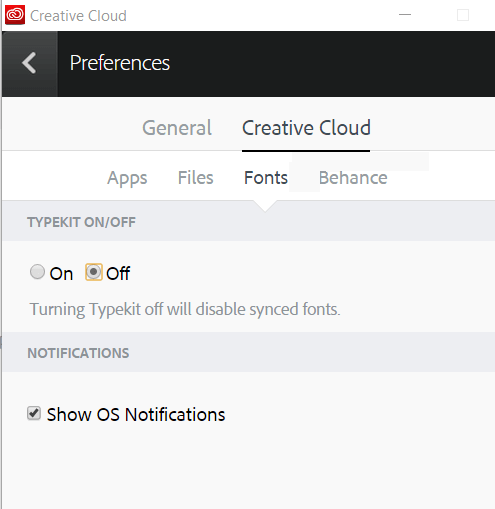
- Go to Fonts
- Right under TYPEKIT ON/OFF, select Off

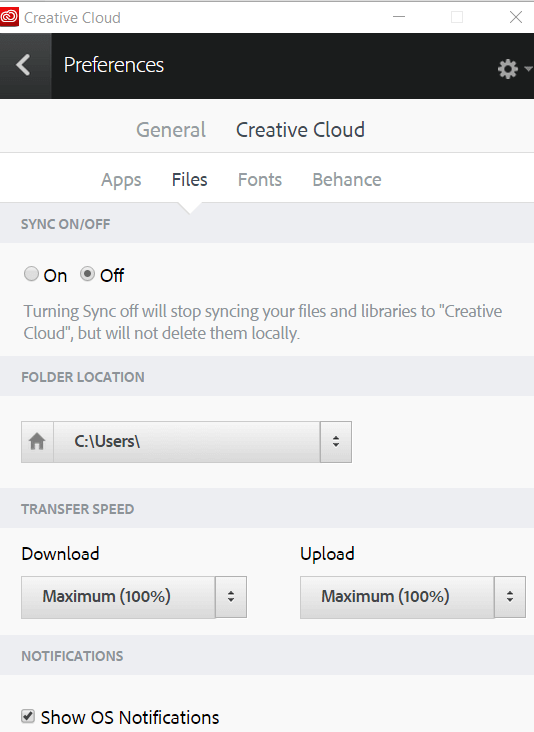
- Go to the Files tab
- Right under SYNCKIT ON/OFF, select Off

- Confirm the changes
- Restart the PC
2. Suspend any antivirus program running in the background
Since suspending an antivirus program varies from product to product, please go to the antivirus developer’s website for more information on the matter.
3. Uninstall and reinstall Adobe’s Creative Cloud apps and then Creative Cloud itself
3.1. Uninstall Adobe’s Creative Cloud apps
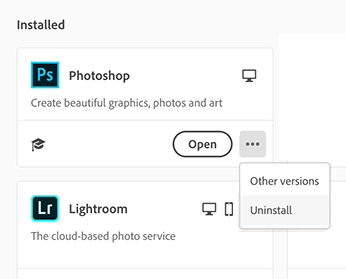
- Click the Creative Cloud icon in your taskbar
- Go to the Apps tab
- Click on the More icon (it looks like three horizontal dots)
- Click on the app you want to uninstall, and choose to Uninstall
- Follow the on-screen instructions for each app
3.2.Uninstall and reinstall Creative Cloud
- Download the official Creative Cloud Uninstaller
- Extract the archive
- Run the uninstaller
- Follow the on-screen instructions
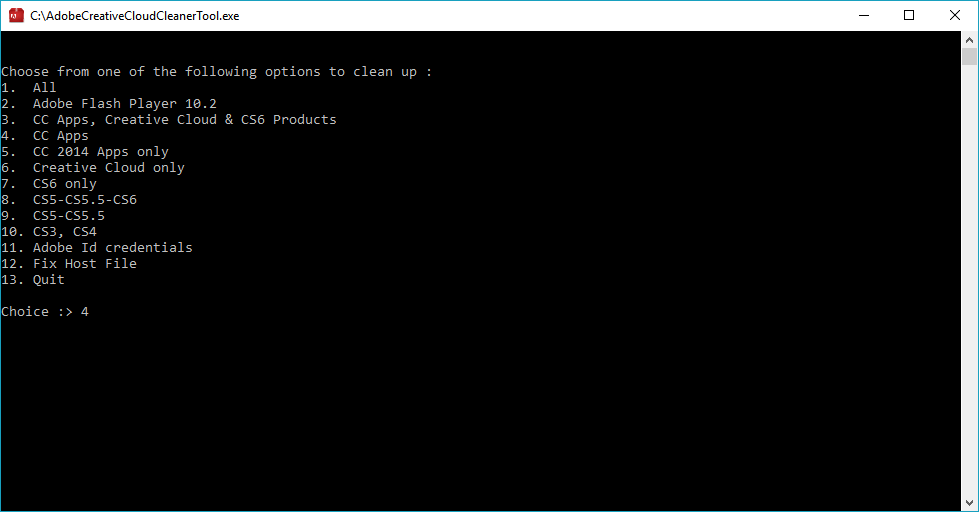
In order to make sure you don’t have any leftover data left, you will need to use the Adobe Cleaner.
- Download the Adobe Creative Cloud Cleaner Tool for Windows
- Right-click it when it is finished downloading
- Select Run as Administrator
- Follow the on-screen instructions

- Restart your PC
- Reinstall the Creative Cloud
By following these steps you should be able to stop Creative Cloud from using too much CPU.
Did you find this guide useful? If so, let us know if it helped you in the comment section below.