7 ways to fix CtHelper.exe high CPU issues on Windows 10

7 methods to fix CtHelper.exe high CPU usage
- Disable CtHelper.exe auto-start function
- Use MalwarebytesAdwcleaner
- Clean up computer with “cleanmgr” (Disk Cleanup)
- Use System Restore
- Run SFC scan
- Install the latest Windows updates
- Uninstall & Reinstall CtHelper.exe’s Creative Sound Blaster
If you are having the issue of CtHelper.exe high CPU on your computer, this article is for you. CtHelper.exe is an executable computer file, installed alongside Creative Sound Blaster (a sound card) which is a product of Creative Technologies, a renowned digital solution company that specializes in the production of computer sound and video boards.
What is CtHelper.exe?
The file is an essential third-party component of computer’s audio system, especially on Mac and a host of Windows versions. It is also an automated process that runs in the background.
Is CtHelper.exe a virus?
CtHelper.exe is often misconceived by many as a virus. However, the file is not a virus; rather, it is an utility file. Nevertheless, various forms of malicious contents are known to attack computers, ranging from malware to trojan to spyware. These files often adopt similar name and file size as CtHelper.exe on your computer system (especially on Windows). As such, it could cause significant damage to your computer, in the guise of being a CtHelper.exe file.
In light of the foregoing, malicious files can result in the “Cthelper.exe high CPU” issue, by building up irrelevant entries on the file, which use more CPU space.
While CtHelper.exe file is normally harmless, it exposes computer systems to a host of errors and external attacks, ranging from malware attack to the more significant high CPU error, which can affect the overall performance of a computer system.
In this article, we have compiled some solutions, which can be adopted to fix the issue of “CtHelper.exe high CPU” and other related errors on your computer.
- READ ALSO: 5 best tune-up utilities for Windows 10
Aside the more significant CtHelper.exe high CPU issue, there are other CtHelper.exe errors, which can disrupt the overall performance and functionality of your system. Some of these errors include:
- CtHelper.exe failed
- CtHelper.exe application error
- CtHelper.exe Not found
- CtHelper.exe is not running
- Cannot find CtHelper.exe
Some of the above outlined errors are caused by corrupt CtHelper.exe Windows affiliate programs, incomplete installation of Sound Blaster, malware or trojan attack and more.
However, as emphasized above, the most notorious of these errors is the CtHelper.exe high CPU issue. You can try the methods listed below to fix it.
How to fix CtHelper.exe high CPU issues
Method 1: Disable CtHelper.exe auto-start function
Cthelper. exe is notorious for dominating a computer’s CPU space. It basically utilizes CPU in excess, and most times, it runs your CPU up to full capacity (100%), thereby inundating your system. To fix this issue and reduce CPU usage, you need to remove the automation capability of the file by disabling it from starting on boot. To do this, follow the steps below:
- Boot up your computer system, navigate to the “Start” menu and open it.
- Under the menu, select “Run”.
- Type in “msconfig” (system configuration utility) in the space provided and click enter.
- Navigate to the “Startup” bar and click on it.

- Under the options brought forth, locate the CtHelper.exe checkbox.
- Clear the checkbox
- Press “OK” and exit the utility configuration program.
- Restart your system and you are all set.
Upon restart, the CtHelper.exe will not start with your computer and you can rest assure that there will be no unnecessary build up on your CPU.
- READ ALSO: Fix: csrss.exe high CPU usage in Windows 10
Method 2: Use MalwarebytesAdwcleaner
MalwarebytesAdwcleaner is one of the most reliable malware cleaning tools for Windows. It can be adopted to detect and remove malwares disguising as CtHelper.exe from your system.
Follow the steps outlined below to run the program on your computer system.
- Download malwarebytesAdwcleaner and install it on your system.
- Open the program by right-clicking the icon and selecting the “Run as Administrator” option.
- Select the “Scan” option to commence the scanning operation.
- After the scan, select the “Clean” option
- After the clean up, shut down your system and restart it.
The above outlined process should clear any malware on your system, including the one affecting your CtHelper.exe file. Nevertheless, you can try a host of other malware clearing tools like Emsisoft, CCleaner, and others.
Clearing malicious contents on your computer system would normally increase the operability of your system. However, accumulated non-malicious junk files and programs would still be present and this could, in a way or another, result in the CtHelper high CPU issue. Hence, it is recommended you clean up your system.
Method 3: Clean up computer with “cleanmgr” (Disk Cleanup)
Accumulated files and programs could be a pain in the ass. Most of these are usually retained or left over files from web browsers, system or installed apps. If this log of unsolicited files is left to build up, it can disrupt the operability of CtHelper.exe.
With this, the file uses more CPU space than normal, thereby resulting in CtHelper.exe high CPU issue. The in-built tool for cleaning up system log is “Disk Cleanup“.
Follow the steps below to run the Disk Cleanup (cleanmgr) program.
- Boot up your Windows device and click on the “Start” button.
- Type “cleanmgr” in the displayed box.

- On the pop up checkbox options, check the boxes of files you want to clear
- Tap “OK”
- Restart your system
— READ ALSO: Fix: High CPU temperature in Windows 10
Method 4: Use System Restore
If the CtHelper.exe file on your device is occupying excessive CPU space or it encounters other errors, you can easily restore your computer system to an earlier settings.
This will clear recent files and modifications, and restore your system to when everything was working perfectly. This is essentially a Windows function, and you can run it on all Windows devices, ranging from Windows XP to Windows 10.
Follow the steps below to execute the system restore process on your computer system.
- Open your computer.
- Navigate to the “Start” button and click on it.
- Enter “System Restore” in the search box.
- Select “System Restore” on the pop up results.

- Input your password
- Follow the guidelines in the “Wizard”
- Select “Restore”
This action will set your system back to an earlier time, and every unwanted latest files would be cleared. This would, no doubt, reduce your computer’s CPU space.
Method 5: Run SFC scan
SFC is a Windows tool, designed to assist you in scanning corrupt files on your system. As such, SFC is able to check for CtHelper.exe errors, including excess CPU usage.
Follow the steps below to run a system file check.
- Power up your system and click “Start”.
- Input “command” in the provided space. Don’t press enter yet.
- Press Ctrl+Shift and Enter, simultaneously
- Select “Yes” in the pop up dialog
- Type “sfc/scannow” in the open box and click “Enter”.

- Wait (the scan often takes a few minutes).
- Follow the command prompt after the scan
- Restart your system.
The system checker will scan your computer’s CtHelper.exe file and other programs for errors. Any detected error is fixed and automatically restored by the SFC tool.
You can also try the next method, if this one doesn’t work for you.
Method 6: Install the latest Windows updates
Windows is regularly updated by Microsoft, and the primary function of these updates is to improve the overall performance of computers. In this case, installing the latest update could be the ultimate solution to the CtHelper.exe high CPU issue and other related errors.
Follow the steps below to check for updates and install them on your Windows computer systems.
- Open your computer and locate “Start”.
- Click on the “Start” button and locate “Windows Update” or you can simply search for the keyword – Windows Update.

- This will reveal to you if there is any available update. If update is available, select “Install Updates” and wait for it (it takes a few minutes).
- Your computer would automically restart upon successful installation.
If the above method is unable to fix CtHelper.exe error and reduce the file’s CPU usage, you can then adopt the next (last) solution.
Method 7: Uninstall & Reinstall CtHelper.exe affiliated program – Creative Sound Blaster
If, after exhausting all available options, you are still battling with the issue of CtHelper.exe high CPU and other related errors, you can try uninstalling & reinstalling the CtHelper.exe-affiliated program.
Note: Procedures for uninstalling programs differ across Windows boards. As such, each Windows version has its specific means of running this operation. For convenience, we’ll stick with Windows 7.
To uninstall the Sound Blaster on Windows 7, follow the steps below.
- Open computer and click “Start”
- Tap on “Control Panel”
- Select “Programs”
- Select “Programs and Features”
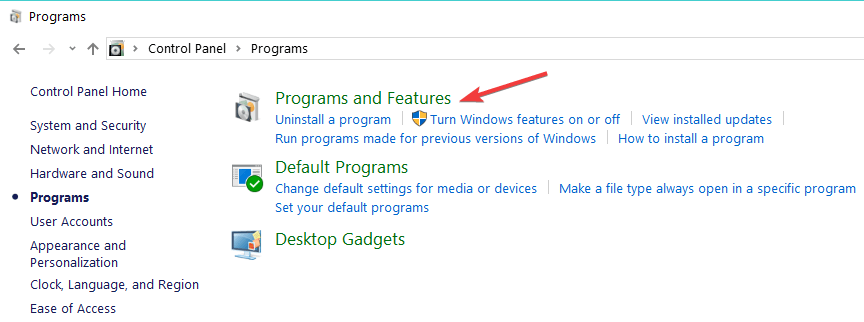
- Locate the CtHelper.exe file proprietary program (Sound Blaster).
- Click on the program and select “Uninstall”.
- Follow the command prompt to complete installation
- Reinstall the program
Conclusion
CtHelper.exe is a utility file, which is an associated function of Sound Blaster; an essential component of a computer’s audio system. The file is known to occupy significant CPU space, which could run up to 100%. This is the basis for the CtHelper.exe high CPU issue.
This post has provided a total of eight solutions, which can be adopted to solve the CtHelper.exe high CPU issue and other related errors on your computer. Depending on your system specs, one or more of the solutions should work for you.
RELATED STORIES YOU NEED TO CHECK OUT:
Read our disclosure page to find out how can you help Windows Report sustain the editorial team. Read more


Improve this guide


User forum
0 messages