5 solutions to fix high CPU usage in Safe Mode
5 min. read
Updated on
Read our disclosure page to find out how can you help Windows Report sustain the editorial team. Read more

Fix high CPU in Safe Mode with these solutions
High CPU usage is a common problem on the Windows platform. On the previous iterations, it was mostly caused by certain system processes, especially flawed Windows Update process. However, they’re usually not present in the Safe mode, where only the essential services and drivers are starting with the system.
But, based on some reports, this isn’t the case for some users. They’ve experienced high CPU usage even in Safe mode.
Since we’re probably looking at a grave system issue, there are some advanced troubleshooting steps you’ll need to take. The list is below so give them a shot and tell us whether they helped you or not.
What to do if CPU is at 100% even in Safe mode
Solution 1 – Check the hardware
Let’s start with the hardware. If the problem was present only during the normal startup, we would completely focus attention towards the software. However, since it appears in the Safe mode, the mode where only the essential drivers and applications are loaded, we must encourage you to inspect hardware as well.
First, make sure that everything is properly connected, that your CPU or GPU aren’t overheating. Make sure to remove and plug-in RAM cards in their respective slots. Also, if you’ve changed your motherboard, disconnect and reconnect everything. Finally, make sure that the HDD is plugged in properly.
Solution 2 – Check the drivers
Now, after we can safely claim that the hardware isn’t causing abnormally high CPU activity, let’s move to the software part. Making sure that both your drivers and BIOS are up to date.
A faulty driver is in the direct connection to many hardware issues, as even the best hardware won’t perform as intended without the proper software support.
For that reason, we suggest checking all drivers and confirming that all are up to date. Also, it’s strongly advised to avoid the generic drivers provided by Windows Update for certain devices, especially the GPU. Make sure to visit the OEM’s official website and get the latest drivers installed.
An easier and more convenient solution would be to use a trusted third-party program that downloads and installs the latest drivers for Windows automatically. With an in-built download manager, the program will get the updates directly from the software, so you won’t have to open your browser.
We recommend this type of tool because it has powerful capabilities, including fixing corrupt drivers and providing robust reports about each driver after performing complex scans.
- Download and install the Outbyte Driver Updater app.
- Launch the software and wait for the app to detect all incompatible drivers.
- Now, it will show you a list of all outdated drivers to select the ones to Update or Ignore.
- Click on Update & Apply Selected to download and install the latest versions.
- Restart your PC to ensure the applied changes.

Outbyte Driver Updater
Maintain your device healthy by letting OutByte Driver Updater find the latest driver options.Solution 3 – Scan for malware
Presence of malicious software can be another reason why your CPU spikes to 100% even in the Safe mode. Malware comes in different shapes and colors, and some of them might use your system resources for mining cryptocurrency and similar backdoor activities.
That’s why it’s of utmost importance to have an up-to-date protection, either Windows Defender or a third-party antivirus.
For this kind of issues, we suggest performing a deep scan to get rid completely of the menacing malware presence. If you’re using Windows Defender, follow these steps to perform a deep scan:
- Open Windows Defender from the taskbar notification area.
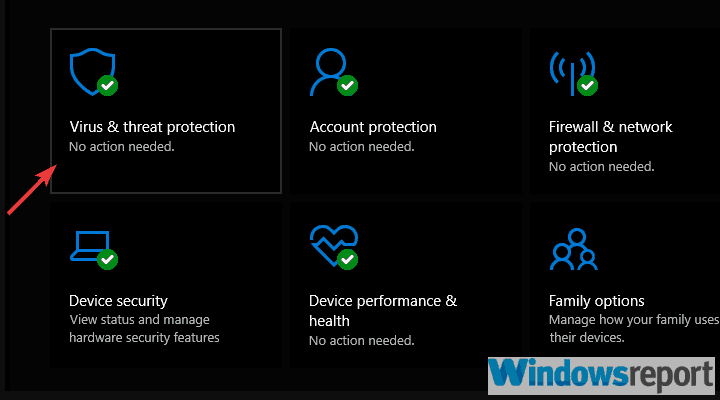
- Choose Virus & threat protection.
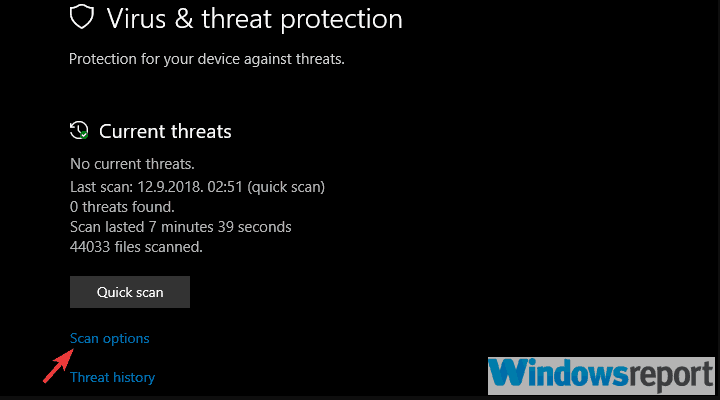
- Choose Scan options.
- Select Windows Defender Offline Scan.
- Click Scan now.
- Your PC will restart and the scanning process will commence.
Solution 4 – Run SFC, DISM, and ChkDsk
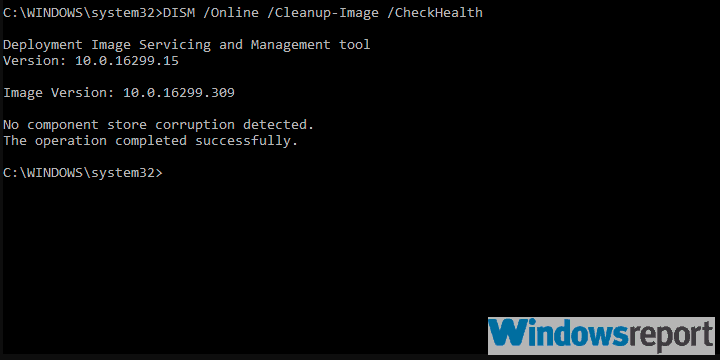
Another possible reason for the resource leakage might lie in the corruption of the essential system files. That’s why we suggest running System File Checker and Deployment Image Servicing and Management to resolve possible corruption of system files. These tools work in a similar manner, but the best way to utilize them is when running in succession.
The same goes for the corrupt sectors in the HDD. If you’re HDD takes too much time to boot the system, the CPU might suffer. For that reason, we suggest using another system utility via the elevated Command Prompt.
Here’s how to run SFC and DISM, and then ChkDsk in Windows 10:
- In the Windows Search bar, type cmd. Right-click click on Command Prompt and run it as admin.
- In the command-line, type sfc/scannow and press Enter.
- After its done, type the following command and press Enter after each:
- When the procedure ends, restart your PC.
Solution 6 – Reinstall Windows 10
Finally, if you’re still experiencing high CPU usage, even when in the Safe mode, we suggest reinstalling the system. Moreover, the best step would be to completely format all drives and start from scratch. Of course, don’t forget to backup your data accordingly.
For this operation, you’ll be needing a USB flash drive with at least 6 GB. Also, you’ll need to download the Media Creation Tool and create the bootable drive.
Everything you need to know is thoroughly explained in this article, so make sure to check it out. If you need any additional help, post your questions below and we’ll gladly help you.
RELATED STORIES YOU SHOULD CHECK OUT:


User forum
0 messages