FIX: The current active partition is compressed
6 min. read
Updated on
Read our disclosure page to find out how can you help Windows Report sustain the editorial team. Read more
Key notes
- If you lack disk storage space, especially in your system drive, then the Windows Drive Compression feature can become extremely handy.
- Unfortunately, the Drive Compression feature can also cause issues in certain situations, and we will be looking over ways to fix these problems when they occur.
- This particular issue is just one of many Install errors covered in this hub, so make sure you check it out, since you might find some other useful guides.
- For more great troubleshooting articles on all things Windows 10-related, check out our Fix page.
When switching to Windows 10 from previous Windows iterations, users have two options. Either they can install Windows 10 clean on the formatted drive or, in the more likely scenario, upgrade over older iteration and retain all applications and data.
However, the latter convenient option seems to be impossible for some users, as they run into the prompt message informing them that The current active partition is compressed.
After that, the upgrade process can’t be continued and they are forced to stick with Windows 7/8.1.
This is a severe problem, especially since Windows 10 is becoming (mostly due to security traits) a system you would want to use these days.
Luckily, there’s a solution to every issue, and we made sure to acquire and post some of them on the list below. Therefore, if you’re unable to upgrade to Windows 10 due to the partition error, you’re at the right spot.
How do I fix the The current active partition is compressed error?
- Disable drive compression
- Check HDD for errors
- Expand the reserved partition
- Use Media Creation tool to upgrade to Windows 10
- Clean install Windows on an alternative HDD/SSD
1. Disable drive compression
- Open My Computer.
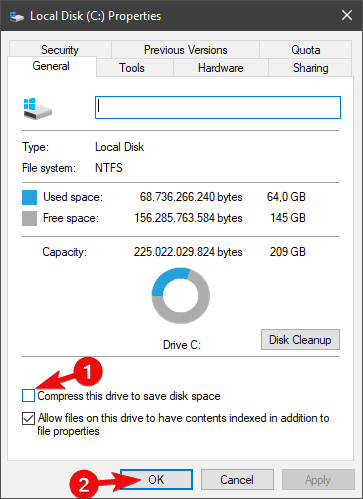
- Right-click on the system partition (usually it’s C:) and open Properties.
- Under the General tab, uncheck the Compress this drive to save disk space box and confirm changes.
- Restart the upgrading process and look for changes.
First things first. In order to preserve the system partition’s storage space, some drives might be automatically compressed. It depends on the configuration setup, as some prebuilt configurations tend to compress data on the system drive, as they’re rarely upgraded, storage-wise.
This is mostly the case with the workstations, but there are exceptions in the non-enterprise pre-built configurations as well.
For various reasons, Windows 10 can’t be upgraded on the compressed system partition within one drive. The most prominent one concerns data allocation, as Windows 7/8.1 is preserved in a folder later on in order to preserve the data.
You can address this by simply unchecking the drive compression and trying to upgrade again.
2. Check HDD for errors
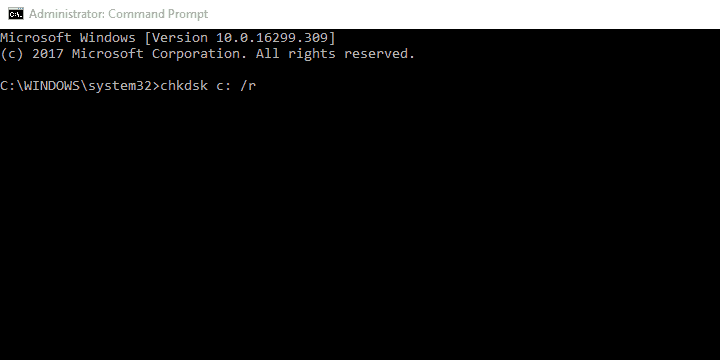
- In the Windows Search bar, type cmd, right-click on Command Prompt and run it as an administrator.
- In the command line, type the following command and press Enter:
- chkdsk c: /r
- Don’t forget to replace c: with an alternative letter assigned to your system partition.
- Albeit, the C is commonly used.
- Wait for the procedure to scan for errors and close Command Prompt.
- Restart your PC and retry upgrading.
Another thing worth checking concerns the overall health of the HDD at hand. Of all the hardware pieces, HDD is the most prone to malfunction. Symptoms are easily distinguishable: system booting and loading take longer than usual and, eventually, you’re unable to boot.
It might be too late to do something when the boot errors occur, so you should check your data storage drive on regular basis.
In order to check for HDD corruption and faulty sectors, you can use third-party tools or built-in system resources. Either way, those can help you address minor errors and give you an insight into HDD’s overall health.
And it’s good to know if it’s in good shape or close to its demise, so you can backup your data timely.
3. Expand the reserved partition
The reserved partition is the small part (around 500MB) allocated from your system partition. It stores essential data during the installation procedure and it should be active, on both Windows 7 or Windows 8.1 if you want to upgrade to Windows 10.
Now, there are 3 things that should occupy your attention regarding the Reserved system partition:
- It needs to have at least 500 MB
- It needs to be set to Active partition mode
- You can’t use compressed Reserved system partition
With that in mind, we need to check if all the conditions are met before moving to alternative upgrade procedures. In order to do so, follow the steps we provided below:
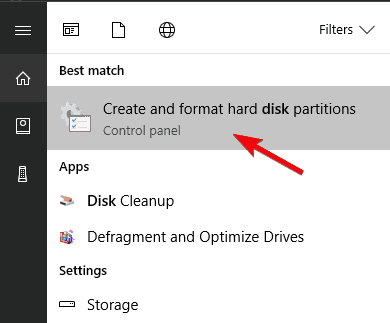
- In the Windows Search bar, type Disk and open Create and format hard disk partitions from the results.
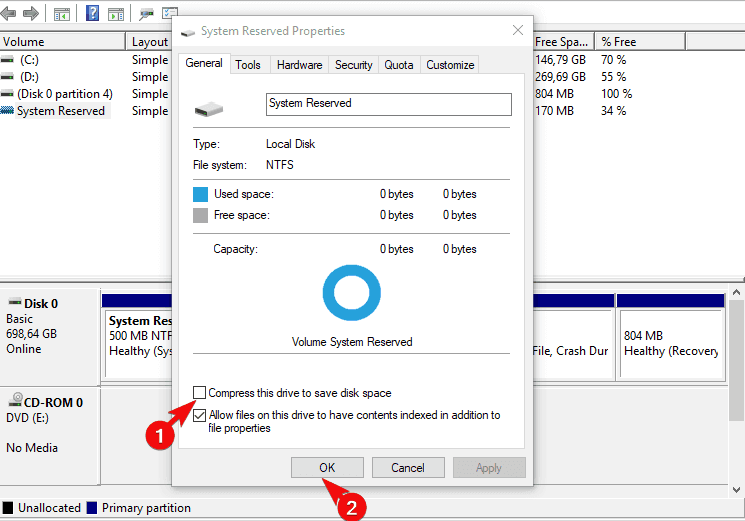
- Right-click on the System Reserved partition and open Properties.
- Under the General tab, uncheck the Compress this drive to save disk space box and save changes.
- Also, make sure that the partition meets all of the aforementioned conditions.
- Restart your PC and give upgrading another go.
You can also opt for an easier solution and use third-party software with multiple capabilities that allow you to manage partitions with ease and more.
4. Use Media Creation tool to upgrade to Windows 10
- Download Media Creation Tool
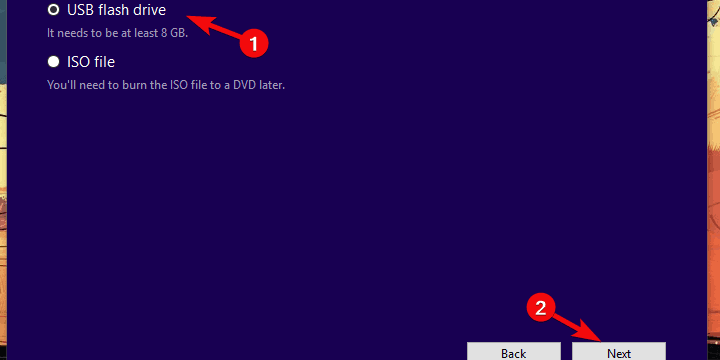
- Plug in the USB flash drive with, at least, 8 GB of storage space
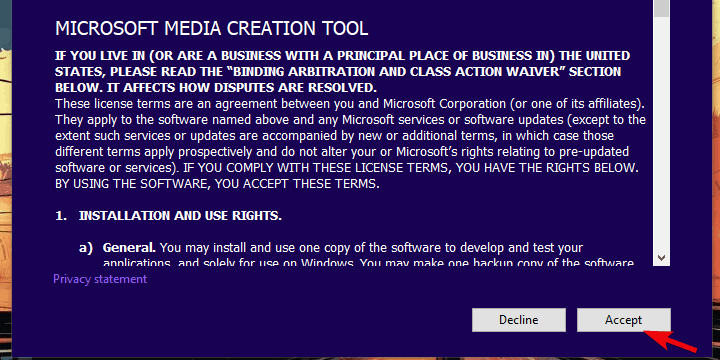
- Run Media Creation Tool and accept the License Terms
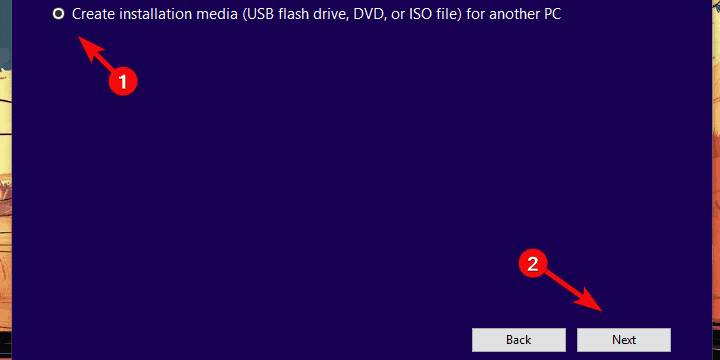
- Select ”Create installation media (USB flash drive, DVD, or ISO file) for another PC”.
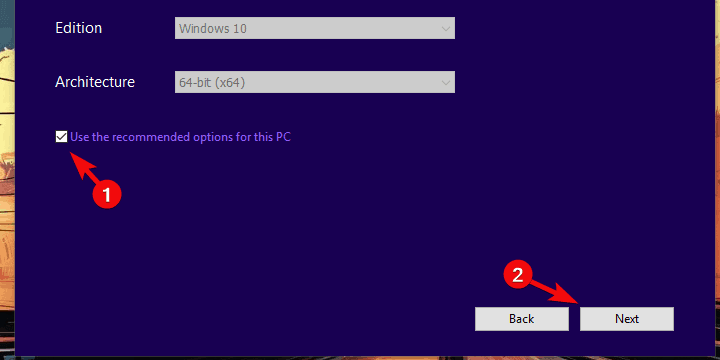
- Choose the preferred language, architecture, and edition and click Next.
- Media Creation Tool will download the setup and copy the installation files onto the USB flash drive.
- Now, you should tend to back up your data. Finally, restart your PC.
- In the initial boot screen press F10, F11, or F12 to access the Boot menu. It differs depending on your motherboard.
- Select your preferences and choose to Upgrade rather than Custom installation and the installation process should commence.
Now, back in the days, when the free upgrade was offered through the Windows Update, users were able to obtain Windows 10 through the system interface.
However, since that’s a goner, there are few ways to obtain and perform an upgrade to Windows 10 legally. You can download Media Creation Tool and upgrade to Windows 10 from the Windows 7/8.1 interface.
Or you can create the installation media (USB or DVD) and upgrade to Windows 10 with it.
Now, even though the former is much easier, it’s not particularly better. Especially, if we take into consideration the error at hand. So, we’ll show you below how to create an installation media and upgrade to Windows 10 that way. Make sure to backup your data just in case something goes astray.
5. Clean install Windows on an alternative HDD/SSD
Finally, if none of the previous steps addressed the issue and you’re still stuck on the The current active partition is compressed screen, we recommend the clean reinstallation.
It’s for the better for various reasons. In theory, the Windows 10 platform should integrate all files and applications from the former system iteration. However, and based on our experience, this doesn’t work that well in practice.
For that reason, and if you’re positive that you indeed have enough storage space, properly configured reserved system partition, and non-active partition compression, we recommend clean reinstallation.
Just make sure to backup your data and Windows 7/8.1 license key. Afterward, you can install all applications from scratch. You can find detailed instructions in this article.
That’s a wrap-up. Just in case you have any questions regarding the aforementioned steps or an alternative solution for the upgrade error at hand, make sure to tell us in the comments section below.




User forum
0 messages