SSD Slow Boot: 6 Easy Methods to Make it Faster
Easy ways to reduce SSD boot time
7 min. read
Updated on
Read our disclosure page to find out how can you help Windows Report sustain the editorial team. Read more
Key notes
- Issues with slow boot time in Windows 10 devices running on SSD are pretty standard but can be fixed differently.
- You may want to start by updating your PC’s AHCI driver and other drivers.
- For many users tweaking the ULPS registry settings will do the trick.
We always tell you to get an SSD drive if you have problems with a slow boot in Windows 10. But if your computer boots slow, even after you get an SSD, that could be a problem.
Fortunately, it is not a problem that we cannot solve. SSD drives beat HDDs when it comes to booting speed. Some SSDs (in combination with the proper hardware) can start your computer quickly.
And since we know SSDs are fast, if booting your computer takes a little bit more time, you should know that something’s not right and needs to be solved.
Why is SSD booting slow?
From interaction with users, we gather that some things can slow your computer despite running on an SSD. At the top of the list, we have the following:
- Issues with ULPS – An enabled Ultra-Low Power State is probably the most common trigger for this problem.
- Power settings – Sometimes, if you have them wrongly configured, the slow SSD booting may be the reason.
- Outdated drivers – SOme users with outdated drivers have also noted that it affects the SSD boot speed.
- Memory problems – From user experience, we note that this can considerably increase boot time in SSD.
Various problems can occur with your SSD, and in this article, we’ve covered the following issues:
- Slow startup on Windows 10 – This is just a variation of this problem, and many users reported that startup is slow on their PC. Third-party applications usually cause this.
- Slow boot time black screen – Several users reported that their boot time is slow due to a black screen. The cause is usually your graphics card driver, and the issue will be resolved after you remove it.
- Windows 10 slow boot after update – Sometimes, this issue can occur after a specific update. You must find and remove the problematic update from your PC to fix the issue.
- Avast, AVG, Kaspersky slow boot time – Third-party applications commonly cause slow boot time. Many users reported that their antivirus was causing this issue to appear.
- Slow dual boot – Many users run multiple operating systems on their PC. However, the dual boot can sometimes cause your boot sequence to slow down.
- Slow cold boot – Users reported slowdowns while performing a cold boot. This can be an annoying problem, but you should be able to fix it using one of our solutions.
Now that we have explored these triggers, let us consider some practical solutions to improve SSD slow boot time in Windows 10. Also, note that even a new SSD may experience a slow boot.
How can I fix SSD’s slow boot?
1. Automatically update your AHCI driver
Users often report issues with slow boot time, and to fix them, it seems that updating the AHCI driver does wonders.
This is relatively simple if you’re not a newbie. You can download and install them manually.
To do that, you need to visit your motherboard manufacturer’s website and take your time to look for the necessary drivers.
This method, though, is not the most reliable. So, if you do not have the necessary computer skills to update/fix the drivers manually, we suggest doing it automatically using Outbyte Driver Updater.
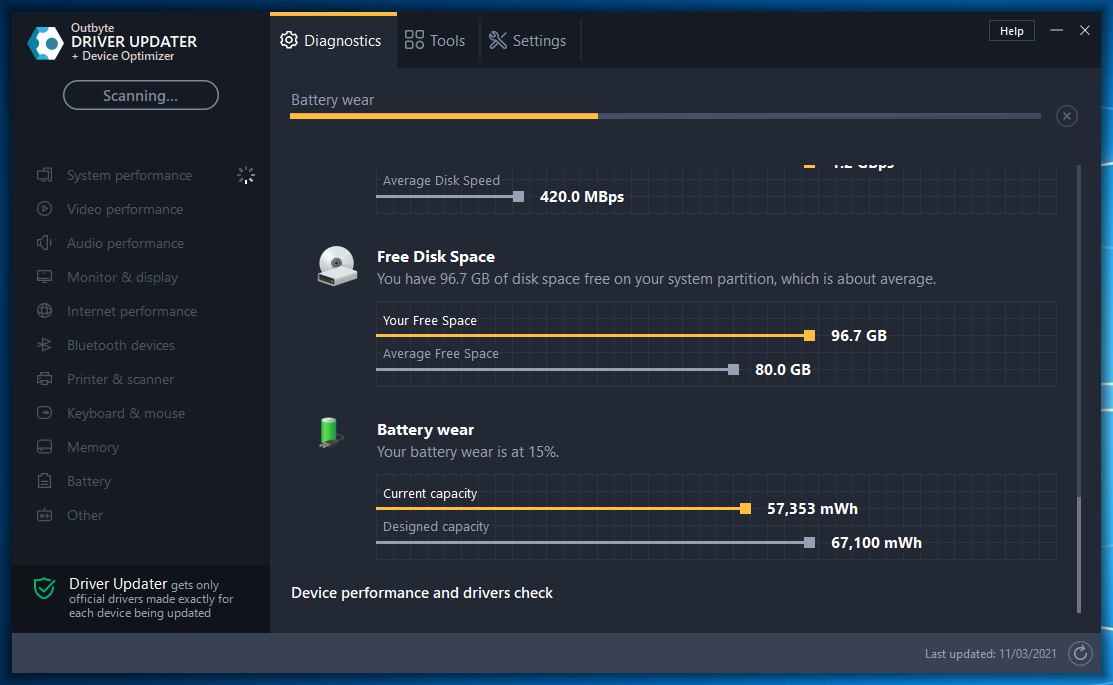
After installing the drivers for your motherboard, the issues with slow boot time should be resolved entirely. On top of that, nothing stops you from updating all your drivers simultaneously.
That’s one of the critical features you’re about to enjoy from Outbyte Driver Updater, along with the option to create backups before making any changes.
This way, rest assured that nothing wrong could ever happen to your device.

Outbyte Driver Updater
Fix the slow boot time issue without any effort by using the Outbyte Driver Updater software.2. Disable ULPS
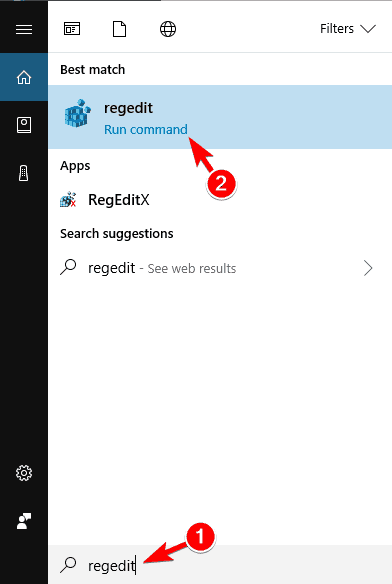
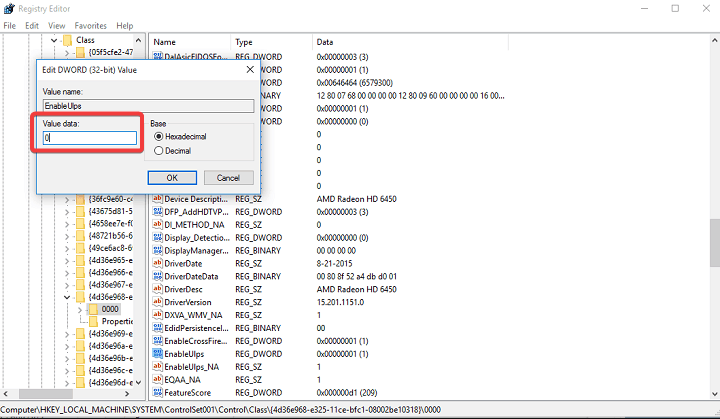
- Go to Search, type regedit, and open the Registry Editor.
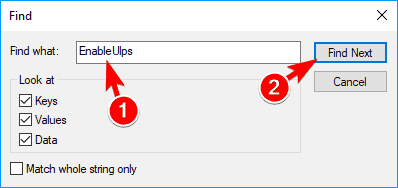
- To avoid digging through numerous registry paths, click Edit, Find, enter EnableUlps, and press Enter.
- Alternatively, you may navigate to the path below to locate EnableUlps:
Computer\HKEY_LOCAL_MACHINE\SYSTEM\ControlSet001\Control\Class{4d36e968-e325-11ce-bfc1-08002be10318}\0000 - Now, double-click on EnableUlps and change its value to 0.
Disabling ULPS is probably the most common and the most effective solution for this problem, judging by the positive feedback. ULPS stands for Ultra-Low Power States, an energy saver for your graphics card.
For example, when your computer goes to sleep, your graphics card will do the same, so you’ll need to wait a few seconds more on your next startup for your graphics card to wake up.
Disabling ULPS will improve wake-up and startup performances, so this solution should be your first call.
After performing this workaround, try to restart your computer, and it will boot at least a little faster. On the other hand, if booting is still slow, try some of the solutions below.
3. Change Power Options to High Performance
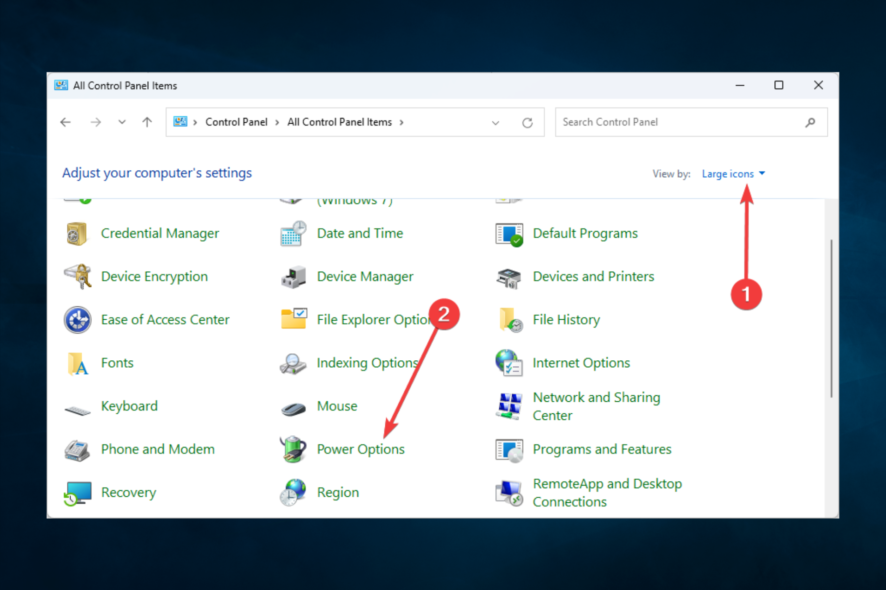
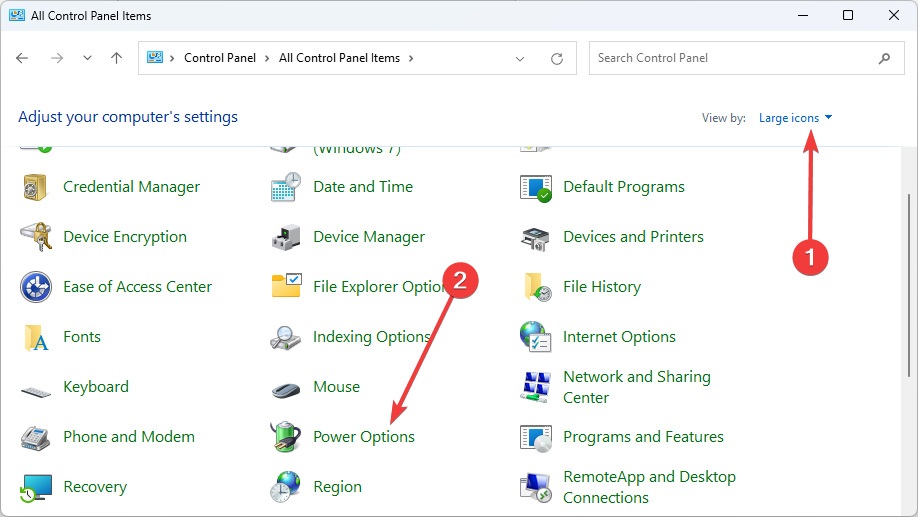
- Press Windows + R, type control panel, and hit Enter.
- Set View by to Large icons, then click on Power options.
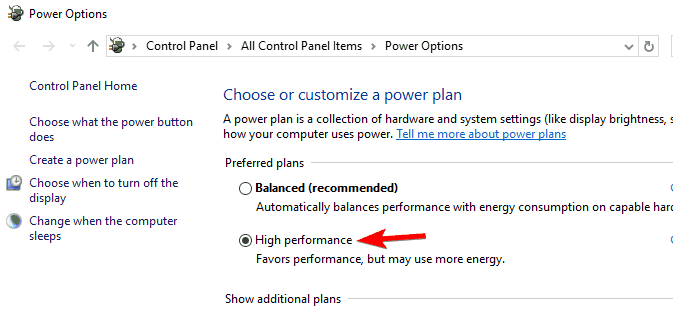
- Finally, in the Power Management window, choose the High-Performance plan.
If disabling ULPS didn’t do much, you could try changing the power options to high-performance. Use the above steps to do that.
This should change your power plan, affecting your next startup and hopefully reducing the boot time.
You can’t find your Power Plans? Get them back by following the easy steps in this article.
4. Turn on Fast Startup
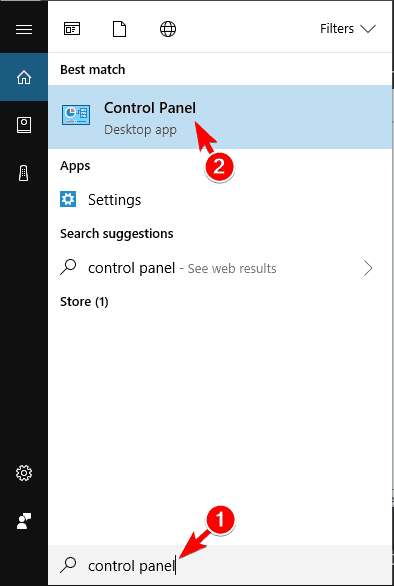
- Press Windows Key + S and enter control panel. Now select Control Panel from the list.
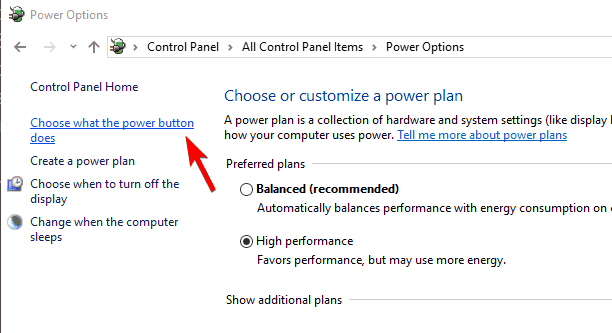
- When Control Panel opens, select Power Options from the list.
- Select Choose what the power button does from the menu on the left.
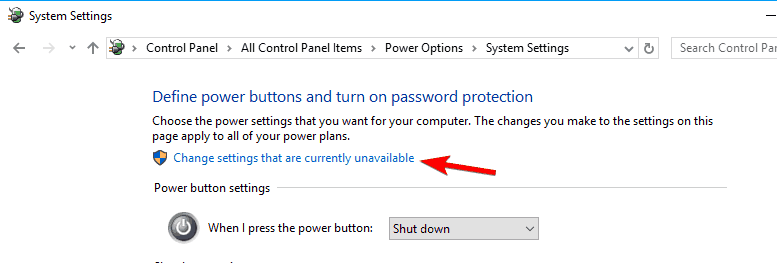
- Click on Change settings that are currently unavailable.
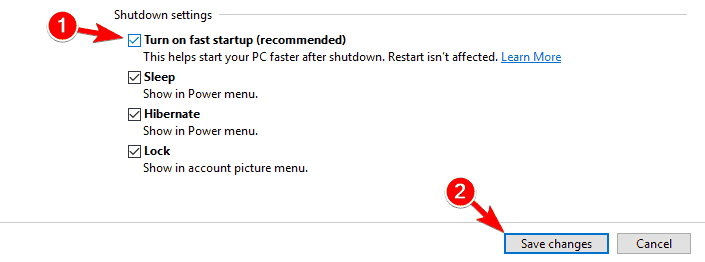
- Look for Turn on fast startup (recommended) and make sure that it’s checked. Now click on Save changes.
Fast Startup is enabled by default, but sometimes specific updates can disable it. If this feature is already enabled on your PC, disable it and check if that solves the issue.
Fast Startup is a feature in Windows 10 that allows your PC to boot faster. If you’re having problems with slow boot time, you can fix them by enabling this feature.
5. Uninstall your graphics card drivers
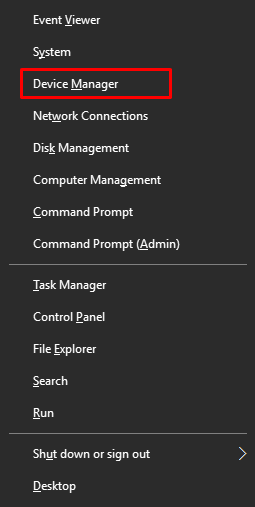
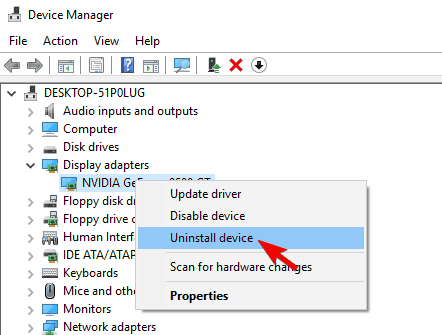
- Press Windows + X and select Device Manager.
- Locate your graphics card driver, right-click it, and choose Uninstall device from the menu.
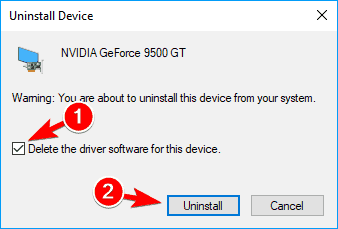
- When the confirmation dialog appears, check Delete the driver software for this device and click on Uninstall.
If you’re having problems with slow boot time, the issue might be related to your graphics card. Several users reported being stuck on a black screen while trying to start Windows.
According to users, the problem seems to be related to AMD drivers. To fix the issue, users suggest uninstalling AMD drivers from their PC.
After uninstalling the driver, check if the problem is resolved. If you want to remove all files associated with your graphics card, we already wrote a guide on using Display Driver Uninstaller, so check it out.
6. Adjust your virtual memory settings
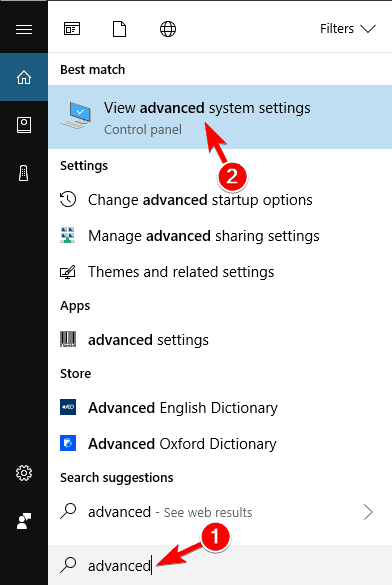
- Press Windows Key + S and enter advanced. Choose View advanced system settings.
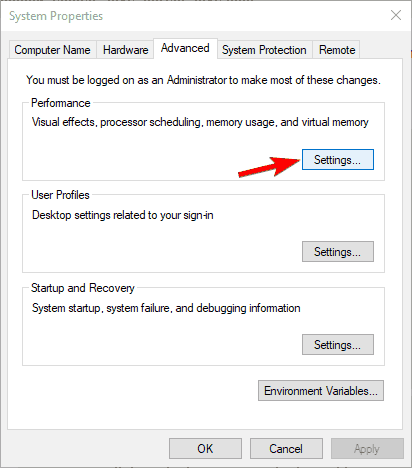
- In the Performance section, click on the Settings button.
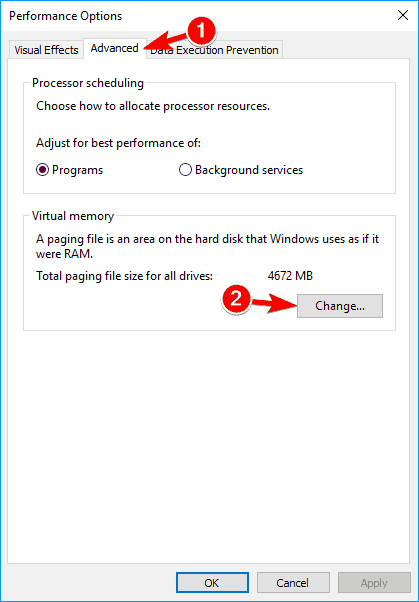
- Go to the Advanced tab and click on Change.
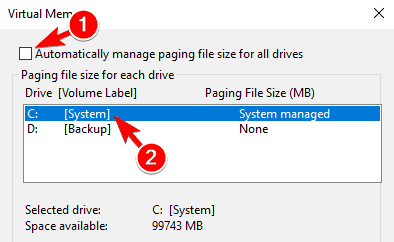
- When the Virtual Memory window opens, uncheck Automatically manage paging file size for all drives and select your System drive.
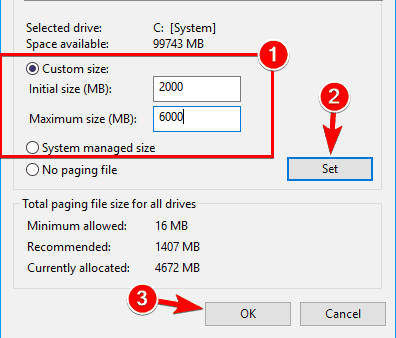
- Select the Custom size option and set Initial size and Maximum size in MB. You can use any value for the Initial size, but as for the Maximum size, use 1.5x or 2x the size of your RAM in MB. Click on Set and OK to save changes.
According to users, you can fix problems with slow boot time simply by adjusting the amount of virtual memory. To do that, follow the above procedure.
After doing that, the issue should be resolved. Remember that this isn’t a universal solution, so it might not work for you. You can also enable TRIM if your SSD is up to it to improve its performance.
If your Virtual Memory is too low, check out this detailed guide that will help you solve the issue.
That should be all; I hope these solutions helped you with the problem. If you have any comments or need additional answers, reach out to the comments section below.




User forum
7 messages