How to Delete System Error Memory Dump Files in Windows
Crash dump files offer insights into what caused errors on your device
Key notes
- The Windows system might just be man's new best friend.
- On top of its numerous advantages, it also provides a process designed to store your RAM content in case of a system crash and dump it in a data file.
- The crash files are obviously useful and can help devs to further fix and prevent BSOD errors.
- However, they tend to pile up and claim quite a chunk of your storage space so you might want to delete them from time to time.

Memory dump files, otherwise crash dumps, are system files saved during blue screen crashes. When a BSOD error message appears, Windows saves a copy of the system memory.
Those crash dump files can then assist developers to fix BSOD system crashes. Users can send the crash dumps to developers when they file support tickets.
Memory dump files can waste a lot of hard drive space. They can hog gigabytes of hard drive storage. Windows only automatically delete crash dump files when HDD space is limited.
However, users can also erase crash dumps with cleanup utilities.
How do I delete crash dump files in Windows?
1. Delete Crash Dumps Via the Command Prompt
- Users can erase crash dumps with a series of Command Prompt commands. To do so, open the Run accessory.
- Enter cmd in Run, and press the Ctrl + Shift + Enter keys.
- Then enter the following separate commands in the Prompt, and press Enter after entering each one.
fsutil usn deletejournal /d /n c:
del “%temp%*” /s /f /q
del “C:$Recycle.bin*” /s /f /q
del “%systemroot%temp*” /s /f /q
vssadmin delete shadows /for=c: /all /quiet
Dism /Online /Cleanup-Image /StartComponentCleanup /ResetBase
2. Turn Off Crash Dumps
- Users can turn off crash dumps to ensure they don’t hog any more HDD storage space. Enter Control Panel in Run’s Open text box and press Return.
- Then click System to open the Control Panel applet shown directly below.
- Click Advanced system settings on the left of the window to open an Advanced tab.
- Then press the Settings button under Startup and Recovery.

- Select the (none) option on the drop-down menu shown directly below to turn off crash dumps.
- Then click the OK button.
1. Launch Run with the Windows key + R keyboard shortcut.
2. Enter cleanmgr in Run’s Open text box.
3. Press Ctrl + Shift + Enter to open Disk Cleanup as administrator.
4. Select the C: drive on the Drive selection window, and click the OK button.
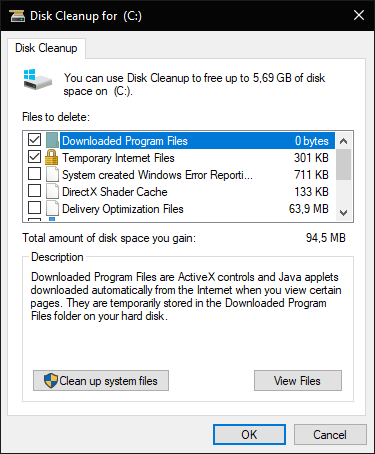
5. Select the System error memory dump files check box.
6. Then click the OK button.
7. Users who can’t find a System error memory dump files option in Disk Clean-up should open that utility via an elevated Command Prompt. To do that, enter the following line in cmd:
%SystemRoot%System32Cmd.exe /c Cleanmgr /sageset:16 & Cleanmgr /sagerun:16
8. Press the Return key. Disk Cleanup will open with more checkbox options. Navigate to the System error memory dump files option and click to delete the files.
3. Delete system error memory dump files in Disk Cleanup
Users can erase crash dumps with Windows’ built-in Disk Cleanup. This tool allows you to perform a clean and safe cleanup on your PC.
So, there are a few ways users can erase crash dumps in Windows. Deleting the crash dumps might free up quite a bit of hard drive storage space so make sure to do so.
Let us know which was your method of choice in the comments section below.
Read our disclosure page to find out how can you help Windows Report sustain the editorial team. Read more


Improve this guide


User forum
0 messages