FIX: Windows 10 Explorer deleted files still show
4 min. read
Updated on
Read our disclosure page to find out how can you help Windows Report sustain the editorial team. Read more
Key notes
- Are deleted files still showing up on your Windows 10 PC? You need to take immediate action.
- Don't worry, we have a few tricks that will help you remove them once and for all.
- See below how to repair your Recycle Bin, use the File Explorer to delete unwanted files, and more.
- If you need further assistance, we also give our top recommendation when it comes to third-party uninstallers.

In Windows 10 users can permanently or temporarily delete folders. That said, many users have reported that Windows 10 keep restoring the deleted files regardless of the location.
After deleting the file, the files show up in File Explorer after a refresh. Here’s how one user described this peculiar issue:
I have several empty folders on my desktop. When I delete them, they immediately re-appear. They also re-appear if I rename them…
Delete the re-appearing files or folders for good with the steps below.
What can I do if deleted files keep showing on Windows 10?
1. Remove the files with a third-party uninstaller
- First of all, run CCleaner.
- Choose the location you want it to scan or let it scan your whole PC.
- From the results, select the data you want to permanently remove.
- Click Run Cleaner and then Continue.
- Wait until the procedure finishes and make sure the files have been completely removed from your PC.
CCleaner has a free version that can save you a huge amount of effort if you want to get rid of files that are often left behind even after you’ve supposedly deleted them.
It is clearly one of the best tools of this kind because it’s light, easy to use, and encompasses tons of useful features to keep your PC cleaning and running as new.
CCleaner can help you uninstall apps directly from the app, clean your browser, clean your registry and remove unnecessary junk files that only take up space.
On top of all these, it not only uninstalls pesky programs but also easily cleans up the leftovers in folders and registries of any kind.
2. Use Shift-Delete to delete the files
- Open the File Explorer and navigate to the location where the problematic files are located.
- Select all the files you want to delete.
- Now press and hold the Shift Key on your keyboard and press the Delete key simultaneously.
- This should delete the file or folder permanently.
- Check if the files re-appear again.
- If this resolves the error, it could be because of some permission issue that Windows restores the files from the Recycle bin. However, since you permanently delete the files, Windows will not restore the files again.
3. Scan for Virus / Malware
- Any malware-infected PCs are known to show such abnormal behavior where the deleted files start restoring automatically to avoid the removal of a harmful threat.
- If you have an antivirus installed, perform a complete scan , and remove any threat detected by the security program.
- If you don’t have any antivirus installed, download and install Malwarebytes Premium. It comes with a free 7 days trial and is very capable of removing any harmful files from your system.
- Make sure you empty the quarantine to avoid restoration in the future.
Additionally, if you look for other effective antiviruses and don’t know where to go or what criteria you should consider, we recommend using the best antivirus software with the highest detection rate.
4. Repair files and folders automatically
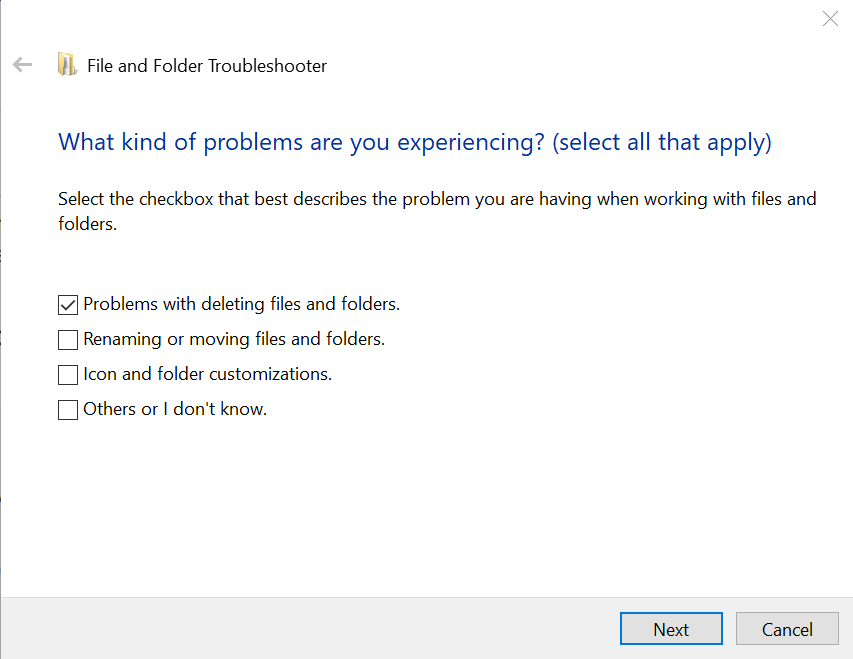
- Go to Windows File and Folder Diagnose page.
- Download Windows File Folder Diagnose tool by clicking the Download button.
- Run the file and click Next.
- It will scan the system and ask you to select the problem you are facing. Select Problems with deleting files and folders and click Next.
- It will again check for any problem with the Recycle Bin and system files responsible for removing the file.
- It will show all the programs that were fixed in the process. Close the repair tool.
- Try to delete the problematic files and folders again and check if the error is resolved.
5. Repair the Recycle Bin
- Type cmd in the search bar.
- Right-click on Command Prompt option and select Run as Administrator.
- In the command prompt, type the following command and press Enter:
rd /s /q C:$Recycle.bin - Wait for the command to execute successfully.
- Type exit to close Command Prompt.
- Now try to delete the folder or file again and check if the issue is resolved.
Were the above solutions helpful? Let us know in the comments area below.
Take a closer look at our Windows 10 section if you’d like to find the latest news and guides.
For similar fixes from tech experts, just bookmark our PC Software Troubleshooting Hub.


User forum
2 messages