6 Simple Ways to Fix Destiny 2 Stuck on Initializing
If you're overclocking your PC, turn it OFF temporarily
3 min. read
Published on
Read our disclosure page to find out how can you help Windows Report sustain the editorial team. Read more

If your Destiny 2 game is stuck on the Initializing screen when updating, you need to end all processes related to Destiny 2 from Task Manager, ensure your internet connection is stable, retrieve storage space, disable antivirus temporarily and run the Blizzard app as admin.
What can I do if Destiny 2 is stuck on Initializing?
1. Run your client app as an administrator
- Press Ctrl + Shift + Esc to open Task Manager. Go to the Processes tab, right-click the Blizzard/Battle.net app, then select End task.
- Right-click the Blizzard/Battle.net shortcut on your desktop and select Properties.
- Go to the Compatibility tab, and under Settings, place a checkmark next to Run this program as an administrator.
- Click Apply and OK to save the changes.
Next, check Destiny 2 server status, disable third-party antivirus temporarily and make sure the Windows operating system and drivers are up to date.
Also, verify if your internet connection is stable, then turn off overclocking and try restarting the router & your computer.
In case you are facing other issues like Destiny 2 won’t update, first ensure you have a stable internet connection; read this guide to learn about other solutions.
2. Rename the Destiny 2 folder
- Press Windows + E to open the Windows Explorer window.
- Go to this path:
C:\Program Files (x86) - Locate the Destiny 2 folder, click the Rename icon and rename the folder.
3. Delete the app cache
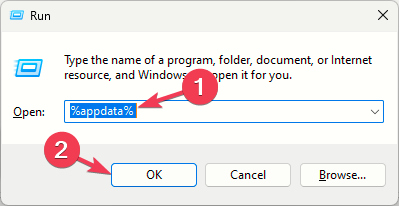
- Press Windows + R to open the Run window.
- Type %appdata% and click OK to open the AppData directory.
- On the Roaming folder, locate Blizzard, Battle.net and Destiny 2, select them and click Delete.
- Go back to the Local folder, locate the same folders and delete them as well.
4. Set the Secondary Logon service to Automatic
- Press Windows + R to open the Run dialog box.
- Type services.msc and click OK to open the Services app.
- Locate and double-click Secondary Logon to open its properties.
- For Startup type, select Automatic from the drop-down menu.
- Click Apply and OK to save the changes, then reboot your PC.
5. Use the Disk Cleanup tool to retrieve space
- Press Windows + R to open the Run window.
- Type cleanmgr and click OK to open the Disk Cleanup window.
- Select the drive and click OK.
- Click Clean up system files.
- Select the drive and click OK again.
- Under Files to delete, select all the items and click OK.
- Next, select Delete files.
6. Reinstall the app
- Press Windows + I to open the Settings app.
- Go to Apps, then select Installed apps.
- Locate Destiny 2, click the three dots icon and click Uninstall.
- Select Uninstall to confirm the action.
- Press the Windows key, type blizzard and click Open.
- Go to Library, right-click the game and select Install.
Now, use these steps to reinstall the Blizzard or Battle.net app that you are using to fix the problem once and for all.
In conclusion, running the client app as administrator, renaming the Destiny2 folder, deleting the app cache helped us fix the Destiny 2 is stuck on Initializing screen issue,
However, sometimes setting secondary logon as automatic, retrieving space on the PC and reinstalling the app did the trick.
If you have encountered other error codes while playing Destiny 2, read this guide to learn more about the fixes.
If you have any questions or suggestions about the subject, feel free to mention them in the comments section below.


User forum
0 messages