Destiny 2 Isn't Updating On Steam: 7 Quick Ways To Fix It In 2026
Key notes
- Many players are reporting that when they try to make changes in Destiny 2, the game does not update on Steam.
- Because of the conversion from Battle.net to Steam, there may be an issue with in-game fixes that are no longer accessible for updating.
- Reinstalling the game and fixing the Steam client to ensure there are no lost links in the client may help.

Destiny 2 is one of the greats in the current meta of online shooters. However, because various in-game bugs too often plague this Activision-produced game, it requires maintenance and adding in-game features.
 NOTE
NOTE
Both are provided via frequent updates. And that’s the problem we’re trying to tackle today. Namely, many users cannot update the game through the Steam client since the update is stuck on initialization.
What can I do if Destiny 2 won’t update on Steam?
1. Check the connection
Obviously, this is a matter we can’t avoid when it comes to updating and running games in the Steam client.
Even though we’re quite certain you’re well aware of network performance, we still encourage you to check everything out before we move to additional steps. So, check whether your PC can connect to the internet.
If the issue is widespread and we can’t ascribe it solely to Ubisoft, follow these steps to troubleshoot network issues:
➡️ Restart your PC
➡️ Use the wired connection
➡️ Restart router and modem
➡️ Flush DNS
➡️ Make sure the ports
➡️ Make sure the client can communicate freely through Firewall. Open the Firewall and check the list of allowed apps. Confirm that Steam is allowed to connect to both public and private networks.
In case you are facing other issues we have a guide that can help you fix Destiny 2 stuck on initializing and other problems, so don’t miss it.
2. Restart the Steam client
Firstly, restart your PC and try rerunning the Steam desktop client. If the issue persists, you might need to kill the client process and allow it to restart the update sequence from the get-go.
You can do so in Task Manager, with a particular focus on the Steam agent’s process.
Here’s what you’ll need to do:
- Close the Steam desktop client.
- Right-click Start and open Task Manager.
- Terminate all Steam-related tasks, including Steam Update Agent.
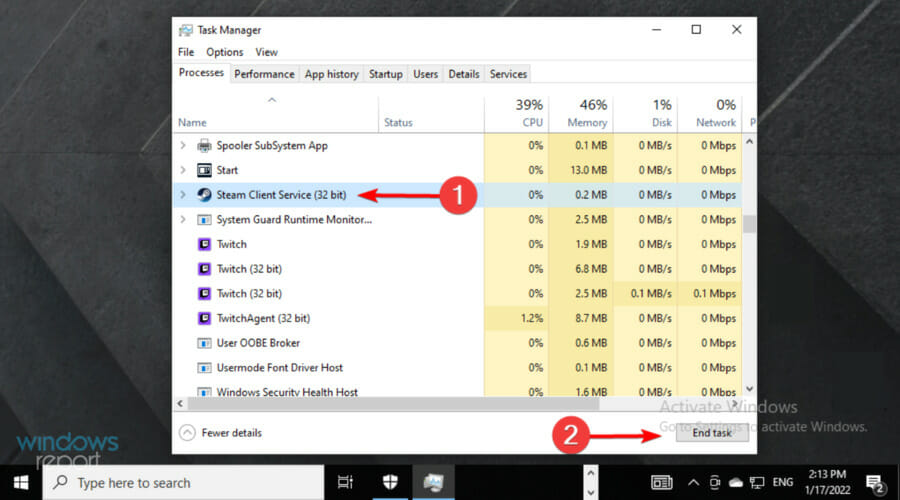
- Restart the client and try updating Destiny 2 again.
In addition, you can right-click on the Steam desktop app and run it as admin. It might help overcome certain system-imposed limitations for third-party apps.
3. Reinstall the client cleanly
Reinstalling the client might help, as well. There are multiple reports garnering around the lackluster desktop client provided by Ubisoft.
And the developer is, seemingly, working on addressing all of those. However, we recommend reinstalling the client when a certain game fails to update.
Here’s how to uninstall and install again the Steam client on Windows 10:
- Navigate to Settings > Apps > Apps & features.
- Uninstall the Steam desktop app.
- In the Windows Search bar, copy-paste %ProgramData% and press Enter.
- Delete both Steam and Destiny 2 folders. You might need administrative permissions to do so.
- Navigate to the Steam Store official site and download the client again.
- Install it and sign in.
- Wait until it synchronizes with the installed games. Try updating Destiny 2 again.
After removing game patches, files, and directories, you will have numerous leftovers and cache you will not need.
We recommend using third-party professional software like CCleaner to remove the Steam desktop client from your computer thoroughly.
Persistent data may not be removed manually; therefore, CCleaner is an excellent tool for thoroughly removing any stored local files. If the software has been uninstalled but the program name remains, use CCleaner’s Delete Entry to delete the Steam desktop client uninstall entry.
4. Clear Steam download cache
- Open the Settings panel from the top left client menu in the Steam Client.
- Select the Downloads tab in the Settings panel.

- Click the Clear Download Cache option at the bottom.
- Then click OK to confirm and agree that you will need to log back into Steam.

5. Verify files integrity
Of course, this is rare but it can cause the updates to be stuck on initialization. If some game files are corrupted or incomplete, the client won’t be able to update them accordingly.
Because of that, we encourage you to check for the integrity of the game files and then move to the updating process.
Here’s what you’ll need to do:
- Start the Steam client.
- Go to the Library tab, right-click on Destiny 2, and then select Properties.

- Navigate to Local Files and then click Verify game file integrity.
- Wait till the verification process is complete.
6. Remove the game folder and restore it before updating
Some users managed to resolve the issue at hand with one simple witty trick.
It seems that the updating process is having issues determining where the game installation is stored.
For that reason, the update process gets stuck. And, seemingly, no matter how many times you restart it — the result is the same. With this approach, you should be able to update Destiny 2 without any issues.
Follow these instructions closely and be patient:
- Follow the instruction from the above-mentioned step to completely shut down the Steam client.
- Navigate to C:Program Files (86x) and drag the Destiny 2 folder to the desktop.
- Open Steam and click Install.
- Before the Install starts, stop at the pop-up window.
- Move the Destiny 2 folder back to C:Program Files (86x).
- Start the update and wait until all files are checked and updated and, hopefully, successfully downloaded.
7. Wait for the servers to respond
Eventually, if the issue persists and you cannot update Destiny 2, we advise you to wait. Sometimes, servers will be clogged, and you must wait until the update is successfully downloaded and installed.
In addition, don’t be discouraged if the UI shows download speed 0 kb/s. That’s hardly the case, and we’re looking at the bug. Just restart your PC and wait until they fix what’s broken.
We covered a similar problem in our Destiny 2 CAT error when no update is available guide, so don’t miss it.
Also, don’t forget to share your experience with the update error on Destiny 2 and related questions or suggestions. You can do so in the comments section below.
Read our disclosure page to find out how can you help Windows Report sustain the editorial team. Read more


Improve this guide


User forum
2 messages