Fix: Dolby Access Requires a Network Connection

Dolby Atmos is available on Windows Store and can be anytime tested for free on your Windows 10 system. In that respect, you can choose the trial version that is available for 30 days, which is more than enough especially if you want to try all the features and the actual functionality of this app.
Shortly, that’s how you can make a better idea about what Dolby Atmos has to offer in terms of audio enhancements.
So, if you already downloaded and installed the Dolby Atmos software on your computer, but you cannot use the app because of a Network connection error, don’t panic. Just go through the troubleshooting methods described below and learn how to fix these system malfunctions.
Just to be clear, we will discuss the error message displayed on your computer when you try to run the Dolby platform and which states that ‘Dolby Access requires a network connection. Please check your connectivity and press the OK button to retry’.
How to fix the Dolby access requires a network connection issue on Windows 10
- Make sure that your network is properly set up.
- Run the built-in Network troubleshooter.
- Run the Windows Store Troubleshooter.
- Reset the Dolby Atmos app.
- Uninstall and then reinstall the app from Windows Store.
- Remove and reinstall Windows Store on your Windows 10 system.
1. Make sure that your network is properly set up
First of all, make sure that your Internet connection is properly set. Verify your Wi-Fi connection and its signal, or even reset your router before testing the network connection on your computer.
If there are no problems with the Wi-Fi signal and you can use the Internet connection on your PC without experiencing issues, you can then resume the rest of the steps from this tutorial. Otherwise, try to establish a strong Internet connection before launching the Dolby Atmos app by getting one of these Wi-Fi repeaters, for example.
2. Run the built-in Network troubleshooter
If everything seems to be working normally, try to run the built-in Microsoft Network Troubleshooter. If there are hidden issues within your Network connection, this troubleshooter should automatically fix the problems or guide you through different troubleshooting processes.
You can initiate this process by following:
- Click on the Windows Search icon, the one that’s located near the Windows Start button.
- There, type Network Troubleshooter.
- From the results that will be displayed select ‘Identify and repair network problems’.
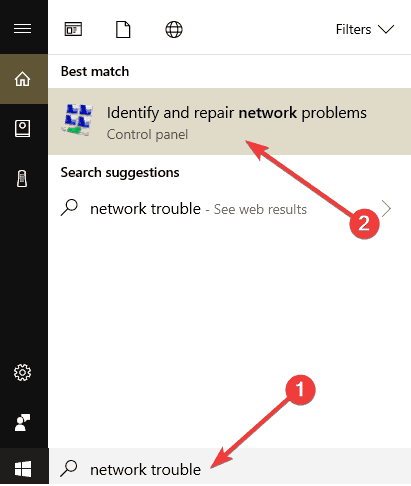
- The troubleshooter will start automatically; way a few seconds and just follow on-screen prompts.
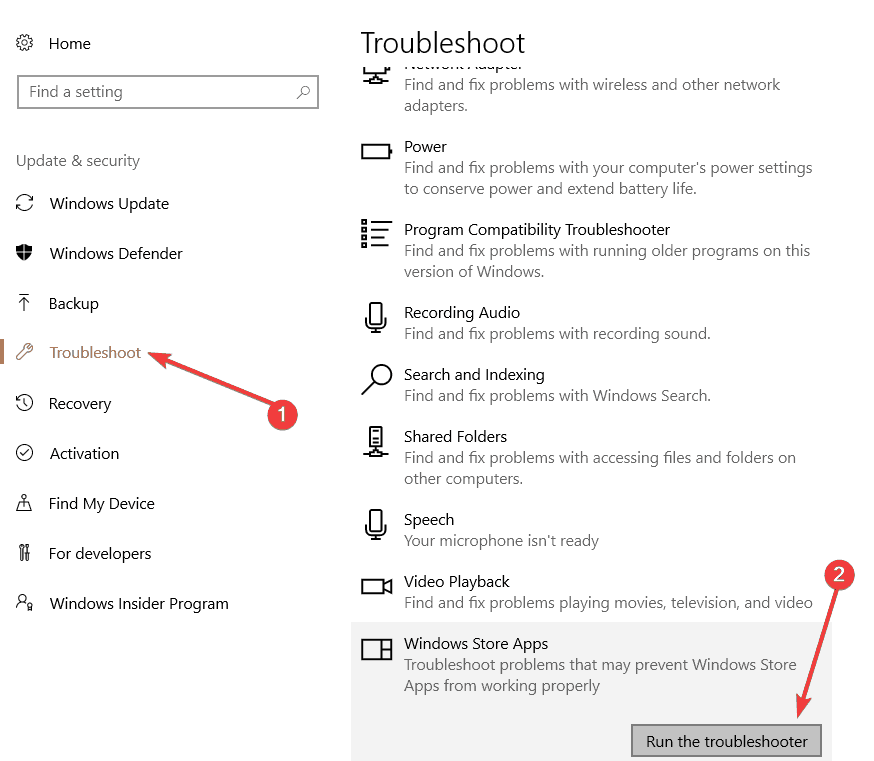
3. Run the Windows Store Troubleshooter
If there are no problems with your network, it means that Windows Store is not running as it should. And, in that case, the first thing to do is to launch another built-in Troubleshooter, though this time you need to choose the Windows Store Troubleshooter engine.
You can run this specific troubleshooter from Microsoft’s official webpage – just follow this link.
Of you can run it straight from your Settings page. Simply go to Settings > Update & Security > Troubleshoot > scroll down and run the Windows Store Apps Troubleshooter.
Additionally, you can try to sign out from your Microsoft account and reconnect afterwards. Of course, if you choose to do that, first of all uninstall the Dolby Atmos app from your computer and reinstall it after you complete the steps mentioned during the lines from above.
4. Reset the Dolby Atmos app
The network problem can be fixed if you reset the Dolby Atmos app, which can be done by applying these steps:
- Click on the Windows Search icon again.
- There type Apps & Features and click on the result with the same name.

- The System Settings window will be displayed and you should be on the Apps & Features sub-section.
- There you should have all your apps listed.

- Find the Dolby Atmos entry and click on it.
- Then, choose Advanced options and from the list that’s displayed choose Reset.
- Reboot your Windows 10 system in the end.
- Note: you can choose to reset the Windows Store app itself as that might fix your network problems – you can reset the Windows Store app in the same way as you did for the Dolby app.
5. Uninstall and then reinstall the app from your PC
As already mentioned, a good idea might be to reinstall the Dolby Atmos app on your computer. When you do that, make sure you download the latest version of this tool.
Also, before doing that I recommend you to sign out from your current Windows Store account. Hopefully, after repeating the installation process you will be able to use the Dolby software without experiencing further issues.
6. Remove and reinstall Windows Store on your Windows 10 system
If the methods from above aren’t resolving your problems, you need to reinstall Windows Store on your computer:
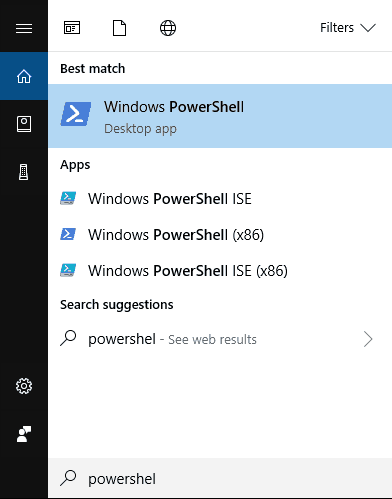
Open Windows PowerShell with administrator rights: in the Windows Search engine type PowerShell; then right-click on the Windows PowerShell result and choose ‘run as administrator’.
First, remove Windows Store
- In the command line enter ‘Get-AppxPackage –AllUsers’.
- Find the Windows Store name from the list that will be displayed; copy the full package name.
- Next, in PowerShell execute ‘remove-appxpackage insert copied package name here’.
- Windows Store will be now removed from your computer.
Now, add Windows Store back
- In PowerShell enter ‘Get-AppxPackage –Allusers’.
- Once more, locate the Windows Store app and write down its full package name.
- Then, return to the command line and execute: ‘Add-AppxPackage -register “C:\Program Files\WindowsApps\PackageFullName\appxmanifest.xml” –DisableDevelopmentMode’.
- Restart your computer at the end.
- Launch Windows Store and download the Dolby Atmos app again as it should work without problems now.
Hopefully, one of the above-explained methods is fixing the Network issues related to the Dolby Atmos app.
You can share your experience with us and with the other users who are still trying to solve this problem by using the comments field below.
Read our disclosure page to find out how can you help Windows Report sustain the editorial team. Read more


Improve this guide


User forum
0 messages