Dump File Creation Failed: Causes & How to Fix
You should try updating the BIOS to the latest version
Key notes
- The dump file creation failed error could often lead to a BSOD error.
- You can fix this by disabling the automatic startup option on your system.
- You should also try to remove any clean-up programs installed on your PC.

Our readers have reported coming across the dump file creation failed error on their Windows PC. The worst part is on investing, users found out that this error was thrown at them out of the blue since there was no dump file created on checking with the Event Viewer.
You are in the right place if you are also getting this dump file creation failed error and looking for solutions. In this guide, we will share many solutions that will help you quickly resolve the problem at your end. Let us get right into it.
What causes the dump file creation failed error?
After digging the internet, we have compiled a list of reasons that could trigger the dump file creation failed error on your PC.
- Problematic third-party cleanup apps: If you are using a clean-up app to clean junk files on your PC, chances are it deletes the dump file on your PC, hence the error.
- Corrupt system files: Corrupt system files can not only cause issues with the performance of the OS but also conflict with system-related programs.
- Outdated BIOS: Multiple user reports have confirmed that this dump file creation failed an error occurred because of outdated BIOS.
- RAM issues: Dump files are often written to RAM. In case there are some RAM-related issues on your PC, then you will face this error.
Let us go through the solutions that will help you resolve the dump file creation failed error on your PC.
How can I fix the dump file creation failed error on my PC?
1. Uninstall the cleanup program
- Open the Start menu by pressing the Win key.
- Open Control Panel.
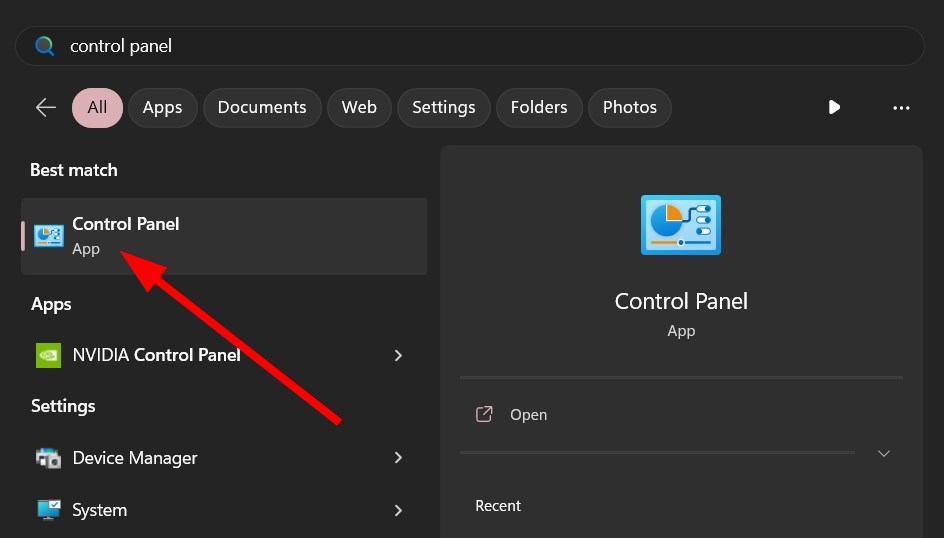
- Click on Programs and Features.

- Select the cleanup app and hit the Uninstall button.

- Follow the on-screen prompts (if any) to completely remove the app from your PC.
- Restart your PC.
Cleanup apps are often responsible for deleting the dump file folder treating it as a temporary file. So, you can try to remove them and check if this fixes the dump file creation failed error.
However, they can help remove unwanted junk files from your PC and boost the performance of your system. You can check out some of the recommended junk file clean-up apps that you can try.
2. Fix corrupt system files
- Press the Win key to open the Start menu.
- Run command prompt as an admin.
- Type the below command and press Enter.
sfc /scannow
- Wait for the SFC Scan tool to complete the diagnosing and fixing process.
- Type the below commands and press Enter, one by one.
Dism /Online /Cleanup-Image /CheckHealthDism /Online /Cleanup-Image /ScanHealthDism /Online /Cleanup-Image /RestoreHealth
3. Update BIOS
The dump file creation failed error is reportedly caused when your BIOS isn’t updated. An unstable BIOS version is also one of the key reasons. In such a case, we suggest you install the latest BIOS to keep your PC’s performance fit and fine.
However, it isn’t a cake in the walk to update the BIOS on your PC, as a wrong move can brick your PC. For that, we have created a dedicated guide explaining how you can update BIOS on your Windows 10 PC.
Windows 11 users do not worry, as we have covered a similar guide showing you steps to update BIOS on your Windows 11 PC. These guides also explain how you can check the version of BIOS on your Windows OS.
Check these guides out before you put the pedal to the metal, as they will help you safely upgrade the BIOS version.
4. Change the debug settings
- Right-click on This PC icon and select Properties.
- Click on Advanced system settings.

- Click on Settings for the Startup and Recovery section.

- Select Complete memory dump from the Write debugging information drop-down.

- Click OK to save changes.
- Restart your PC.
5. Tweak the registry
- Open the Run dialogue by pressing the Win + R keys.
- Type regedit and press OK.

- Navigate to the below path and press Enter.
HKEY_LOCAL_MACHINE\System\CurrentControlSet\Control\CrashControl
- Right-click on the blank space on the right.
- Select New and then DWORD (32-bit) Value.
- Rename this newly created DWORD as DisplayParameters.
- Edit the Value Data to 1.
- Press OK.
- Restart your PC.
Check if tweaking the registry as suggested above helps you to get rid of the dump file creation failed error on your PC.
6. Disable Automatic Restart Option
- Right-click on This PC icon and select Properties.
- Click on Advanced system settings.
- Click on Settings for the Startup and Recovery section.
- Under System failure, uncheck the Automatically restart box.
- Click OK to apply the changes.
- Restart your PC.
When you turn off or disable the automatic restart option, you ensure your system does not accidentally create a dump file with misconfiguration. This could also help you resolve the dump file creation failed error on your PC.
That is it from us in this guide. Notably, we have a guide that explains where you can find the dump files on your Windows 11 PC very easily. You should check that out if that interests you.
Dump files can also cause issues, and you can learn more about troubleshooting the problem of unconfigured Coredump targets in a separate guide.
Let us know in the comments below which one of the above solutions resolved the dump file creation failed error for you.
Read our disclosure page to find out how can you help Windows Report sustain the editorial team. Read more


Improve this guide


User forum
0 messages