PC not Using all RAM: Fix It with These Simple 9 Solutions

Using a 32-bit version of Windows can cause this issue

Reading time icon 6 min. read


Readers help support Windows Report. We may get a commission if you buy through our links. Tooltip Icon

Read our disclosure page to find out how can you help Windows Report sustain the editorial team Read more

Key notes

  • Ensure that your RAM is compatible with your motherboard.
  • Adjusting BIOS settings might be necessary to fix this issue.
windows 10 not using all ram

In some instances, PC is not using all RAM, and this can be a major problem because you have memory that won’t ever be accessed.

This means that you’re not using your computer to its full potential and utilizing its resources properly, but there is a way to fix that.

Why is my PC not using all of my RAM?

32-bit versions of Windows can’t often use all your RAM. Issues with RAM or integrated graphics can also cause this problem.

How do I make sure my computer is using all of my RAM?

Before we start, check your RAM and make sure it’s compatible and properly installed. You can also rearrange it. Lastly, update the BIOS to the latest version.

1. Use the 64-bit version of Windows

  1. Press the Windows key + I to open the Settings app.
  2. Head over to the System section.
  3. Select About from the left pane. In the right pane locate System type.

If the PC is not using all RAM and you’re not using the 64-bit version of Windows, you’ll have to perform a clean install of Windows 10 with Refresh Tool. Keep in mind that this version requires a 64-bit processor.

The process will remove all files from your system partition, so be sure to back them up beforehand. After you install the 64-bit version of Windows, your PC should utilize all your available RAM.

Quick warning, if you already have a 64-bit version and Windows isn’t using all your RAM, there’s no need to reinstall it. Instead, try one of our other solutions.

If your Windows device doesn’t have enough memory, it might not be able to work at its full potential. To fix it, check out this detailed guide.

2. Turn off Auto RAM Virtualization

You can bypass this unpleasant error by simply turning off the auto RAM Virtualization option and resolve PC not using all RAM issue.

1. Press the Windows key + S and enter advanced. Choose View advanced system settings from the menu.

2. When System Properties window opens, click the Settings button in the Performance section.

windows-10-isnt-using-all-ram

3. Performance Options window will appear. Go to the Advanced tab and click on Change.

windows-10-isnt-using-all-ram

4. In the Virtual Memory window, uncheck Automatically manage paging file size for all drives option. Now select each drive on the list and choose No paging file option. Click OK to save changes.

windows-10-isnt-using-all-ram

3. Check if your RAM is faulty

  1. Download MemTest86 tool and create a bootable media.
  2. Restart your PC and boot from the bootable media.
  3. MemTest will automatically start scanning your RAM.
  4. Leave it running for a few hours.
  5. If an issue is detected, it means that one of your modules is damaged and in need of replacement.
  6. To find out the damaged module, scan one memory at a time until you do.

4. Change your BIOS settings

  1. Press F2 or Del key while your system boots to access BIOS.
  2. Change the following values:
    • Vitualization – ON.
    • iGPUOFF.
    • Render Stability Enabled
    • iGPU memory Auto
    • Multimonitor Disabled
    • Frame Buffer LocationBelow 4G
  3. Navigate to the Advanced section and select System Agent Configuration.
  4. Select Memory Remap and set it to Enabled.

5. Use msconfig

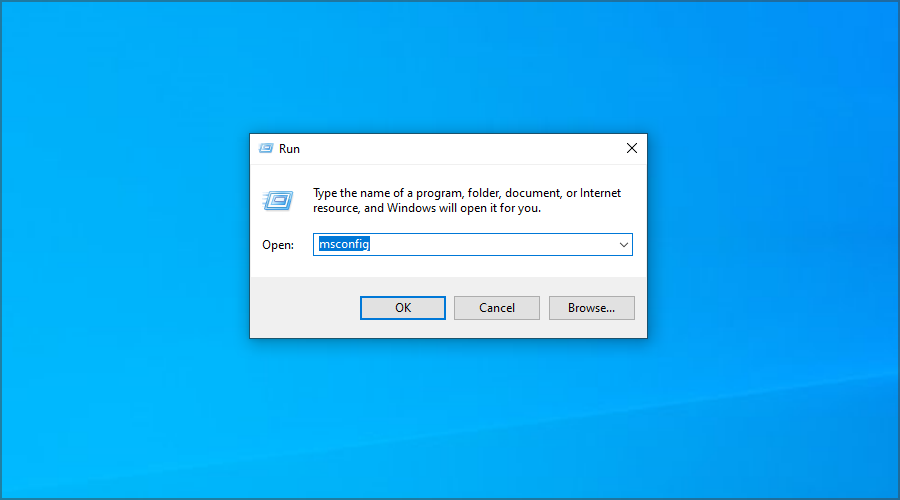
  1. Press the Windows key + R, type msconfig, and press Enter.
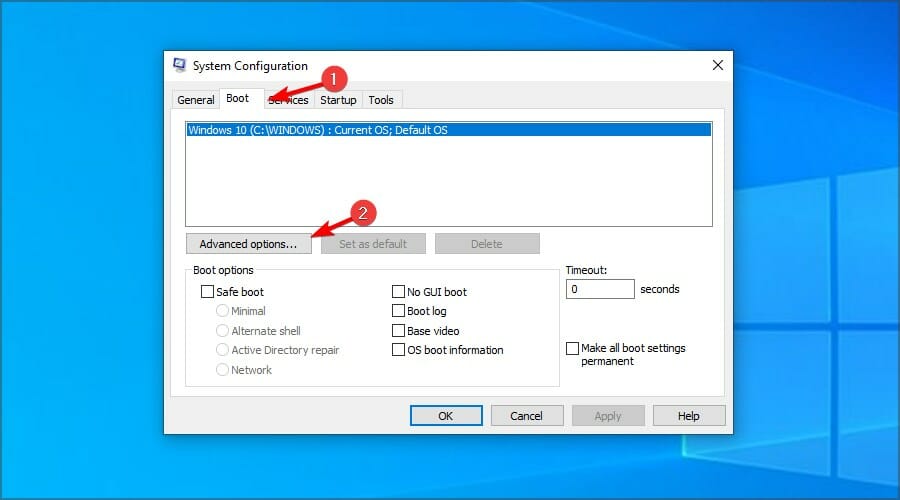
  2. System Configuration window will now appear. Navigate to the Boot tab and click on Advanced options.
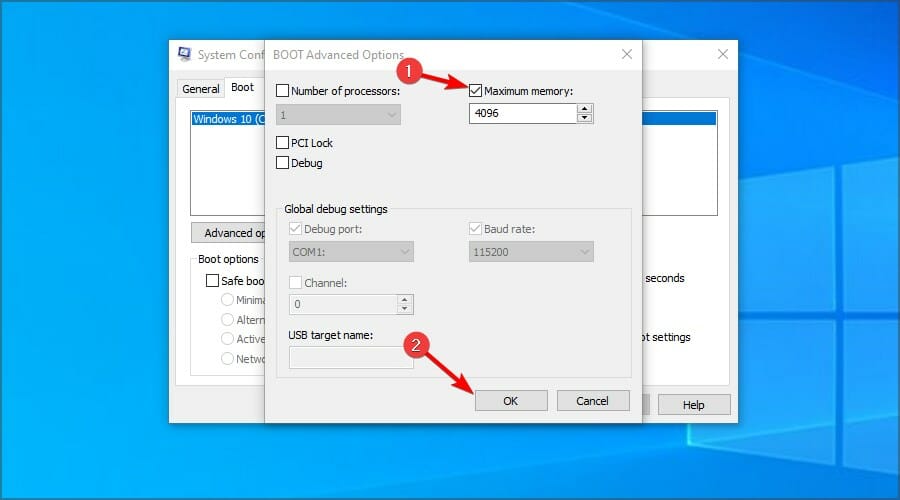
  3. Check the Maximum memory option and enter the amount you have in MB. 1GB is 1024MB, and since we have 4GB RAM on our PC, that’s 4096MB. For your PC, be sure to enter the correct amount of RAM in MB. After you’re done, click on OK.
  4. Save changes and restart the computer.

If you have 16GB RAM installed and only 8GB is usable on Windows 10, you can use the maximum memory feature to set it right.

6. Modify your registry

  1. Press the Windows key + R, type regedit, and press Enter.
  2. In the left pane navigate to the following key: HKEY_LOCAL_MACHINE\SYSTEM\CurrentControlSet\Control\Session Manager\Memory Management
  3. In the right pane, double-click the ClearPageFileAtShutdown DWORD to open its properties.
  4. Set the Value data to 1 and click on OK.
  5. Optional: Several users claim that you need to set Value data for ClearPageFileAtShutdown DWORD to 2 and save changes. After doing that, set the Value data for the same DWORD to 0 and save changes.

7. Update your BIOS

  1. Visit your motherboard manufacturer’s website.
  2. Go to select your motherboard model and the Driver & Utility section.
  3. Head over to the BIOS section, locate the latest version, and click on Download.
  4. Once the files are downloaded, extract them to a USB flash drive.
  5. Restart your PC and keep pressing F2 or Del to enter BIOS.
  6. Select the Update option.
  7. Now choose the files from your flash drive.
  8. Wait for the process to finish.

For more information, be sure to visit our guide on how to flash BIOS.

8. Check if you have integrated graphics

  1. Press the Windows key + X and choose Device Manager.
  2. Expand the Display adapters section.
  3. Locate your graphics card.
  4. Google it, and see if it’s integrated or dedicated.

To see how much memory your graphics card use, and other important information, try using video card information software.

9. Check if BIOS recognizes your RAM

  1. Restart your PC.
  2. While it boots, keep pressing F2 or Del.
  3. Once you enter UEFI, you’ll see all installed modules on your computer.

In case you can’t find a certain module, there might be a problem with it, or you might’ve exceeded the RAM limit on your motherboard. Keep in mind that the latter only affects older devices.

What happens when the PC isn’t using all of my RAM?

If your computer is not using all RAM, you’ll have fewer resources to work with, and you’ll experience a performance drop.

Let’s say you have 16GB of RAM, but your PC detects 8 GB. You’ll have twice as little memory to work with and experience issues when multitasking or when using more demanding applications.

Now that you know how to use all RAM on your PC, keep in mind that sometimes your RAM is not detected, but we have a guide that addresses that issue.

There are several ways to address this issue, but if you didn’t manage to solve it, you can also limit RAM usage on your PC to optimize it. We also have a guide on RAM not running at full speed, so be sure to visit it.

You may also want to enable Memory Compression for better optimization. The guide is for Windows 11 but works on Windows 10 too.

Did we miss any of the solutions for this problem? If we have, let us know in the comments section below.

More about the topics: Computer Memory, windows 10