How to Set Up & Change Network Scanning on the Epson Event Manager
Event Manager enables you to set your device for online scanning
Key notes
- Epson Event Manager is an important application that helps you to make the most of the main features of your Epson scanner.
- Specially designed for the Epson scanners, it allows you to scan from its control panel, and also provides support for different functions like scanning the file as PDF, scanning to PC, etc.
- However, you need to download & install the utility and, then set up the network scan settings on Epson Event Manager.
If you are confused about how to set up and change the network scan settings on the Epson Event Manager, this guide is just for you.
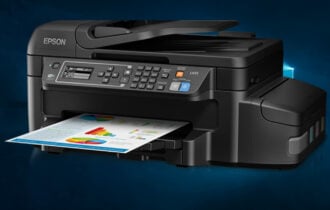
The Epson Event Manager is a utility that allows you to control the functions of the scanner directly from the desktop.
It sits in the notification area of your taskbar and should be connected to the scanner to take advantage of the main features of the Epson product.
However, for this, you should set up the network scan settings on the Epson Event Manager.
But if it’s the Epson scan that’s not working on your Windows 11 PC, then you can follow our detailed guide for more information.
How do I connect my Epson scanner to my network?
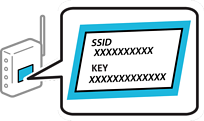
To connect the scanner to your network, enter the SSIDs (network name) and the passwords of your Wi-Fi router and the scanner.
For this, your PC/device must be Wi-Fi enabled so that it can set up the connection. At the same time, make sure that you have installed the scanner software based on the manual.
Best of all, you can also re-install the scanner software and then connect to the network as shown below:
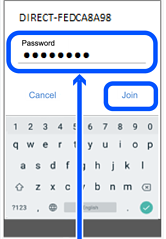
- Check your scanner for the SSID and password on its label, and then turn it on.
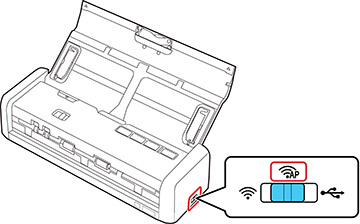
- Go to the scanner’s control panel and move the switch on its side to AP mode.
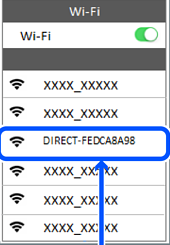
- On your PC/device, click on the Wi-Fi icon on your taskbar and open the list of wireless networks.
- Select the SSID matching the one on the scanner label and select connect.
- Next, enter the password as it appears on the scanner label. The AP mode light should be blue showing that the AP mode is connected.
- Connect your PC/device to the wireless router, and move the switch on the control panel to Wi-Fi mode.
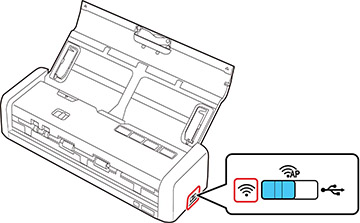
- Now, wait for the Wi-Fi light on the scanner to stop blinking and be stable, signifying that the scanner is now connected to the network.
However, you must set up network scanning next to connect your computer and wireless scanner which we will explain below.
What is the IP address of my Epson scanner?
If you have more than one scanner and wondering how to share the Epson Scanner on the network, you must find out the IP address of the scanner. Here’s how you can:
- For Windows 10, click on EpsonNet, and then click on EpsonNet Config
- On Windows 8.x, go to the Apps screen and click on EpsonNet Config
- For other versions of Windows, click on Start, select All Programs or Programs, and then select EpsonNet.
- On Mac, open the Applications folder, select Epson Software, click on EpsonNet, and then select EpsonNet Config
Now, look for your scanner in the list and note down the IP address.
The default IP address setting for the Epson scanner is Auto, Panel, and PING, and the default IP address is 0.0.0.0 to 255.255.255.255.
Want to know how to scan using the Epson Event Manager? You can follow the below instructions to set up network scanning on the utility first.
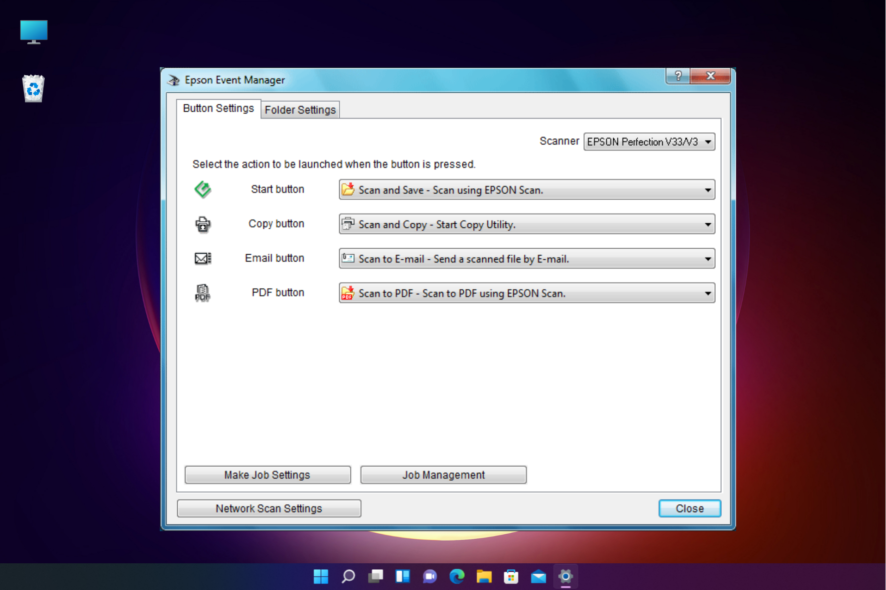
How do I set up network scanning on the Epson Event Manager?
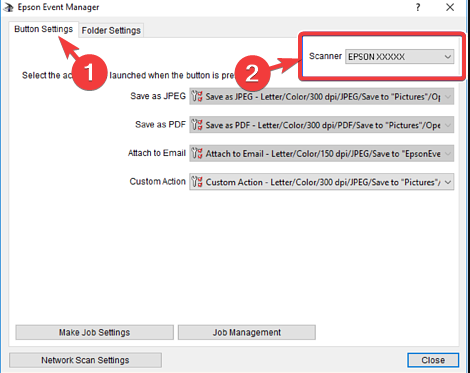
- Launch the Epson Event Manager software.
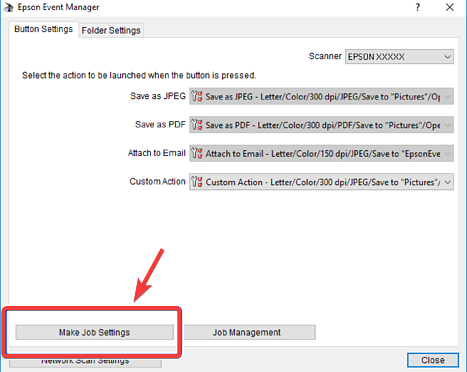
- Next, under the Button Settings tab in the Epson Event Manager, go to Scanner and select your scanner model.
- Now, go to the action name and click on the drop-down arrow to select your preferred action. For example, Scan to PDF, Scan to Email, etc.
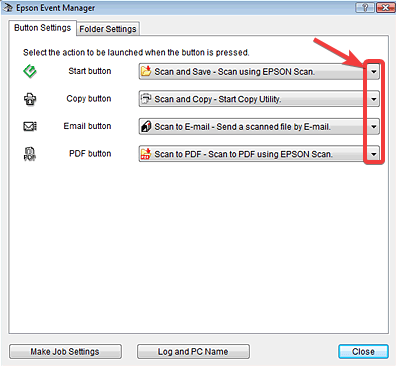
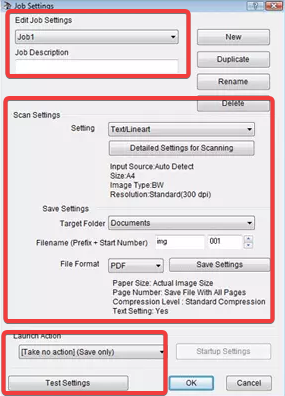
- To add the action as a custom scanning option, click on Make Job Settings.
- Now, in the Job Settings dialog, add Job Description, customize the Scan settings and press OK to return to the main window.
- Here, make sure to select Custom Action.
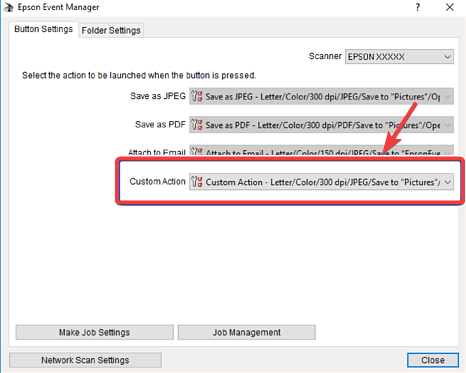
- For All-in-One/wired/wireless networks, click on the Network Scan Settings button below.

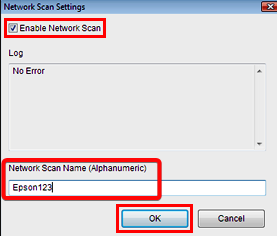
- Next, in the Network Scan Settings dialog, check the box next to Enable Network Scan, type the Network Scan Name, and press OK.
Once done, close the Event Manager and you have now successfully set up the Epson network scan settings on your Windows 10/11 PC.
 NOTE
NOTE
Also, ensure that the Epson Event Manager is ready to scan for the Scan to PC function.
Why is my Epson scanner not connecting to my computer wirelessly?
There could be several reasons why your Epson Scanner may not be connecting to your computer wirelessly, such as:
- If the Event Manager utility is being blocked by your firewall or the antivirus software
- The Epson Scan function is not started before the scanning
- If the device does not support starting a scan with the scanner button wirelessly
- When scanning the original file of a high resolution
- If the network communication is interrupted while starting Epson Scan
- Check the connection setting of your Epson scanner and test the connection using the Scan Settings
- The firewall and the anti-virus software on your wireless router or access point are blocking the connection
- When there is a communication error between the scanner and the computer
- If your network is using IPv6 because Epson Scan does not support the configuration
While adding the Event Manager utility to the Firewall/antivirus exclusions list can fix the issue, using an IPv4 network can also help the scanner connect to your PC wirelessly.
Also, make sure that the Epson device supports the scanner button to start a scan over a wireless network.
But if you are facing a problem with the Epson scanner on your Windows 10 PC, we have some effective workarounds for you in this detailed post.
For any other queries related to the Epson scanner or the Event Manager utility, do let us know in the comments box below.
Read our disclosure page to find out how can you help Windows Report sustain the editorial team. Read more


Improve this guide


User forum
0 messages