5 Ways to Fix Epson Event Manager When It's Not Working
Event Manager is a key software component for your Epson device
Key notes
- The Epson event manager is additional software that you need to install to take advantage of the main features of your Epson product.
- However, sometimes, it may stop working if the scanner drivers are not updated, it’s not installed properly or it’s blocked by the Firewall.
- In such cases, it either does not connect to the scanner, or you may bump into errors like this function is not available for the Epson event manager.

While the Epson Event Manager is an essential utility for your scanner/printer, you may sometimes experience a situation when it’s not working.
It’s a common error that could occur with the Epson printer or scanner and the Event Manager stops working completely.
This is when you may often come across different errors, for eg, Epson Event Manager cannot find the scanner driver, Cannot connect to a scanner check the scanner connection, etc.
However, if you are experiencing Epson scanner problems in Windows 10/11, then you can refer to our detailed post for quick solutions.
Why isn’t Epson’s Event Manager working?
There could be quite a few reasons behind why your Epson Event Manager has stopped working:
- The Event Manager is blocked by a Firewall
- It’s not properly installed or not ready to scan
- The network scanning settings are not set correctly
- Corrupted system files
- Outdated scanner drivers
It could also be possible that the Epson Event Manager is not working due to a network communication error, or if there’s a problem with the Epson scanner itself.
Do I need Epson Event Manager on my computer?
The Epson Event Manager is a crucial application that’s often required for essential activities by the scanner.
It’s known to support different Epson scanners and facilitate functions like Scan to Email, Scan as PDF, Scan to PC, etc.
How do I fix the Epson Event Manager if it’s not working?
1. Add Epson Event Manager to exclusions
- Expand the system tray on the taskbar and click on the Windows Security icon.

- On the Windows Security page, click on Virus & threat protection.

- Next, go to Virus & threat protection settings and click on Manage settings.

- On the next window, scroll down, and under Exclusions, click on Add or remove exclusions.
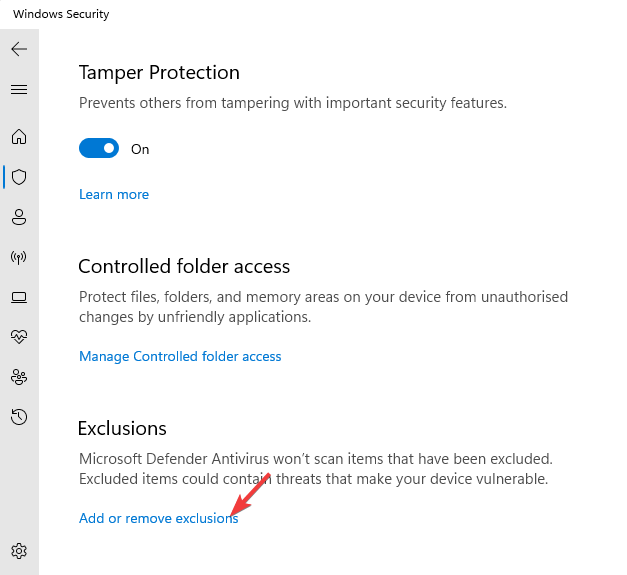
- Under Exclusions, click on Add an exclusion and then select Folder.

- Now, select the EventManager Application folder to add to the exclusion list.
You have now successfully added the utility to the exclusions list and the problem should be resolved now.
2. Update the scanner driver
- Visit the official Epson support page, enter the product name and click on Search.
- Select your scanner model from the list.

- Next, click on the blue Download button.

- Now, follow the on-screen instructions to finish installing the driver.
You can also follow our detailed guide on how to install the Epson scanner driver for more solutions.
Once done, the Epson Event Manager cannot communicate with the scanner issue should be fixed.
If you are looking for a quicker and safer solution to update your scanner driver, you can fully rely on Outbyte Driver Updater an automated tool which will check, find and replace any available driver on your device.
3. Perform a clean install for the scanner
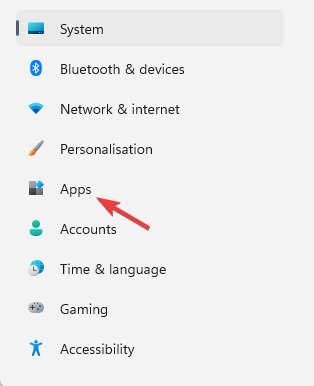
- Press the Win + I keys simultaneously to open Windows Settings.
- On the Settings screen, click on Apps on the left.
- Now, go to the right and select Apps & features.

- Next, go to the App list, look for the Epson scanner, click on the three dots next to it and select Uninstall.

- Once the uninstallation is complete, press the Win + R shortcut keys to open the Run console.
- Type control printers in the search bar to open the Drivers and Printers window.

- Here, select the scanner and hit Delete.
- Once the scanner is completely deleted from the system, restart your PC and visit Epson’s official support page.
- Here, look for the product name and download and install the complete software package for the scanner model.

You can now open the Epson Event Manager and it should be working now.
4. Run the system file checker
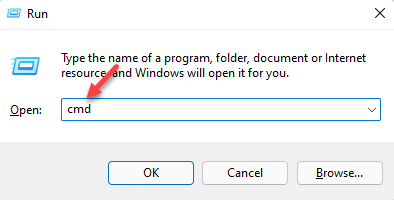
- Open the Run console by pressing the Win + R keys together.
- In the search box, type cmd and press the Ctrl + Shift + Enter keys simultaneously to open the elevated Command Prompt.
- Run the below command in the Command Prompt (Admin) window and hit Enter:
sfc /scannow
- This process takes a while, so wait patiently till it’s over and you see the success message.
Once done, restart your PC and now check if you see an error like Epson Event Manager cannot find scanner driver.
A good alternative is a system repair and malware removal tool for Windows devices.
They promise fast and detailed system analysis. As a result, users can expect robust system optimization, no more spyware viruses, and a tidy device.
5. Allow scanning via a network
- Click on Start and type Epson in the Windows search bar.

- Open the Epson folder and select Epson Scan Settings.
- Next, select your scanner from the Select Scanner list.
- Now, click on the Network setting and click Add.

- It will now start scanning for an IP address.

This method is applicable if the Epson scanner is not working and causing an issue with the Event Manager.
How do I connect my Epson printer to the Event Manager?
Before you proceed to download and install the utility, and connect it to the printer, make sure you disable any firewall/antivirus to avoid communication block between the printer and your PC.
Now proceed to install and connect the Event Manager with the Epson printer:
- Visit the official download page for the Epson Event Manager and download the utility for Windows/Mac.
- Click Next on the Epson Event Manager setup wizard and follow the on-screen instructions to finish the installation.

- Make sure to check the box next to Allow communication through Windows Firewall in the end.
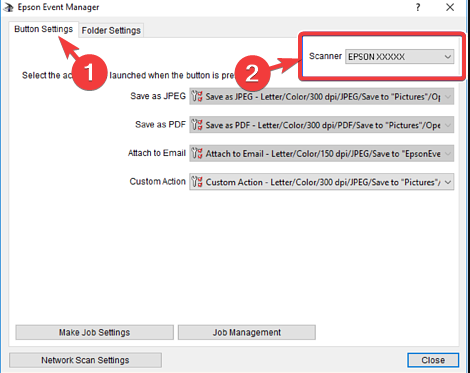
- Open the Event Manager and under the Button Settings tab, select your Epson product from the drop-down next to Scanner.
- Next, press the Win + R keys simultaneously to open the Run console.
- In the search bar, type control printers and hit Enter.

- On the Devices and Printers window, right-click on your Epson printer/scanner and click on Printer Properties.

- Next, in the Properties dialog, click on the Events tab, and Select an event from the drop-down next to it.
- Under Actions, select Epson Event Manager to Start this program.

- Click Apply and OK.
However, if your Event Manager is still not working on Windows 10/11, refer to the user manual that came with the printer and contact Epson tech support if the device is still under warranty.
But if your Epson scan is not working on Windows 11, then you can read our troubleshooting guide for more information.
For any other queries related to the Epson printer or scanner, you can let us know in the comments box below.
Read our disclosure page to find out how can you help Windows Report sustain the editorial team. Read more


Improve this guide


User forum
0 messages