10+ ways to fix error code 0x80240031c in Windows 10
![]() 7 min. read
7 min. read
![]() Updated on
Updated on
Share this article

Improve this guide
Read our disclosure page to find out how can you help Windows Report sustain the editorial team Read more
Key notes
- Updating your OS isn’t always simple, and there might be some problems from time to time.
- Error code 0x80240031c is just one issue that may come between you and your upgrade from Windows 7 or 8 to Windows 10. Fortunately, we have the fixes.
- Do not let anything to chance and stay error-proof thanks to our Windows Update Guides.
- Bookmark our Windows 10 Troubleshooting Hub as well.
Updating Windows 10 isn’t always simple, and there might be some problems from time to time. Some users are getting error 0x80240031c while updating Windows 10, so let’s see how to fix this error.
How can I fix error 0x80240031c in Windows 10?
Table of contents:
- Log in with a local account
- Delete Windows.old folder
- Disable or temporarily uninstall your antivirus software
- Update using the wired connection
- Disable your graphics card drivers
- Perform Automatic Repair
- Run the Update Troubleshooter
- Run the SFC scan
- Run DISM
- Restart Windows Update components
- Restart the BITS service
1. Log in with a local account
If you’re updating to newer build of Windows 10, and you’re using your Microsoft account to access Windows 10, you might want to switch to local account in order to fix error 0x80240031c.
There are two ways to do this: you can create a new local account and switch to it, or you can change your current account to a local one. To create a new local account, follow these instructions:
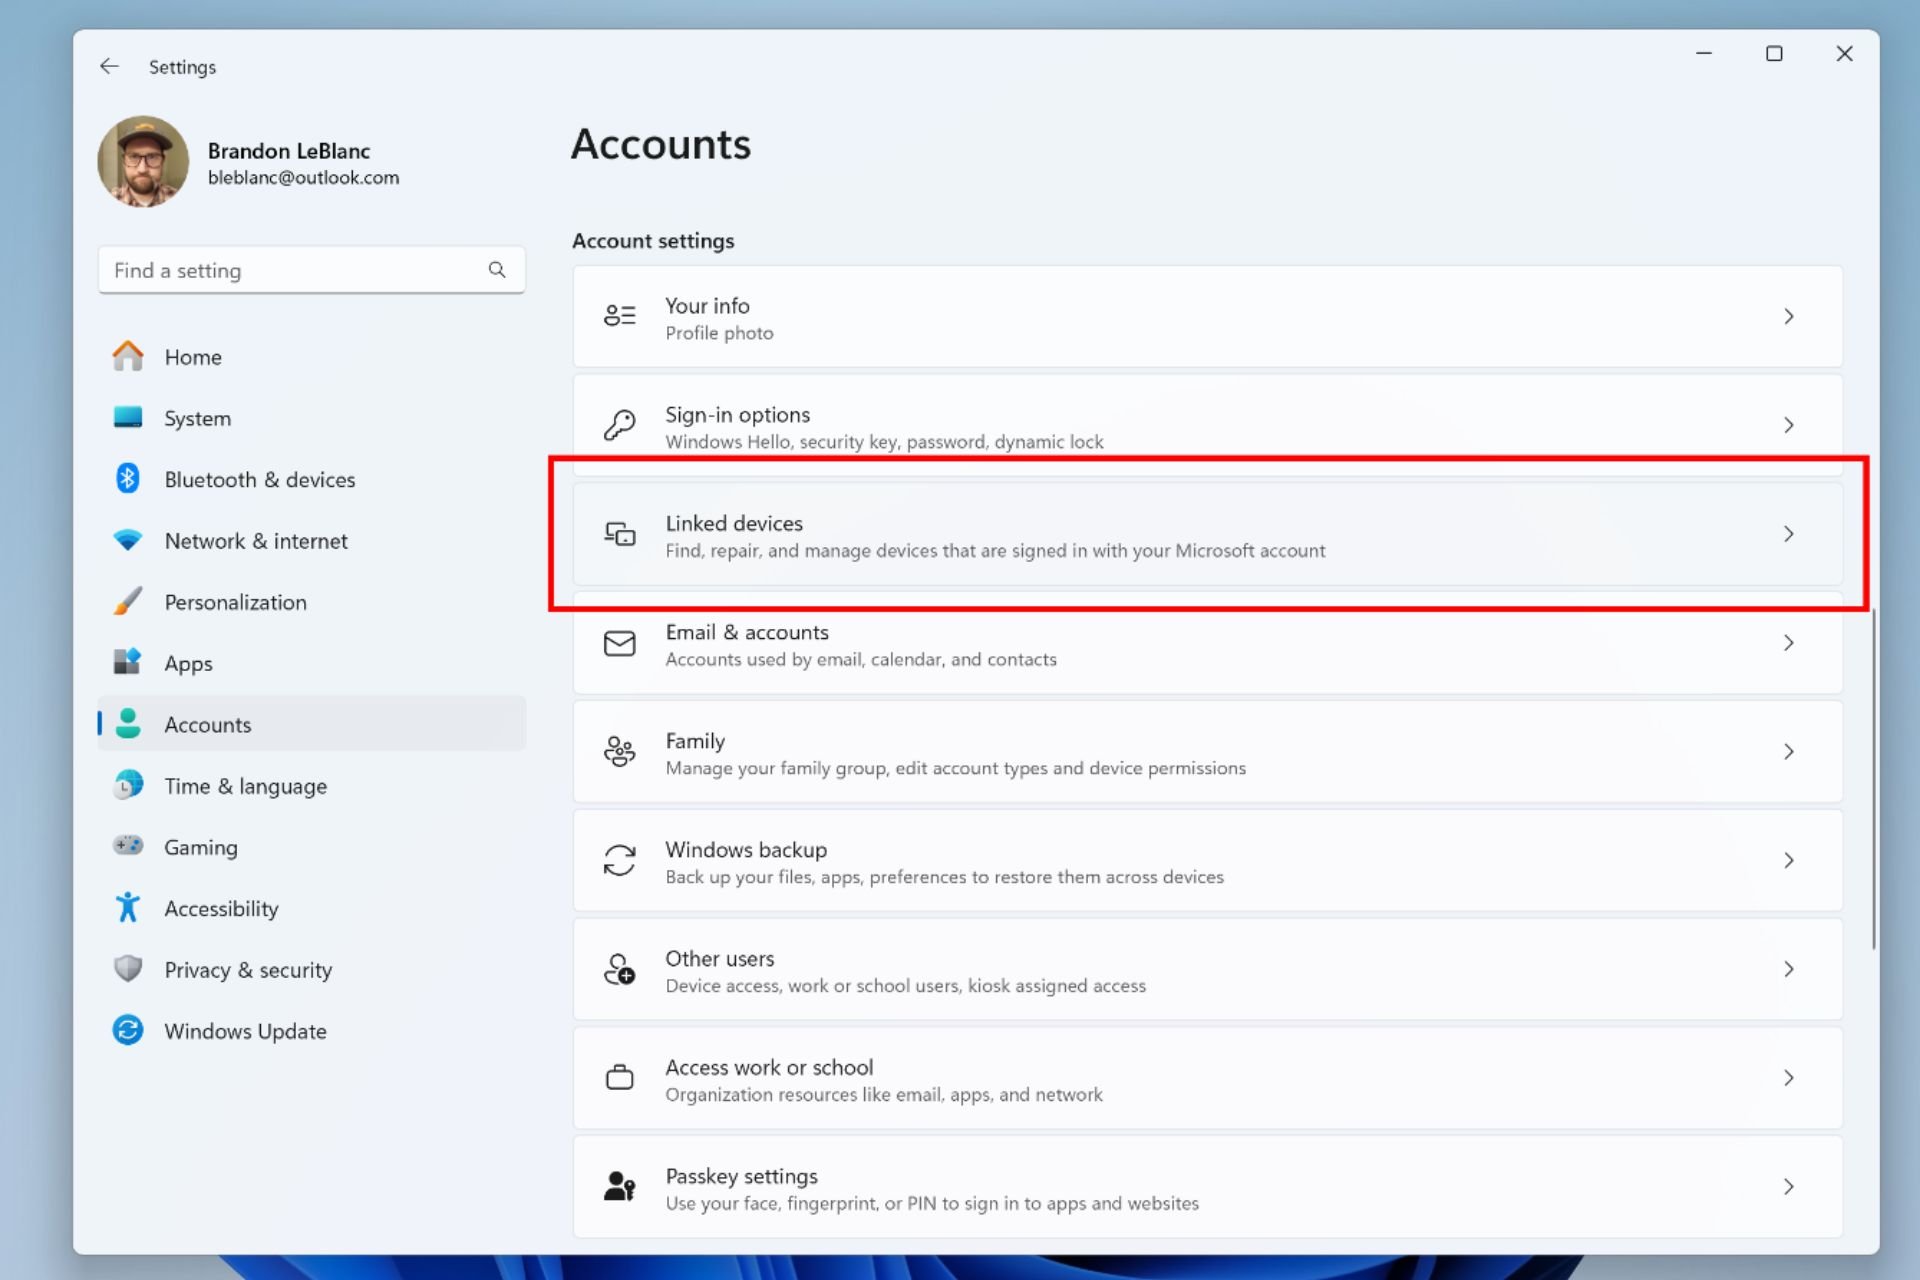
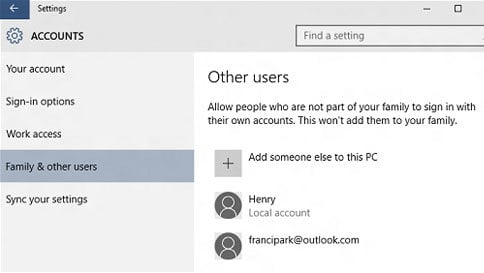
- Open the Settings app.
- Navigate to Accounts > Other users.

- Under Other users section, click Add someone else to this PC.
- Choose I don’t have this person’s sign-in information, and then click on Add a user without a Microsoft account.
- Enter the username and password for this user.
- Now you need to log out of your account and switch to a new local account that you’ve just created.
- After switching to a new account, try to update Windows 10.
After you’re done, you can delete the local account. If you wish to change your account from Microsoft account to a local account, do the following:
- Open Settings app and go to Accounts > Your account.
- Next, click on Sign in with a local account instead.
- Enter the password for your account and click Next.
- Now, enter username and password that you wish to use. After you’re done, click Next.
- Next, click Sign out and finish.
- Log in back again to your account, and try to update Windows 10 again.
2. Delete Windows.old folder
If you have upgraded from Windows 8 or Windows 7, you might have Windows.old folder on your main hard drive. This folder contains everything from your old operating system, and you can use that folder to switch back to the previous version of Windows. However, if you’ve performed a clean install or you have been using Windows 10 for more than a month, this folder is probably not on your hard drive.
Sometimes this folder can be the cause of error 0x80240031c on Windows 10, so make sure that you delete it. After deleting Windows.old folder, you won’t be able to return the previous version of Windows, so keep that in mind.
3. Disable or temporarily uninstall your antivirus software
Sometimes error 0x80240031c is caused by your antivirus software, so before you try to upgrade, make sure that your antivirus software is disabled. If the issue persists even if your antivirus software is disabled, uninstall your antivirus and try to upgrade Windows 10 again.
Users have reported that AVG antivirus is causing this issue, but if you use different antivirus software, make sure that you disable it, or uninstall it if you’re getting error 0x80240031c.
4. Update using the wired connection
It has been reported that this error appears when you try to update Windows 10 using a wireless or mobile network such as Verizon 4G LTE, AT&T 4G LTE, etc. If you’re using wireless or mobile network, connect your device to a wired network and try to perform the upgrade again.
5. Disable your graphics card drivers
Graphic card drivers can cause issues when performing Windows update, and it’s advised that you disable your graphic card driver when you’re upgrading your Windows. To do so, just visit Device Manager, find your graphic card, right click it and choose Disable.
After you’ve disabled your graphic card driver, try to perform the upgrade again.
6. Perform Automatic Repair
If the issue persists, you could perform Automatic Repair in order to fix this problem. To perform Automatic Repair, you’ll have to use Advanced Startup.
To access Advanced Startup, you need to do the following:
- While in Windows 10, hold the Shift key on your keyboard and click the Power button. From the list of options choose Restart.
- Your computer will restart and take you to the Advanced Startup menu.
- Now you need to choose Troubleshoot > Advanced Options > Automatic Repair.
If Automatic Repair doesn’t fix this issue, you might want to refresh your PC. To do that, you need to repeat Step 1 from this solution and choose Troubleshoot > Refresh your PC.
7. Run the Update Troubleshooter
The next thing we’re going to try is running Windows 10’s built-in troubleshooter. This troubleshooting tool can resolve various issues, including our update problem.
Here’s how to run the Update troubleshooter in Windows 10:
- Go to Settings.
- Head over to Updates & Security > Troubleshoot.
- Select Windows Update, and go to Run the Troubleshooter.
- Follow further on-screen instructions and let the process finish.
- Restart your computer.
8. Run a SFC scan
Since we got involved with the troubleshooting tool, you may as well try the SFC scan. This is a command-line tool that basically scans your system for potential issues, and resolves them automatically (if possible).
Here’s how to run the SFC scan in Windows 10:
- Right-click on the Start Menu button, and open Command Prompt (Admin).
- Enter the following line and press Enter: sfc/scannow
- Wait until the process is done (it may take a while).
- If the solution is found, it will automatically be applied.
- Now, close the Command Prompt and restart your computer.
9. Run DISM
And finally, the last troubleshooting tool we’re going to try is Deployment Image Servicing and Management (DISM). As its name says, this tool deploys the system image all over again, and can hopefully ‘wipe away’ the problem.
Here’s how to run DISM in Windows 10:
- Open the Command Prompt as shown above.
- Enter the following command and press Enter:
-
-
DISM.exe/Online /Cleanup-image /Restorehealth
-
-
- Wait for the process to finish.
- Restart your computer.
- In case the DISM can’t obtain files online, try using your installation USB or DVD. Insert media and type following command:
-
-
DISM.exe/Online /Cleanup-Image /RestoreHealth /Source:C:RepairSourceWindows /LimitAccess
-
-
- Make sure to replace C:RepairSourceWindows path of your DVD or USB.
- Follow further on-screen instructions.
10. Restart Windows Update components
If none of the previous solutions resolved the problem, let’s try with resetting Windows Update components. Here’s how to do that:
- Start Command Prompt as administrator.
- When Command Prompt starts, run the following commands:
- net stop wuauserv
- net stop cryptSvc
- net stop bits
- net stop msiserver
- ren C:WindowsSoftwareDistribution SoftwareDistribution.old
- ren C:WindowsSystem32catroot2 Catroot2.old
- net start wuauserv
- net start cryptSvc
- net start bits
- net start msiserver
11. Restart the BITS service
The final thing we’re going to try is restarting the BITS service, which is responsible for acquiring updates. Here’s how to reset the BITS service:
- Go to Search, type services.msc, and open Services.
- Find Background Intelligent Transfer Service. Right-click and open Restart.
- Wait for the process to restart.
- Now, on the General tab, find Startup type and choose Automatic.
- If the BITS is not running, right-click and choose Start.
- Confirm selection and close window.
We have to mention to use refresh option as the last solution and only if you’re unable to fix error 0x80240031c in any other way.
Bear in mind that refreshing your PC will delete your downloaded software and files, although your personal documents and Universal apps will be saved, so use it as a last resort.
[wl_navigator]