ERROR_UNEXPECTED_MM_MAP_ERROR 557 (0x22D) [BSoD Fix]
Restart your PC in clean boot to identify the cause
Key notes

The ERROR_UNEXPECTED_MM_MAP_ERROR with error code 557 (0x22D) and description If an MM error is returned which is not defined in the standard FsRtl filter, it is converted to one of the following errors, which are guaranteed to be in the filter. In this case information is lost, however, the filter correctly handles the exception, indicates an issue related to memory mapping in Windows, particularly virtual memory management or in the file system.
You might face this error due to corrupted memory, bad sectors on a disk or hardware or driver issues. First, restart your PC, press Windows + X, and select Event Viewer. Head to Windows Logs>System and look for memory-related errors.
How can I fix ERROR_UNEXPECTED_MM_MAP_ERROR?
1. Run the Windows Memory Diagnostic tool
- Press the Windows key, type memory diagnostic, and click Open from the list of options to launch the Windows Memory Diagnostic tool.

- Select Restart now and check for problems.

During the reboot, the Windows Memory Diagnostic tool runs several tests, and you can see the progress with the progress bar on the screen. This scan may take some time, depending on the RAM’s size.
Your PC will restart and take you to the login screen once the memory scan is complete. The test results should appear on the screen when you log in. If the results are not displayed on the desktop, head to Event Viewer to check them out. In case there are errors, reseat the RAM and rerun the scan. If you still get the errors, you might have to replace the faulty RAM or its memory modules.
2. Run the CHKDSK scan
- Press the Windows key, type cmd in the search box, and select Run as administrator from the list of options to open Command Prompt with administrator privileges .

- Type the following command to run the chkdsk utility to scan and repair any file system issues found after replacing C: with the affected drive letter, and hit Enter:
chkdsk C: /f
- If the drive is already in use, you will be prompted to schedule a scan after the restart; type Y and hit Enter.
- Now save all your work and reboot your PC to initiate the scan.
The CHKDSK scan will start and will go through different stages, it will check for lost clusters, verify file integrity, and assess security descriptors. If there is an issue, the utilty will try to recover lost files, and fix the inconsistencies. Once done, your system will restart and you can login to check the results.
Remember the process may take some time depending on the size of the drive and there should be no interrruption, so run the scan in your free time.
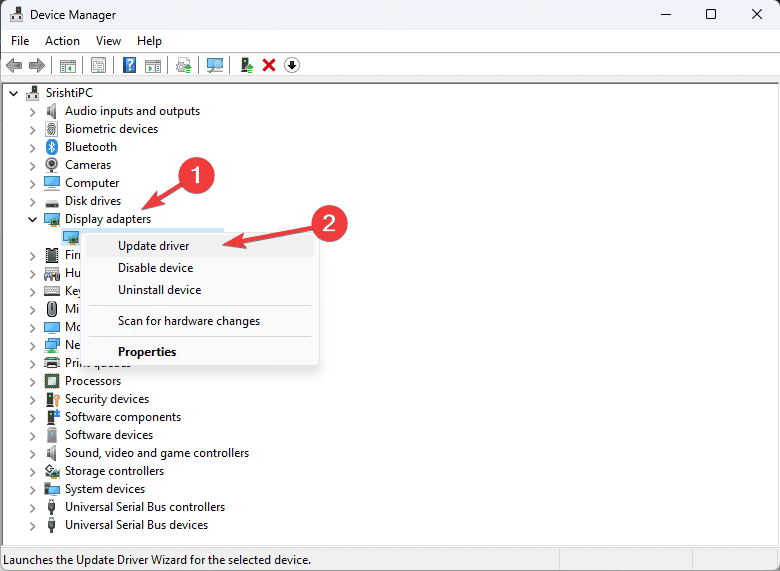
3. Update the device drivers
- Press Windows + R to open the Run console.

- Type devmgmt.msc and click OK to open the Device Manager window.
- From the list of system components, navigate to each category, expand them one by one and look for a driver with a yellow triangle and an exclamation point inside it.
- If found, right-click it and select Update driver from the context menu.
- Select Search automatically for drivers.

Windows will try to find a suitable version of the driver. However, if it fails, go to the device manufacturer’s website and download the latest version manually. Alternatively, you can download & install a reliable third-party driver updater tool to make sure all the device drivers are up to date.
4. Run the SFC scan
- Press the Windows key, type cmd in the search box, and click Run as administrator from the list of options to launch Command Prompt with elevated rights.

- To repair or replace damaged system files with the correct versions from a local cache, type the following command and hit Enter:
sfc /scannow
- Windows will now check the integrity of important system files and once the scan is complete, copy & paste the following DISM commands one by one to repair the system image via Windows Update and press Enter after each command:
Dism /Online/Cleanup-Image /CheckHealth
Dism /Online/Cleanup-Image /RestoreHealth
- Wait for the scan to complete, then restart your computer to let the changes take effect.
5. Check the Virtual memory settings
- Press Windows + R to open the Run console.

- Type sysdm.cpl and click OK to open System Properties.
- Go to the Advanced tab, navigate to the Performance section, and click the Settings… button.

- In the Performance Options window, switch to the Advanced tab.
- Look for the Virtual Memory section and click Change.

- On the following page, click each drive one by one and make sure the Automatically manage paging file size for all drives option is selected for all disks.

- Click OK, then restart your computer to apply the settings and check if the ERROR_UNEXPECTED_MM_MAP_ERROR persists.
You can also set it manually, follow these steps to do so:
- On the Virtual Memory page, remove the checkmark next to the Automatically manage paging file size for all drives option.
- Select C or the system drive letter you want to use for the paging file, and select Custom size.

- Set the Initial size equal to the installed RAM size and the Maximum size 1.5x to 3 times more than the physical RAM.
- Now, click Set.
- Click OK, and restart your PC to apply the changes.
6. Restart your PC in clean boot environment
- Press Windows + R to open the Run console.

- Type msconfig and click OK to open System Configuration.
- Naviagte to the Services tab, place a checkmark next to Hide all Microsoft services and click Disable all.

- Switch to the Startup tab, and click the Open Task Manager link.

- On the Task Manager window, select all the Enabled items one by one and click Disable, then close it.

- Back on the System Configuration window, click Apply and OK.

- Click Restart if prompted to boot your computer.

Your device will restart and have the necessary services and startup items. Next, enable third-party services and startup items one by one and check if you get the ERROR_UNEXPECTED_MM_MAP_ERROR. If not, reverse engineer the above steps to restart your computer in normal mode.
7. Restore your PC to an older version
- Press Windows + R to open the Run console.

- Type sysdm.cpl and click OK to open System Properties.
- On the System Properties window, navigate to the System Protection tab and click the System Restore button.

- Select Choose a different resort point on the System Restore wizard and click Next to proceed.

- From the list of available restore points, choose the one created before the ERROR_UNEXPECTED_MM_MAP_ERROR appeared for the first time, then click Next.

- Click Finish.

Windows will restart and try to restore your system settings to the chosen version. If Windows is unable to do so, and you get System Restore did not Complete Successfully message after restart, the reason could be corrupted system files or conflicting drivers; check out this guide to learn more.
8. Reinstall your operating system
Before you reinstall Windows, make sure you do these things:
- Back up all your important data, including videos, photos, documents, and other files to an external drive or another PC
- Keep your Microsoft account credentials handy
- Make a list of all installed apps, their licenses, and credentials ready
- Get a USB flash drive with 8 GB of free space
- If using a laptop, connect it to a charger
Create an installation media
- Go to the Windows 11 download website on another PC.
- Locate Create Windows 11 Installation media and click the Download now button.

- Once the mediacreation.exe is downloaded, double-click to run it and click Yes on the UAC prompt.
- The Windows 11 Setup wizard will launch, click Accept.

- On the following page, choose the language, edition, and architecture, and click Next.

- Plug in your USB drive; on the Choose which media to use screen, choose the USB flash device option and click Next.

- On the Select a USB flash drive page, the flash drive letter will appear. If it doesn’t, click Refresh drive list and ensure the flash drive is listed, then click Next.
- Wait for the process to complete, click Finish, then remove the USB device from the PC safely.
Reinstall the OS
- Plug the flash drive into the affected computer, then restart your PC.
- The device will automatically boot to the USB drive; however, if it doesn’t, you need to change the boot order from the boot menu.
- Once the PC boots to the USB drive, you will get the Install Windows page.
- Choose your language, time, and keyboard preferences, and click Next.
- Click the Install Windows button.
Your PC may restart several times, and once it is complete, Windows will boot and take you to the login screen. You can then log in to your account, check for Windows Updates, and configure your device settings as per your preferences.
Reinstalling Windows is the last resort to fix any BSoD errors like ERROR_INTERMIXED_KERNEL_EA_OPERATION 324 (0x144), ERROR_BAD_STACK, and ERROR_INVALID_HW_PROFILE, so, first try all the other methods before trying this.
In conclusion, to fix the ERROR_UNEXPECTED_MM_MAP_ERROR, run the SFC scan to repair system files, use the CHKDSK utility to scan the disks for errors to eliminate the faulty RAM, update the drivers, or restart your PC in clean boot to identify the cause. If none of these work for you, try reinstalling Windows.
If you have questions or suggestions about the BSoD error, feel free to mention them in the comments section below.
Read our disclosure page to find out how can you help Windows Report sustain the editorial team. Read more


Improve this guide


User forum
0 messages