Extend a Basic Volume on Windows 11 - Step-by-Step Guide
![]() 4 min. read
4 min. read
![]() Updated on
Updated on
Share this article
Improve this guide
Read our disclosure page to find out how can you help Windows Report sustain the editorial team. Read more
If you’re wondering how to extend a basic volume in Windows 11, this is the best guide you can refer to!
Storage disks are often cluttered with many unnecessary partitions that can be challenging to track. Not to mention, some disk drives might hit the maximum storage capacity ceiling. These situations might push you to seek options to extend basic volumes by using unallocated disk spaces.
So, I’ve tested a few built-in and third-party tool-based methods to change a drive’s capacity and listed the best ones here.
How To Extend a Basic Volume on Windows 11
There are two simple methods you can try out:
Using the Disk Management Tool
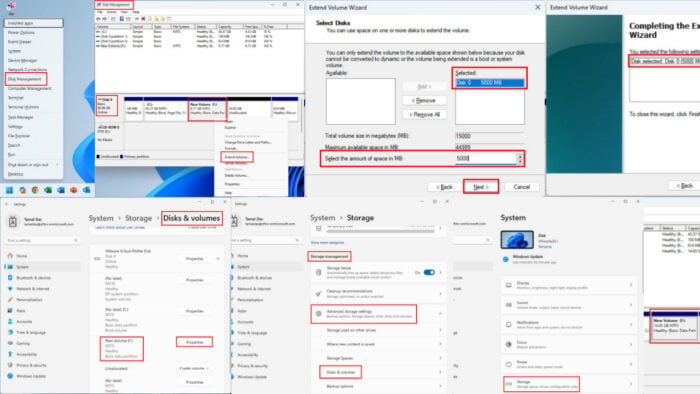
Windows Disk Management is the native tool for creating, deleting, merging, and editing partitions. In most cases, this is the only method you need to know, because it gives deep access to internal storage drives like HDDs, SSDs, and NVMe SSDs.
- On your PC, press the Windows + X keys together to launch the Power User context menu in the bottom left corner.
- There, find and click on the Disk Management tool.

- Let the Disk Management app open and load all drives and partitions.
- Now, select the basic volume you want to extend from the list of partitions for individual HDDs or SSDs.
- Windows 11 will list the HDDs or SSDs as Disk 0 for the first storage drive, Disk 1 for the second storage drive, and so on.
- Here, I selected Disk 0, and inside Disk 0, I clicked on the New Volume (F:) partition I wanted to extend.
- After selecting the source partition, right-click and select Extend Volume from the context menu.

- The Extend Volume Wizard will open. Click Next.
- If there’s just one disk in the PC, it’ll automatically select that in the Selected list on the right side of the Extend Volume tool.
- In the same dialog box, you’ll see the maximum available storage space you can allocate to extend the basic volume.
- Enter the storage space requirement in MBs within the Select the amount of space in MB field. Click Next to move forward.

- Click Finish to complete the process.

You can see in the above screenshot that Windows 11 has taken away 5 GB of storage space from the Unallocated partition. The same amount was added to the New Volume (F:) to increase its storage ceiling.

Using the Settings App
If the Disk Management tool isn’t available or doesn’t work, you can try this alternate method:
- Press the Windows + I keys together to launch the Settings app.
- Click System on the left-side navigation panel and select Storage from the right-side menu.

- On the next screen, scroll down to the Storage management section and click on Advanced storage settings.
- More tools will become available on the menu. Click on the Disks & volume option.

- Find the partition you want to extend in the Disks & volume menu and click Properties next to it.

- You should now see the details window for the selected basic volume. Here, click on Change size.

- The Change size dialog will pop up. There, enter the new storage space you want. For example, 25,000 for 25 GB.

- Click OK and Windows will instantly allocate new storage space to the basic partition.

How To Troubleshoot Basic Volume Extension in Windows 11
If the Extend Volume button isn’t active or not available at all, try these troubleshooting ideas:
- Make sure unallocated space is available next to the partition you want to extend. If not, delete as many partitions as possible. Then, create a new volume from scratch.
- Format the source partition to NTFS from the FAT file system.
- If the volume you want to extend is on a basic disk, consider converting it to a dynamic disk.
- Between the volume you want to extend and the unallocated space, there shouldn’t be any system-reserved partition or other protected partition.
So, now you know how to extend a basic volume on Windows 11 to increase the storage capacity.
If the article helped you manage disk drives and partitions effectively, you can acknowledge it in the comments below. Also, if you’ve got any feedback, feel free to share it!


User forum
0 messages