Solutions to fix Office errors 0-1011, 0-1005, 30183-1011
5 min. read
Updated on
Read our disclosure page to find out how can you help Windows Report sustain the editorial team. Read more
Key notes
- The Microsoft Suite is vital for our daily tasks. Of course, in order to get so attached to the suite, you firstly need to install it.
- If you're having a hard time doing that, here's how to solve a few common Office installation errors.
- Once you've dealt with the installation, you might begin to notice different update errors. Take a look at this Office Notifications Guide to turn off Updates for Office are ready to be installed notifications.
- Feel free to explore our Microsoft Office Hub as well.
Although the Microsoft Suite is, dare we say, a vital resource for many PC uses, we simply cannot ignore the frequent problems that occur when installing Office.
A while ago, Microsoft published an official resource on how to fix errors 0-1011, 30088-1015, or 0-1005 when installing Office on your system.
According to the famous manufacturer, these error codes usually appear when you’re having a network connection issue or if your hard drive is running out of space.
Fix error code 0-1011, 30088-1015, 30183-1011, or 0-1005 when installing Office
- Check your Internet connection
- Increase your hard disk space
- Temporarily turn off proxy settings
- Temporarily turn off antivirus software
- Temporarily turn off firewall
- Use an Ethernet connection
- Install Office from home
- Disable VPN software
- Stop the Print Spooler service
1. Check your Internet connection
So, of course, the first things you need to do are to check your internet connection and just make sure everything is alright.
Also, make sure you have more than enough free storage space. If this doesn’t solve the problem, here are some other steps that you could undertake.
2. Increase your hard disk space
To increase hard disk drive space, you can use the native Disk Cleanup utility to clean the system of unwanted files, or you can go for professional third-party software tools such as Ashampoo WinOptimizer.
Install Ashampoo WinOptimizer
When it comes to increasing disk space and optimizing your PC, the WinOptimizer is unparalleled.
By eliminating anything from redundant files to invalid Registry entries, browsing traces or useless temporary, or log files, this powerful optimization tool allows you to reclaim disk space, improve your PC’s overall performance and avoid potentially fatal errors.
The WinOptimizer closely monitors your entire system, performs deep scans in order to avoid performance bottlenecks, and acts upon them for maximum performance and privacy every time.
Increasing disk spaces and reclaiming your resources has never been easier.
Let’s quickly look at its key features:
- Complete system monitoring
- Power saving profile to conserve energy
- Integrated Browser extension manager to keep your browser clean and safe from hidden malware
- Uncluttered, user-friendly interface with fast access to every feature
- Continuous program updates in perfect sync with OS updates
- Privacy-oriented features to keep targeted advertising or PC tracking under control
- Auto-Clean feature to remove junk data automatically
- Live-Tuner feature to accelerate program launches
- Cleaning modules (delete redundant files and superfluous Registry entries to reclaim disk space and improve performance)
- Full compatibility and performance with old and new Windows versions alike

Ashampoo WinOptimizer
Clean, repair, and increase disk space with a one-of-a-kind system optimization software.⇒ Download Ashampoo WinOptimizer for Windows here
3. Temporarily turn off proxy settings
If you use your device both at home and at work, try turning off the proxy settings in Internet Explorer before you install Office. If you’re using a different browser, check their help to find out how to turn off proxy settings.
NOTE: There might be more proxy settings that you need to bypass. If this doesn’t work, and you’re installing Office from work or school, check with your IT department for more information.
4. Temporarily turn off antivirus software
If you need information about how to turn off your antivirus software, check your antivirus manufacturer’s website. Uninstalling your antivirus software may also help. Don’t forget to reinstall it after Office is finished installing!
TIP: Not sure which antivirus software you have? Use the Control Panel to find the name of the antivirus software installed on your device.
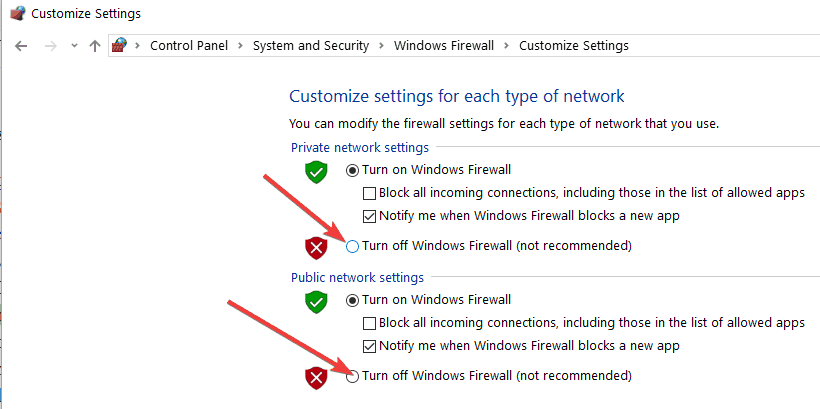
5. Temporarily turn off firewall
Turn off Windows Firewall. If you’re using a firewall from another manufacturer, visit the manufacturer’s website for information about how to temporarily disable the firewall.
6. Use an Ethernet connection
Use a wired connection to the Internet, if possible. If this doesn’t work, try connecting at a different location, such as a friend’s house or a wireless hotspot.
7. Install Office from home
If you’re trying to install at work or at school, the network might be limited in a way that won’t allow Office to install.
Your IT department might be able to help you handle these limitations. If not, you could also take your computer home to install Office. After it’s installed, you’ll be able to use it at work or school as if you had installed it there.
8. Disable VPN software
Apart from the solutions suggested by Microsoft, you can also turn off your VPN software.
Some Windows 10 users confirmed they managed to successfully install Office after temporarily closing their VPNs. Maybe this quick solution works for you as well.
9. Stop the Print Spooler service
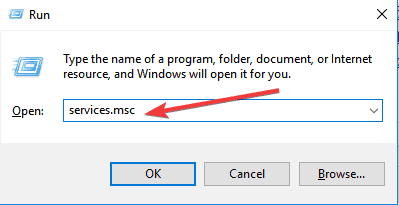
The Print Spooler service may also be another element blocking your Office install. As a result, stopping the Print Spooler feature may fix the problem:
- Type services.msc in the Seach box.
- Locate Print Spooler > open it.
- Click Stop and then OK to turn off the service.
- Check if you can install Office now.
- Once the installation completes, restart the Print Spooler.
Also, you can remove and reinstall Office, of course, and try and run the Fix It tool, as well, as it has proven to be helpful in these situations.
Leave your comments below and let us know whether you have found other potential fixes, as well.





User forum
0 messages