Fix: File Explorer Icon Missing in Windows 10 Start Menu
Change your settings to get File Explorer back on your PC
Key notes
- File Explorer replaced Windows Explorer from previous versions of Windows, and sometimes it's not visible.
- Adjust your Taskbar settings if you want to get File Explorer back.
- Creating the shortcut manually is also a great way to fix this issue easily.
In Windows 10, the File Explorer icon is available by default in the taskbar. File Explorer icon missing from Start Menu is an issue that you may encounter out of nowhere, though.
Some Windows 10 users have reported that File Explorer is missing from the Start menu. This isn’t the only issue as many reported that File Explorer is slow on their PC.
What can I do if the File Explorer icon is missing in Windows 10 Start menu?
1. Verify Settings App
- Click on the Start button and then click on the Settings icon available in the Start menu. Alternatively, you can simply press Windows + I keyboard shortcuts, to quickly launch the Settings app.

- Click on Personalization and then Start. On the left pane, scroll down to the bottom and click on the link, which reads Choose which folders appear on Start.

- Now verify that the File Explorer option is On. If it is disabled, enable it by moving the toggle, and File Explorer will definitely appear in the Start menu.

But for some reason, if you cannot change the setting for File Explorer or if the toggle is grayed out, then check out the next solution.
2. Manually add File Explorer in the Start menu
- Right-click your Desktop, next choose New, and then Shortcut.
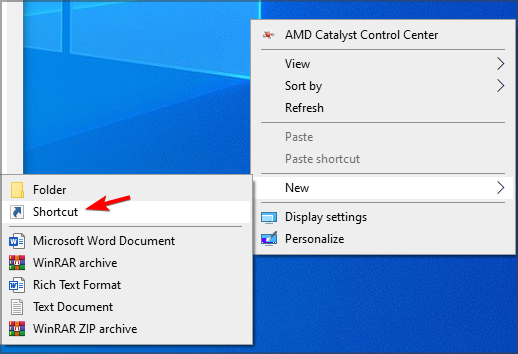
- Type explorer.exe and follow the instructions on the screen.

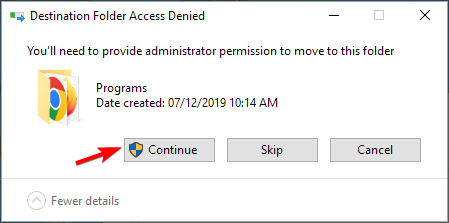
- Press Windows + R keyboard shortcuts and type the following path in it and press OK.
C:\ProgramData\Microsoft\Windows\Start Menu\Programs
- Move the newly explorer.exe shortcut to the Programs directory.
- Click on Continue to proceed.
3. Change File Explorer properties
- Launch the Run dialog box by pressing Windows + R keyboard shortcut.
- In the Run dialog box type the following:
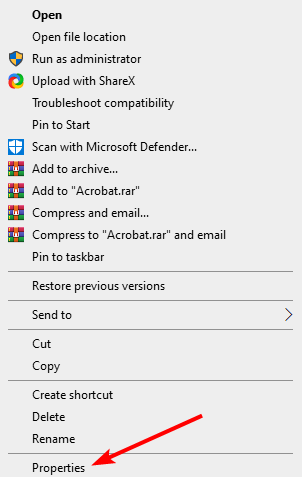
C:\ProgramData\Microsoft\Windows\Programs - In the folder, make right-click on the empty area of the folder and from the context menu select Properties.
- Switch to the Previous Versions tab.
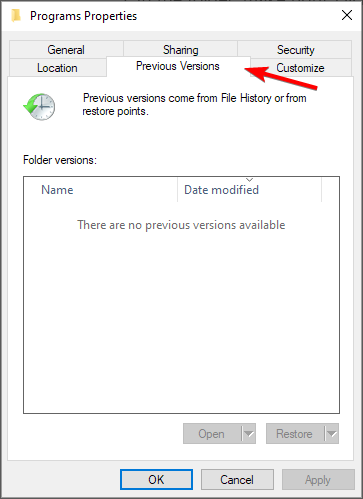
- Choose the earlier data, and then click on the Restore button.
Now doing this, the File Explorer shortcut will start appearing in the Start menu places folder. If it appears in the folder, you can enable the File Explorer toggle in the settings app.
Why are my icons missing from the Start menu in Windows 10?
When you have icons missing from the Start menu in Windows 10, it’s usually the corrupt system files to blame. Or it could be a trivial bug in the explorer.exe process, restarting, which should get things up and running.
Besides, do make sure that you didn’t inadvertently remove the icons that are missing. If so, you can always manually pin programs to the Start menu.
That’s all! We are confident this method will resolve the File Explorer Icon Missing in Windows 10 Start Menu issue.
If you have more issues, visit our File Explorer issues guide for more solutions.
Why not give these methods a shot and let us know which one you used to resolve the missing File Explorer bug?
Read our disclosure page to find out how can you help Windows Report sustain the editorial team. Read more


Improve this guide

User forum
0 messages