Fix: Printer Keeps Printing 2 Pages Instead of 1

Is your printer always printing two copies whenever you send a document to print? Well, this can be attributed to your printer settings either from the printer or from the document settings you’re working from. Otherwise you’d have to check your printer’s drivers if the settings are fine.
Before you try some of the fixes below, check whether there are any changes you made to your printer, whether the issue persists when you make a copy from your printer, if you can print from a different application and still get the same results.
Here are some solutions you can use to try and resolve the problem and get your printing back in order.
What can I do if my printer prints twice in Windows 10?
- Change the number of copies from printer settings
- Uncheck Enable bidirectional support (for HP printers)
- Install the latest printer drivers
- Adjust number of copies from the document
- Reset Printing system
- Reinstall your printer
1. Change the number of copies from printer settings
- Click Start and select Control Panel.

- Select Hardware and Sound.
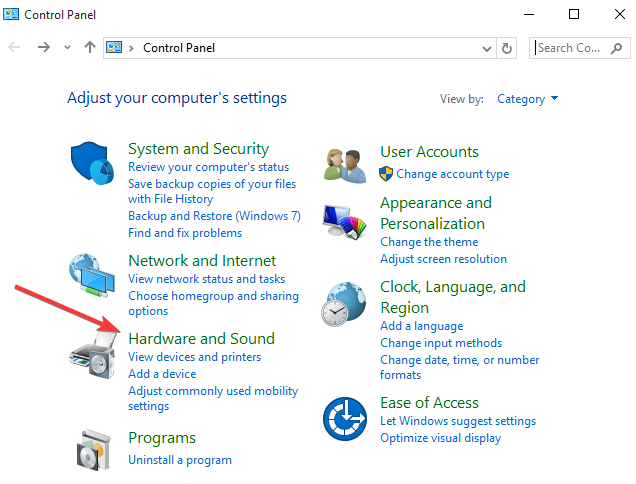
- Click Devices and Printers.

- Click printer properties.
- Select number of copies. If it is set to 2, change it to 1 and see if it helps.
2. Uncheck Enable bidirectional support (for HP printers)
- Click Start and select Control Panel.
- Select Hardware and Sound.
- Click Devices and Printers.
- Right-click your HP printer icon.
- Select Printer server properties.

- Select Ports.

- Uncheck enable bidirectional support.
- Click Apply.
3. Install the latest printer drivers
You can do this via the Add a Printer wizard. Here’s how:
- Click Start and select Control Panel.
- Select Hardware and Sound.
- Click Devices and Printers.
- Click Add a printer which opens a Choose a device or printer to add to this PC Click Next if you see your printer.

- If you don’t see your printer, click The printer I want isn’t listed and select Add a local printer or network printer with manual settings then click Next.

- Choose the port you want your printer to use then click Next.
- Click Windows Update then click the name of your printer in the Printers pane.
- If it is on the list, click Next.
- If it isn’t on the list, click back twice then go to Find a printer by other options.

- Select Add a printer using TCP/IP address or hostname and click next.

- Select Autodetect from Device type dropdown.
- Type your printer’s IP address and click Next.
- Wait for your computer to connect to your printer and click Next to install the printer driver.
4. Adjust number of copies from the document
Depending on the document you’re using, do the following to control the number of copies of your printed document in the application or software submitting the job to the printer:
Word document
- Click File
- Select Print
- Select Copies.

- Adjust the number of copies.
PDF document
- Click Printer icon.
- Click Copies.
- Adjust the number of copies.
Web page
- Click File.
- Select Print.
- Select Copies.
- Adjust the number of copies.
5. Reset Printing system
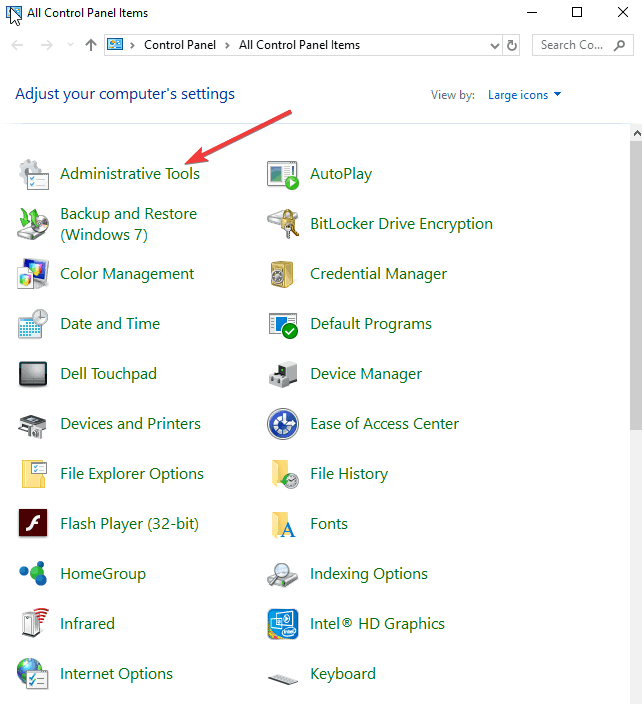
- Click Start and select control panel and select View by Large Icons.
- Click Administrative tools.
- Click Print management.

- Click Print servers.

- Right-click on the empty space next to the name of the print server.
- Select Add/Remove servers.

- Click Remove All, and then click OK.
6. Reinstall your printer
- Click Start and select Control Panel.
- Click Programs.
- Right-click Start and select Device Manager.
- Check if your printer is listed there and delete it.
- Go to Control Panel.
- Select Hardware and Sound.
- Click Devices and Printers.
- Select any printer listed and check options on the top.
- Click Print Server properties.
- A popup will display, click the Drivers tab.

- Delete all printer drivers listed there.
- Restart your computer.
- Update the firmware from Control Panel.
- For this, you have to be connected to your wireless network.
- Right-click Start and select Run.
- Type %temp% in the run box and click OK or press enter.
- This brings up the temporary files folder.
- Delete all files in the folder and restart your computer again.
- Download the latest full feature printer driver from your device manufacturer’s website and install it.
Many also reported that printer is printing even pages first, but we covered this issue in another guide.
Were you able to resolve the printer always prints 2 copies issue? Share your experience in the comments section below.
Read our disclosure page to find out how can you help Windows Report sustain the editorial team. Read more


Improve this guide


User forum
0 messages