How to fix sleep mode on Windows 10/11
Key notes
- Do you want to fix Sleep Mode on Windows 10? Then you need to update certain important system elements.
- We recommend you try professional software that can download new patches and prevent future system errors.
- A good idea, in this case, is also to disable a particular set of connections and you can see in this guide how to do it correctly.
- Unplugging some devices is at times an easy solution that can help you fix Sleep Mode on Windows 10.

If you use Windows 10, the Sleep Mode feature allows you to keep your Laptop or Desktop PC on a minimum power consumption mode.
In this manner, you’ll reduce the time you wait for the computer to start up every time you want to watch a movie or play a game.
Sleep mode for Windows 10 is a very good app to have around when you’re going out to buy groceries or you have something else to do for a couple of hours.
If you activate this feature on your Windows operating system, then the power consumption will be greatly lowered without having to turn off your PC and wait for it to start up again when you come back.
Seeing that a lot of Windows 10 users are having trouble enabling this feature, I have decided to show you exactly how to use Sleep Mode in a few quick steps.
There are several methods on how to fix sleep mode and make it run as it should on your Windows 10.
How do I fix Windows 10 sleep mode problems?
1. Enable the Balanced power scheme
- When the PC starts up, we will need to press and hold the Windows logo key button and the X button (Windows+E).
- In the menu, we need to click on Command Prompt (Admin).
- Now we need to restore all your power schemes to the default Windows State by running the command below: powercfg -restoredefaultschemes
- Let’s reboot the PC now.
- Click on the Seach bar situated on the right of the screen and in there we need to click Settings.
- Click the Control Pane icon.
- In the upper right of the window showed right next to View by we need to select Small icons.
- Now let’s click on Power options in the All control panel items window.
- In the new window, we need to double-check that the option that says Balanced is checked.

Enabling the Balanced Power Scheme can be an excellent method to fix sleep mode on Windows 10. Start by accessing the Comand Prompt as an Administrator, and follow our instructions.
2. Enable hybrid sleep
- Launch Control Panel.
- In the upper right corner of the window, select View by and select Small icons.
- Now let’s click on Power options in the All control panel items window.
- Right next to the plan you have selected, it should be Balanced, click on Change Plan settings situated on the right of the Balanced plan.
- Let’s click on Changed advanced power settings.

- Click (left click) on Change settings that are currently unavailable.
- Let’s look at Allow hybrid sleep in the window we opened and make sure this feature is set to ON.
- Let’s look at USB Selective suspend in the window we opened and make sure this feature is set to ON as well.

- We will need to reboot the computer and see if the issue is fixed.
Users claimed that they fixed their issue with the sleep mode feature on Windows 10 by enabling the Hybrid sleep option.
Once you access the Changed advanced power settings panel you’ll be able to easily enable the Hybrid Sleep feature.
3. Leave HomeGroup
- Launch Control Panel again.
- In the upper right of the window, right next to View by we need to select Small icons.
- Let’s click on HomeGroup in the All control panel items window.

- Click on Leave HomeGroup.
- Reboot the PC.
Another tested solution for fixing the sleep mode on Windows 10 is to leave the HomeGroup and then reboot your device. This procedure should allow you to use the Sleep Mode function.
4. Update your display drivers
- Go to Start, type device manager, double-click on the first result to launch Device Manager.
- Locate your display driver, then right-click on it and select Update driver
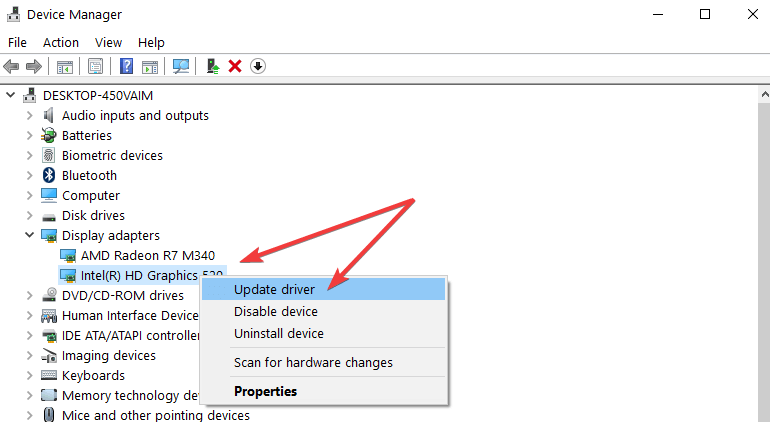
- Restart your computer and check if the issue persists.
Sometimes, outdated display drivers may prevent you from using Sleep Mode on your computer. The quickest and safest solution to fix this issue is to install the latest display driver updates.
One of the factors that cause Sleep Mode to not function on your Windows 10 is that your drivers are out of date. Choose a professional tool that can help you update your device.
Regular updates are crucial if you want your Windows system to function at its optimum capacity and prevent errors. Graphics card drivers are extremely advanced and difficult to grasp.
They are in charge of managing fan speeds, understanding CPU commands, caching data from various sources, decoding and encoding video, and other things. Driver updates shorten the pathways that the graphics card takes to complete its tasks by eliminating unnecessary operations or better dividing the workload.
A professional tool like Outbyte Driver Updater is an excellent choice for this task. It has a clean interface and is simple to use, even for computer newbies. The driver updater program is handy for automatically upgrading Windows drivers. Otherwise, doing it manually takes time and needs extensive knowledge of the drivers you’re looking for.
5. Disable network connections
- Launch Control Panel.
- In the upper right of the window, right next to View by we need to select Small icons.
- Let’s click on Network and sharing center in the All control panel items window.

- Click on Change adapter settings.
- Click on the adapters and click Disable.

- Now we need to check if the PC will go to sleep mode.
- If it goes to sleep mode then the problem is with one of the network adapters – in this case, we will need to update it.
In order to fix the sleep mode on Windows 10, you should disable network connections. Access the Network and sharing center then follow the steps we mentioned above.
6. Unplug your USB peripherals
- Try to unplug any USB devices that might be on your PC like for example USB stick, printer, and so on.
- After you unplug these USB devices try to put your Windows 10operating system to sleep mode and see if it will work.
Solving the sleep mode on Windows 10 can also require you to unplug your USB devices such as printers, speakers, and so on.
Users claimed that after performing this operation the Sleep mode feature began to function.
7. Run the Power Troubleshooter
- Launch Control Panel, type troubleshoot in the search bar, select Troubleshooting.
- Click on View all to list all the troubleshooters.
- Select Power and follow the on-screen instructions to launch the tool.

Windows 10 features a series of dedicated troubleshooters that help you fix general issues affecting the OS. If the sleep mode problem persists, you can try to run the Power Troubleshooter.
These are several tutorials on how you can fix your Windows 10PC sleep mode issues. If you have anything else to add to this or any opinions on this matter, please let us know in the comments below.
Read our disclosure page to find out how can you help Windows Report sustain the editorial team. Read more


Improve this guide


User forum
0 messages