Fix: Windows Driver Foundation High CPU Usage [5 Ways]
A list of surefire fixes to normalize your PC CPU usage
6 min. read
Updated on
Read our disclosure page to find out how can you help Windows Report sustain the editorial team Read more
Key notes
- If the Windows Driver Foundation is causing high CPU usage on your PC, it might be due to third-party apps.
- You can fix this issue by performing a clean boot that starts your PC with only the required services.
- Another excellent fix is to uninstall and reinstall your WiFi driver.
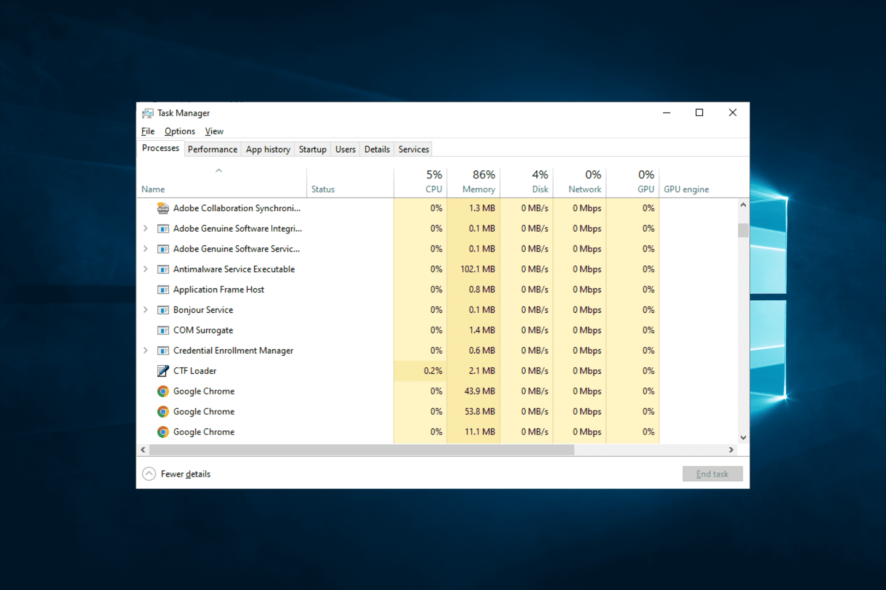
The Windows Driver Frameworks (WDF), formerly known as Windows Driver Foundation, is a set of libraries that you can use to write device drivers that run on the Windows OS.
Usually, the WDF doesn’t use too many resources. However, Many Windows users often complain that the Windows Driver Frameworks uses too much CPU, slowing down Windows and draining the battery insanely fast.
If you are also facing this issue, rest assured that the solutions in this guide will help you fix it effectively.
What causes Windows Driver Foundation’s high CPU usage?
There are a few reasons the Windows Driver Foundation registers high CPU usage when using a media player. Below are some of the potential causes to look out for:
- Activities of third-party: The Windows Driver Foundation high CPU when using Teams or other apps can be caused by the third-party apps using the process. To fix this, you need to perform a clean boot. If you detect the app causing the issue, you might need to remove it with one of the best uninstaller software.
- Driver issue: This high resource usage issue can also be caused by issues with your WiFi drivers. In this case, you need to reinstall or update the driver.
- Zoom app features: At times, some Zoom app video features make use of the WDF processes. This can increase its resource usage. The solution here is to tweak some of these settings.
- Faulty memory: Some users have found their PC memory to be the cause of this issue. You need to run the Memory Diagnostic tool to fix this.
How can I fix Windows Driver Foundation’s high CPU usage?
1. Reinstall your WiFi driver
- Before we start, download the latest WiFi drivers from your device’s manufacturer.
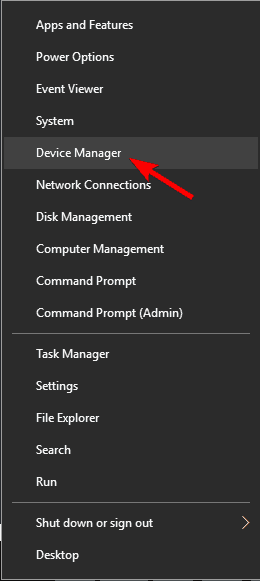
- Press the Windows key + X to open and choose Device Manager from the list.
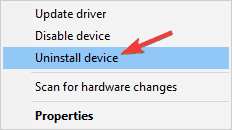
- When Device Manager opens, locate your WiFi adapter, right-click it and choose Uninstall device from the menu.
- A confirmation dialog will now appear. If available, check the Remove driver software checkbox. Now click Uninstall.
According to users, sometimes problems with Windows Driver Framework and high CPU usage can occur due to your drivers. Several users reported fixing the issue simply by reinstalling their WiFi driver.
Also, if you are experiencing the Windows Driver Foundation high CPU issue with DisplayLink, you should know the driver uses the WDF process. So, choosing between the high CPU and the ability to extend your active displays would be best.
Since Windows Driver Framework is related to your drivers, we strongly suggest keeping your drivers up to date to fix this problem.
Update drivers automatically (third-party tool suggested)
Downloading and installing drivers manually is a process that carries the risk of getting the wrong driver installed, which may lead to severe malfunctions. We strongly suggest you update your driver automatically by using a driver updater tool that can repair broken or missing drivers.
You can prevent these problems by using an automatic tool that will search and install the correct drivers on your computer with just a few clicks. That's why we recommend you use Outbyte Driver Updater. Here's how to do it:
- Download and install the Outbyte Driver Updater app.
- Launch the software.
- Wait for the app to detect all incompatible drivers.
- Afterward, it will show you a list of the drivers found to select the ones to Update or Ignore.
- Click on Update & Apply Selected to download and install the newest versions.
- Restart your PC to ensure the applied changes.

Outbyte Driver Updater
Use this software and solve all driver-related issues from your PC.2. Run the System Maintenance troubleshooter
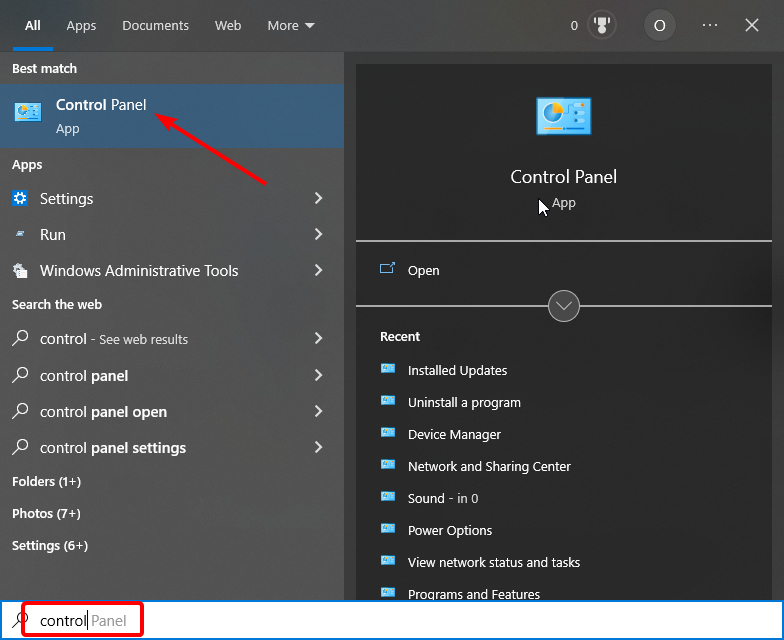
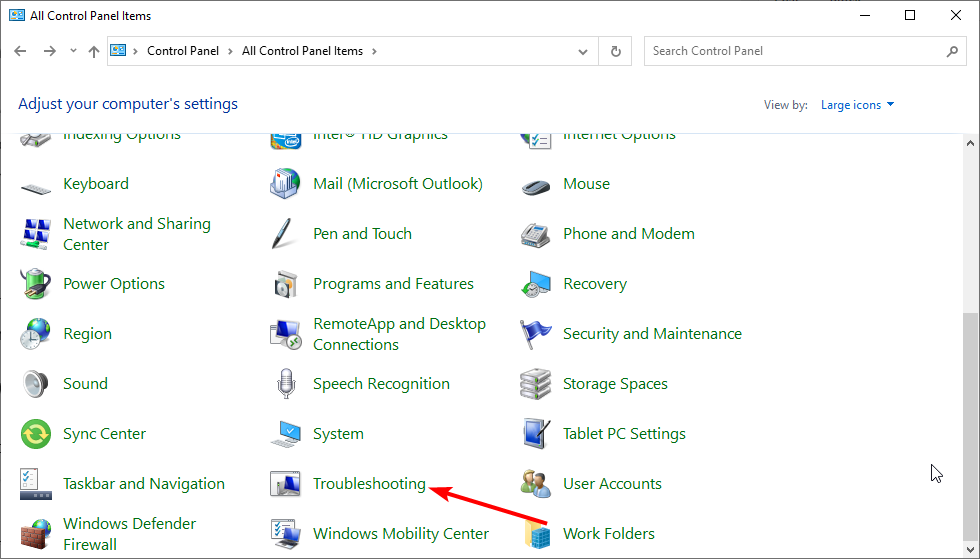
- Press the Windows key, type control, and select the Control Panel option.
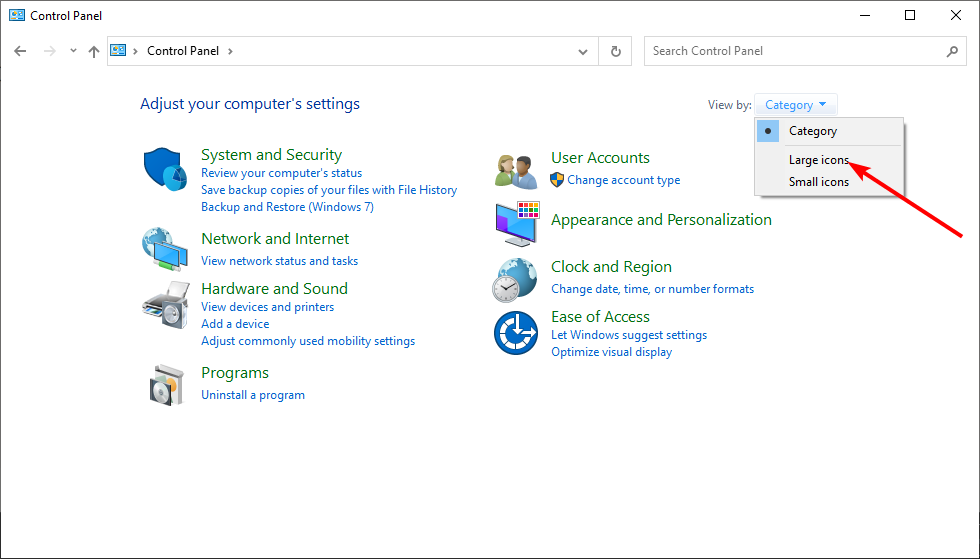
- Click the dropdown before View by and select the Large icon option.
- Choose the Troubleshooting option.
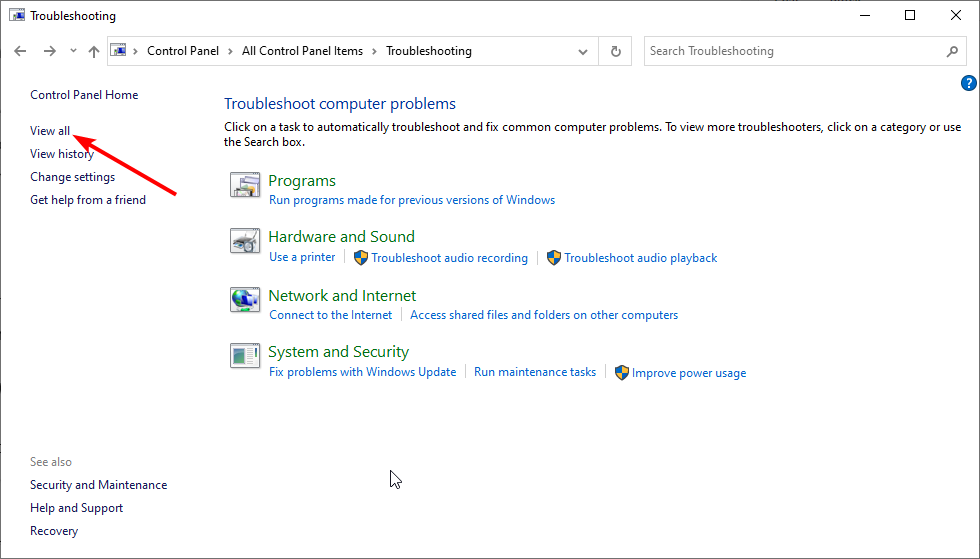
- Now, click View all in the left pane.
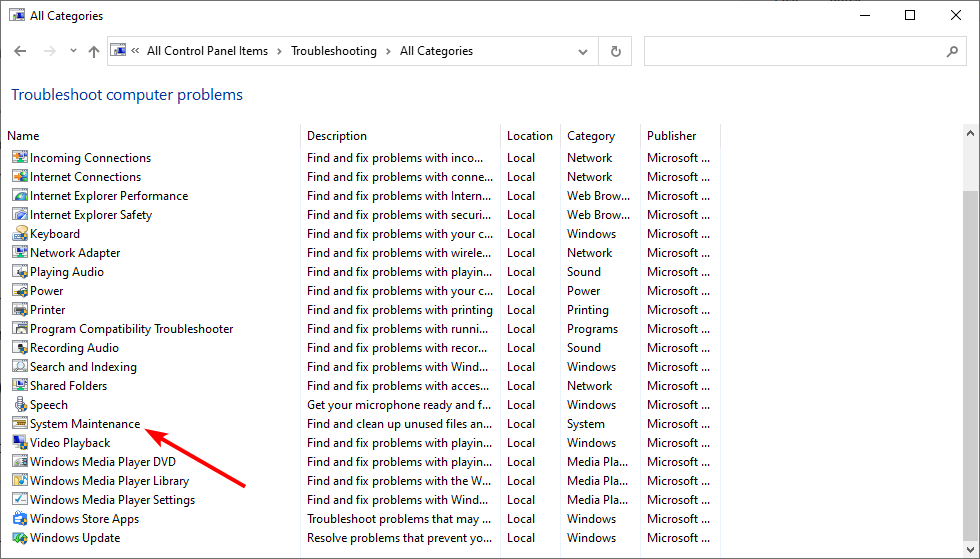
- Select the System Maintenance option from here and wait for the diagnosis to complete.
The System Maintenance troubleshooter helps to make your PC run optimally. For example, this can help fix the Windows Driver Foundation high CPU issue.
3. Change the Zoom video setting
- Launch the Zoom app and click the Gear icon in the top right corner.
- Choose Video in the left pane and click the Advanced button.
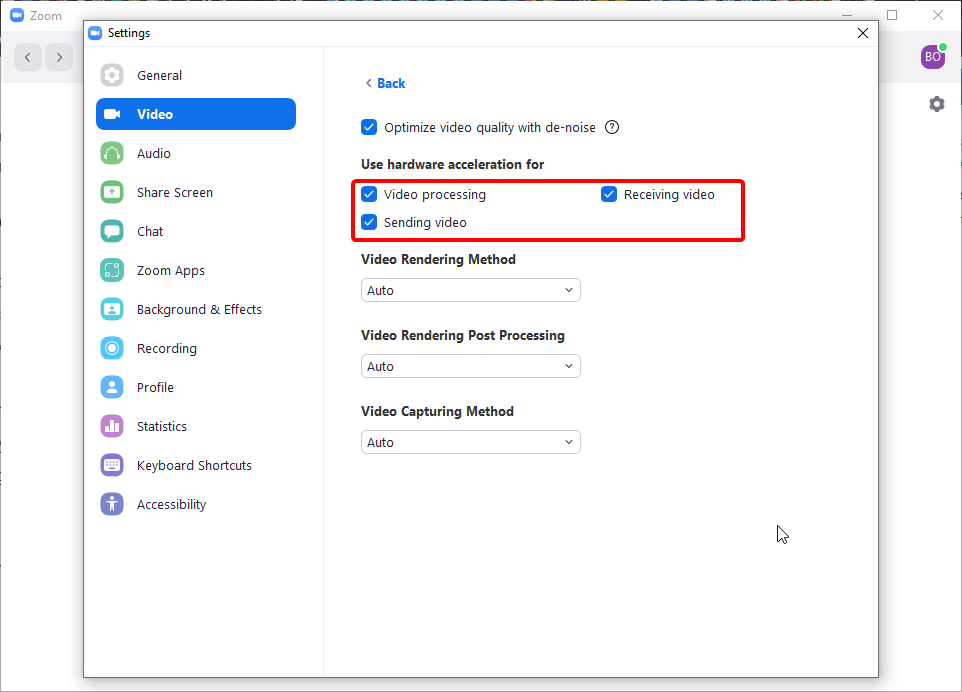
- Check all the boxes under Use hardware acceleration for section.
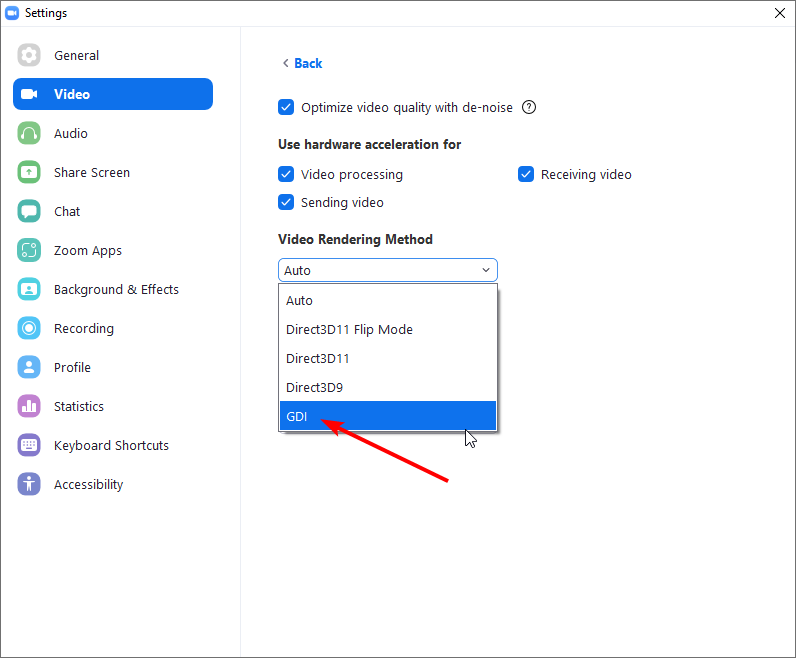
- Now, click the dropdown before for Video Rendering Method and set it to GDI.
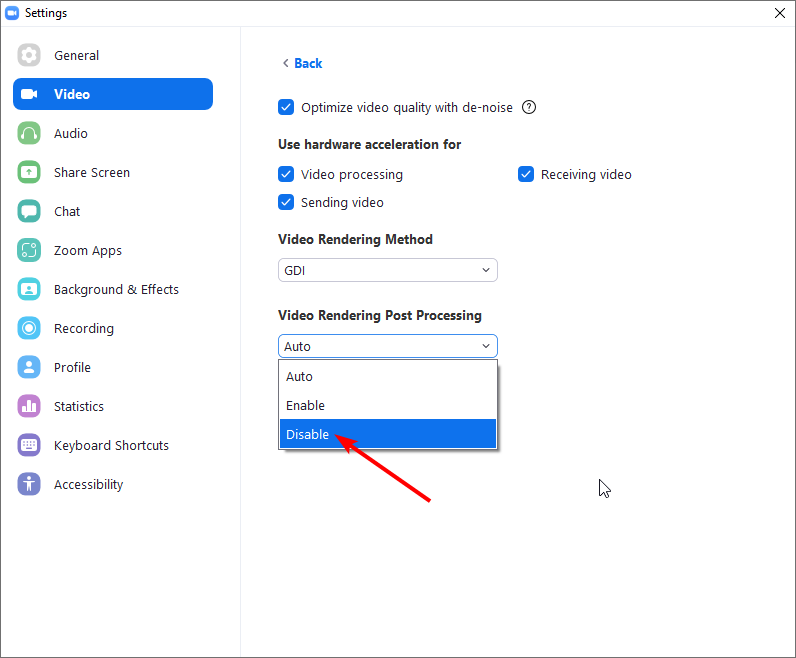
- Click the dropdown for Video Rendering Post Processing to Disable.
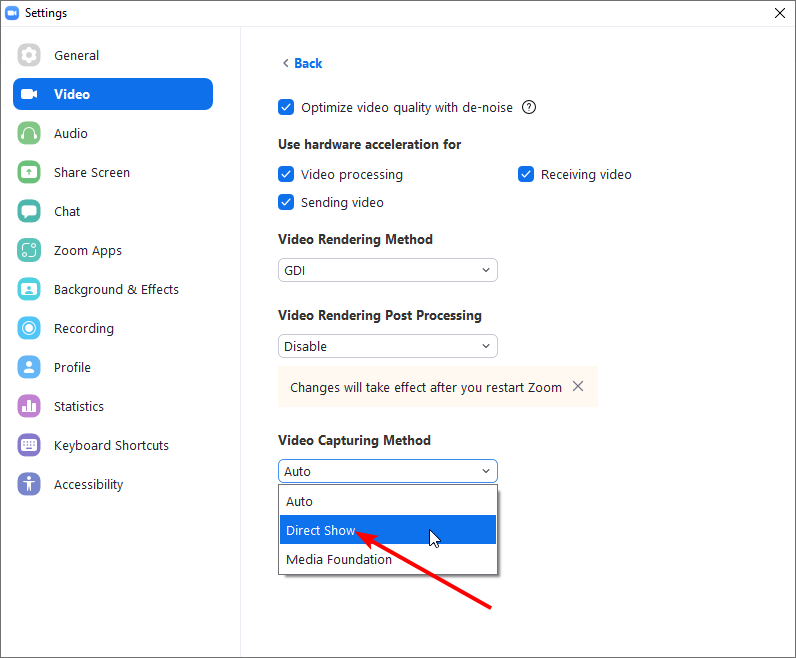
- Finally, set the option for Video Capturing Method to Direct Show and restart Zoom to effect the changes made.
Zoom uses a feature called Media Foundation for Video Capturing Method. Unfortunately, this can use the Windows Driver Foundation process leading to high CPU usage.
Following the steps above should help normalize the process.
4. Perform a clean boot
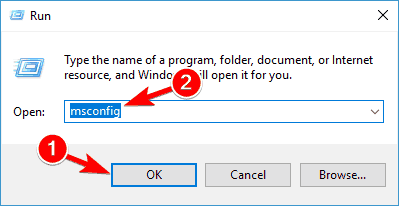
- Press the Windows key + R, type msconfig, and click OK.
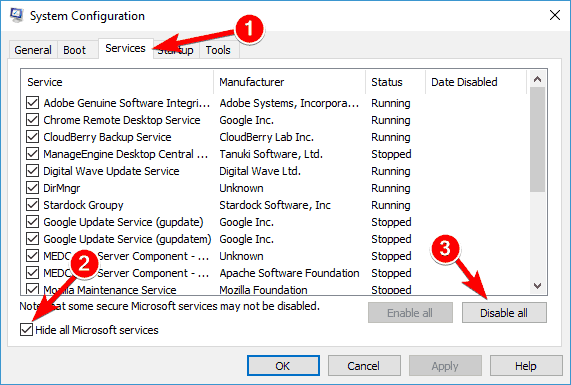
- Choose the Services tab at the top, check the box for Hide all Microsoft services, and click Disable all.
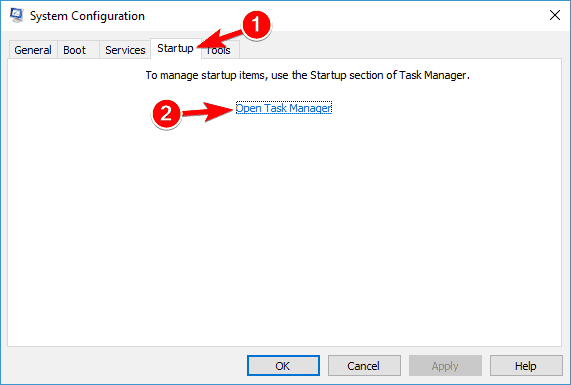
- Go to the Startup tab and click Open Task Manager.
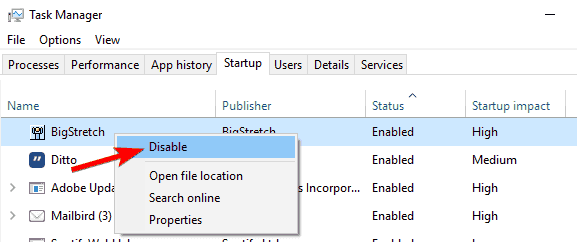
- Right-click each of the apps here and choose Disable.
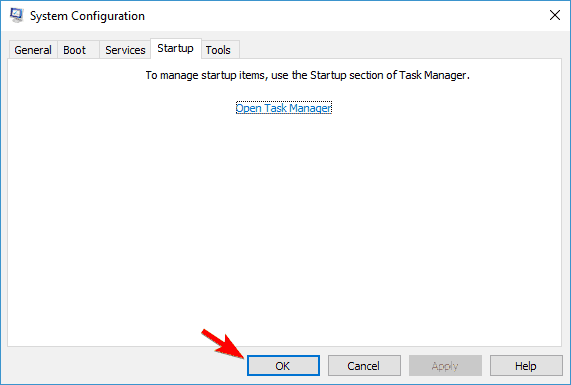
- Go back to the System Configuration window, click Apply, and OK to save changes.
- Finally, restart your PC.
Sometimes third-party applications or services can cause the Windows Driver Foundation high CPU issue. To pinpoint the cause, it’s advised to perform a clean boot.
Your PC will now start without any third-party services or applications. Now you need to check if the problem is resolved.
If so, you’ll need to enable disabled applications and services one by one until you find the one causing this issue. Remember to restart your PC to apply changes after allowing an application.
5. Run the Memory Diagnostic tool
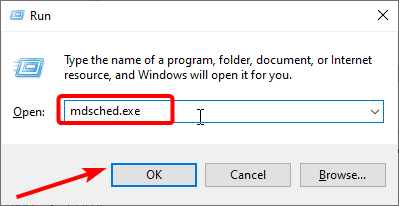
- Press the Windows key + R, type mdsched.exe, and click OK.
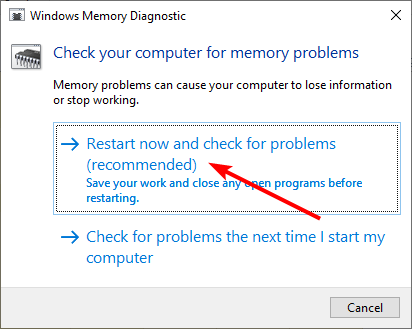
- Choose Restart now and check for problems (recommended) option.
- Wait for the diagnosis to complete and apply any recommended fix.
How to fix Windows Driver Foundation high CPU usage on Windows 11?
Besides applying the solutions above, you can also do the following:
- Run Windows Update
- Repair your system files as they may be corrupt
- Disable Windows Driver Foundation
- Optimize startup applications
For more solutions, check out our guide on how to fix high CPU usage in Windows 11.
Memory issues are another known cause of this abnormal resource usage. Again, the Windows Memory Diagnostic tool should detect and recommend effective fixes.
Alternatively, you can use MemTest86 to detect and fix issues with your PC memory.
The Windows Driver Foundation’s high CPU issue can make your PC run at unbearable temperatures. Unfortunately, this can lead to more severe problems in the future. Thankfully, this guide has everything you need to fix it effectively.
Are you facing a related issue, such as Explorer.exe high CPU usage? Then, check our detailed guide to fix it quickly.
Feel free to let us know the fix that helped you get past this issue in the comments below.

