High DPC Latency in Windows 11? 7 Ways to Fix it
Try disabling the IPv6 on your PC to fix the problem
Key notes
- High DPC latency can be caused by a particular program or because of some internal issues.
- You should try disabling the Firewall to check if that was interfering and causing the issue.
- Else, you should also try disabling Dynamic Ticking on your computer to fix the problem.

There are many Windows 11 users that have reported facing high DPC latency in Windows 11 caused by ndis.sys, dxgkrnl.sys, and nvlddmkm.sys. We have a guide that explains how you can fix high DPC latency on Windows 10.
In this guide, we will share with you a list of effective solutions that will help get rid of the high DPC latency issue in Windows 11. Let us check out the solutions.
What causes high DPC latency in Windows 11?
DPC or Deferred Procedure Call allows your system to perform the high-priority tasks first and low-priority tasks later, for optimal usage of resources.
We looked into multiple forums and user reports to understand the issue and found some common reasons that were triggering high DPC latency in Windows 11.
- Outdated graphics and audio drivers – If you are running outdated graphics drivers and audio drivers on your PC then you will face multiple issues including high DPC latency in Windows 11.
- Problems with the Power plan – Chances are that the existing power plan selected on your computer might be the reason for the high DPC latency in Windows 11.
- Dynamic ticking is causing the problem – Multiple user reports have claimed that the issue was raised because Dynamic ticking was enabled.
- Incorrect Registry settings – There is a specific registry setting that you need to tweak in order to resolve the high DPC latency in Windows 11.
- The Firewall is interfering with the process – Windows Defender Firewall is often the culprit for several unnecessary issues on your computer.
Let us check out the solutions that will help resolve the high DPC latency in Windows 11 problem.
How can I fix the high DPC latency in Windows 11?
1. Update the graphics and audio drivers
- Press the Win key to open the Start menu.
- Type Device Manager and open the appropriate option.

- Expand the Display adapters section.

- Double-click on your graphics driver to open it.
- Click on the Driver tab.

- Click on the Update driver option.

- Select the Search automatically for drivers option.
- Install the update.
- Expand the Audio inputs and outputs section.

- Double-click on your audio device.
- Switch to the Drivers tab.

- Click on the Update driver option.

- Select the Search automatically for drivers option.
- Install the update and restart your computer.
You can check out our guides that explain how you can update graphics drivers on your Windows 11 PC.
Another feasible solution to manage all PC drivers is to download a tailored application with enhanced technology to update drivers automatically.
2. Disable the firewall
- To open the Start menu press the Win key.
- Open Control Panel
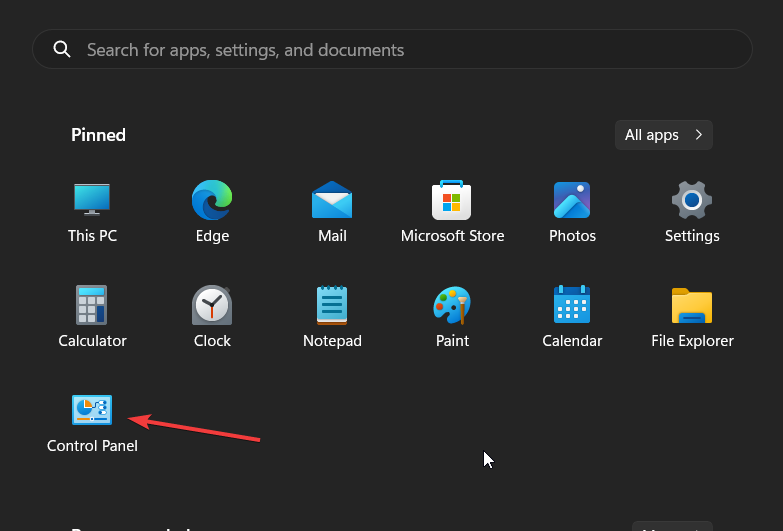
- Select Windows Defender Firewall.

- Click on Turn Windows Defender Firewall on or off option on the left pane.

- Check the radio buttons Turn off Windows Defender Firewall (not recommended) for both Public and Private networks.

3. Disable IPv6
- Press the Win + R keys to open the Run dialogue.
- Type ncpa.cpl and press OK.

- Right-click on your connected network and select Properties.

- Uncheck the Internet Protocol Version 6 checkbox and click OK.

Disabling the IPv6 has resolved the high DPC latency issue in Windows 11. You should try following the above steps and check if this fixes the issue or not.
4. Disable Dynamic Ticking
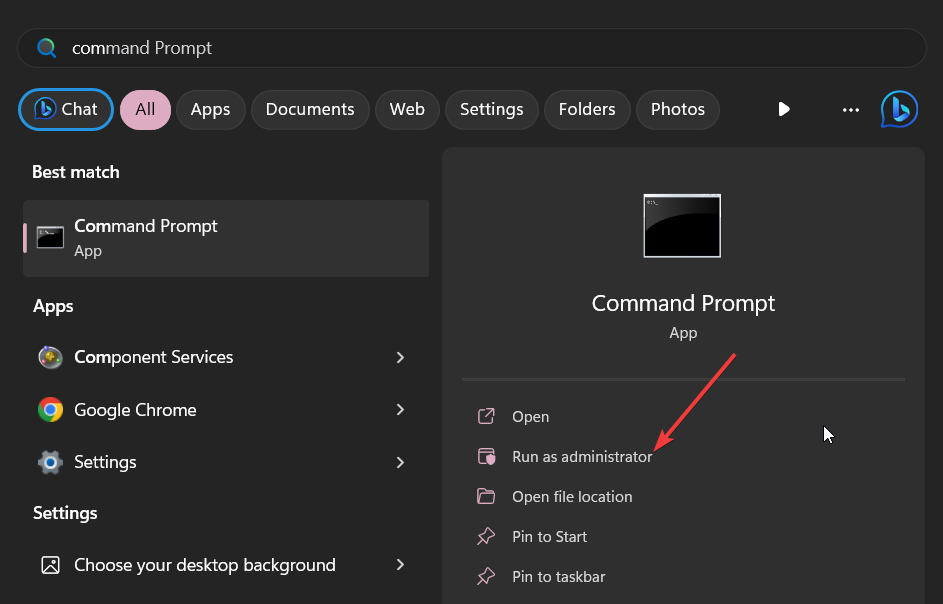
- Press the Win key to open the Start menu.
- Type Command Prompt and run it as an administrator.
- Type the below command and press Enter.
bcdedit /set disabledynamictick yes - Restart your computer.
5. Tweak the Registry
- Press the Win + R keys to open the Run dialogue.
- Type regedit and press Enter.

- Navigate to the below path and press Enter.
HKEY_LOCAL_MACHINE\SYSTEM\CurrentControlSet\Control\Video{DEB039CC-B704-4F53-B43E-9DD4432FA2E9}\0000
- Right-click on 0000, select New and click DWORD (32-bit) Value.
- Change the name of the key to PerfLevelSrc.
- Double-click on it and change the Value data to 3322.
- Repeat the above steps to create three more REG_DWORD values named PowerMizerEnable, PowermizerLevel, and PowermizerLevelAC.

- Double-click on PowermizerLevel, and PowermizerLevelAC and set the Value data as 1.
- Click the OK button and restart your computer.
6. Change the Power Plan
- Press the Win + R keys to open the Run dialogue.
- Type powercfg.cpl and hit Enter.

- Change the power plan. It is advised that you select the High Performance plan.

7. Uninstall the Bonjour application
- Press the Win key to open the Start menu.
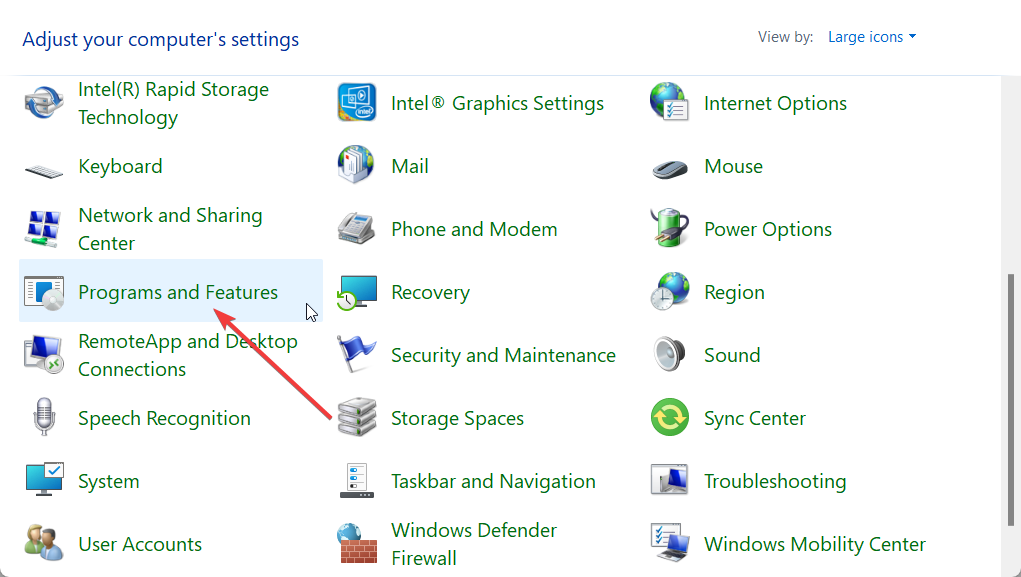
- Open Control Panel.
- Select Programs and Features.
- Select Bonjour and hit the Uninstall button at the top.
If you have recently connected an Apple device to your PC, you will see the Bonjour app getting installed on your computer. This is often the culprit for the high DPC latency in Windows 11. Try removing it and check if this resolves the issue or not.
You should check out our guide that explains what is a DPC latency checker and how you can use it to your advantage.
That is it from us in this guide. Let us know in the comments below if you found a different solution working for you to resolve the problem at hand.
Read our disclosure page to find out how can you help Windows Report sustain the editorial team. Read more


Improve this guide


User forum
0 messages