5 Ways to Record Gameplay on Windows 11 [Quick Guide]
Key notes
- Recording your Windows 11 homescreen can help you create your gameplay videos or instructional videos to help someone.
- Windows 11 does have an in-built screen recording feature called Xbox Game Bar, which lets you record your screen and offers a bunch of settings as well.
- You can also choose among various third-party apps such as Bandicam to record your gameplay videos.

Who doesn’t love playing video games? They are the favorite past time of millions of people across the globe. Some of them have turned their favorite past-time into their primary source of income.
How did they do that? Well, they followed the trend of creating videos online on various streaming platforms such as YouTube and Twitch.
If you’re still using an older version of the OS, you can always check out the best screen recorder for Windows 10.
If you are also interested, then the first thing you should know is how to record gameplay on Windows 11. Since Windows 11 is the latest operating system, many users who have installed it would like to know how you can record your gameplay on it.
Once you are done recording your gameplay, you can simply edit it or live-stream it onto different platforms and grow your subscriber base.
You can improve your recordings by editing them before uploading, and the guide at how to edit Xbox clips on PC shows you the steps you need.
Not everyone will make it big in this league, but it is worth giving a shot. And if you are intrigued by it, then you have landed in the right place.
In this guide, we will show you how you can record gameplay on Windows 11 using the in-built tool and third-party apps.
How is Windows 11 better for gaming than Windows 10?
Microsoft is one of the big names in the gaming space. Along with games for their desktops, Microsoft also has a lineup of Xbox consoles for those who want dedicated beasts for gaming.
Since we are focused here on Windows 11, some of you would like to know if Windows 11 is better than the previous version of the OS, i.e. Windows 10.
It all started with Windows 8, where Microsoft included the Xbox companion. This tool came with features such as access to the live Xbox community, remote control, second screen, and more.
Then, with Windows 10, Microsoft added some more features to the Xbox companion, including a Game Bar, screen capturing, broadcasting, and even a dedicated settings page for the game you are running on your PC.
With the new Windows 11, Microsoft has added a bunch of cool features that will take your gaming experience to a new level.
Windows 11 gets the Auto HDR feature. This will enhance your gaming experience by converting the SDR content into HDR using machine learning available in Windows 11.
Moreover, the new OS also gets the Direct Storage option. This enables the API to allow the GPU (Graphics Processing Unit) to directly load the data from the SSD. Previously, this process also involved CPU processing, which is now not needed, as a result, saving a lot of power.
Though these are not groundbreaking changes, they are good enough to make Windows 11 a better OS than Windows 10 for gaming and coupled with a great gaming laptop, you’re ready to explore some of the latest titles.
How to record your screen with audio on Windows 11
- 1. Open the Gaming Settings page.
Press the Windows + I buttons together on your keyboard to open the Settings page. Under the Settings page, select Gaming from the left side panel.

- 2. Click on Captures
Inside the Gaming page, you need to click on Captures.

- 3. Set up your desired recording settings
You will see under the Captures settings page, there are several options that you can change and tweak for recording videos. Here is a quick glance at what options you can tweak from the Captures settings page:
- You can change the location where you wish to save your recorded videos
- Enable or disable the option to press Win + Alt+ G key to record your gameplay
- You can limit the maximum record length
- Option to record video with or without audio
- Select the video recording framerate
- Select video quality

After you finish setting everything up, in order to record gameplay video, all you need to do is open the Start menu. Then search for the Xbox Game Bar. Alternatively, if you have enabled the toggle next to Record what happened simply press Windows + Alt + G. This will show you the Xbox console.

- 5. Open Xbox Game Bar and start recording
You can either hit the record button available on the console or use the below shortcuts:
- To start recording a video: Windows + Alt + R
- To turn on your mic: Windows + Alt + M
Record your screen with Xbox Game Bar
Before you jump into record your screen while gaming, make sure that you have all settings in place as this will help you improve the overall experience of your recording. Here’s what you need to do:
Your recorded video will be stored at the selected location. As mentioned, there are a bunch of options to explore inside the Xbox Game Bar. Feel free to use them.
Do keep in mind that sometimes Windows Alt R won’t work, but that can be easily fixed, and we have a special guide that addresses that.
Use third-party apps
Well, you don’t need to rely on the in-built screen recording tool to record your gameplay on your Windows 11 PC. There are a plethora of options to choose from.
However, do note that you might get confused with which app to opt for or which would be the best app that you should download to record your gameplay.
We have already compiled a list of some of the best screen recorder software for Windows 10. You can check out the list and download the app as per your preference.
To demonstrate how you can use a third-party app to record your gameplay, we will make use of the Bandicam screen recording app.
It is one of the best and most popular names when it comes to screen recording and editing. The interface is nice and clean. You get the option to save the recorded file in MP4, AVI, or even image files.
Let us take a look at how you can use Bandicam to screen record on Windows 11 with audio.
- First, you need to download Bandicam from its official website and install it on your Windows 11 PC.
- Now, launch the screen recording app on your PC.
- You will be greeted with the Bandicam interface. Here, you will see different options such as Rectangle area, Fullscreen, Around mouse, and more.

- If you want to record a certain section of your screen, then you can opt for the Rectangle area option. Otherwise, you can go for the Fullscreen mode.
- Once you have selected your preferred recording choice, simply press the red REC button at the top of the menu bar or press teh F12 shortcut key.

- That’s it! The screen recording of your screen will start. You can proceed to begin recording your gameplay. You can find your recordings under the Videos tab.

Use other options
We have just given an example of the Bandicam video recording app, but several other apps may even provide you with more advanced options.
Besides, you need to unlock the Bandicam app to unlock all of its features. In such a case, you can make use of the free video recording app available for download from the Microsoft Store. It is called the Free Screen Recorder.
It is a pretty straightforward screen recording app. Some of the features of this software include no watermark, unlimited screen recording, a simple interface, a browser recorder, and more.
How to take screenshots of your gameplay?
While video recording is a nice way to stream your gameplay online or store it for uploading at a later stage, you may require a thumbnail for the video or you may want to highlight a special moment during your gameplay.
In such cases, screenshots can come in handy. Screenshots simply mean a still image of what’s happening on your Windows 11 home screen.
You can opt for different software to take a screenshot, but for such a simple task, we would advise you to make use of the PrtSc or Print Screen key on your keyboard.
When you press this key, your PC immediately takes a screenshot of the home screen. But once you press the PrtSc button, you immediately need to paste it into an image editing app or drawing app such as Paint It. Only then you will be able to save it.
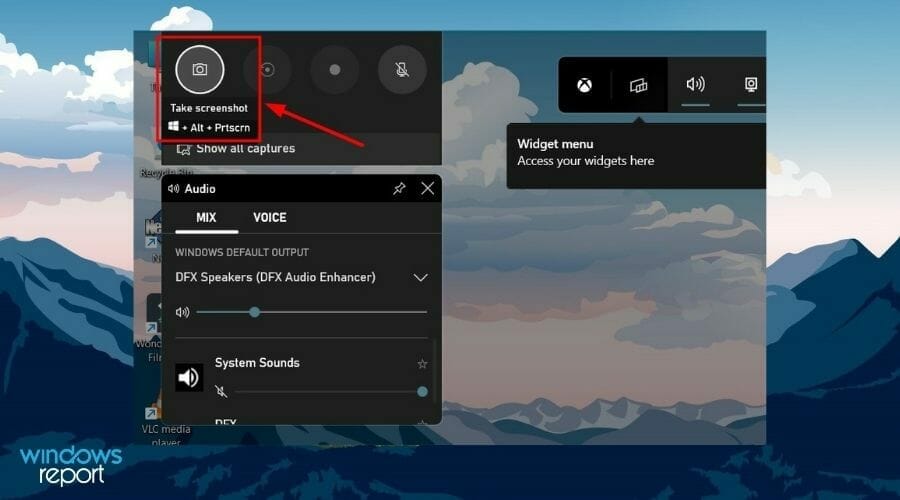
Otherwise, if you are using Xbox Game Bar, then there is a screenshot icon on the top-left menu bar. You can either press it or use the shortcut Windows + Alt + PrtScr to capture the screenshot. Here, you will be able to locate your captured screenshots inside the Videos>Captures folder.
You can check out our guide where we have compiled a list of all the different ways which you can use to take screenshots on your Windows 11 PC.
Let us know in the comments section below which option mentioned in this post is used by you to record your gameplay videos on Windows 11.
Read our disclosure page to find out how can you help Windows Report sustain the editorial team. Read more


Improve this guide


User forum
0 messages