Fix: HP Printer Prints Extra Blank Pages for Word Documents
Steps to fix hp printer printing blank pages
- Check That There isn’t an Extra Blank Page in the Document
- Remove Page Breaks From Pages
- Reduce the Font Size for Non-deleteable End Paragraphs
- Print Hidden Text in the Document
- Enter a Specific Page Range When you Select Print
- Select the Print Directly to Paper Option
- Reinstall HP Printer Software
It is not entirely unusual for HP printers, and other printer brands, to print extra blank pages at the end of documents. Numerous HP printer users have stated on forums that their printers print out blank sheets. Their printers print the full documents along with one, or more, extra blank pages at the end.
That might not be such big deal so long as your main documents get printed, but the extra blank pages can slow printing down. These are few resolutions that might fix HP printers printing additional blank pages for MS Word documents.
What to do if HP printer prints additional blank page
1. Check That There isn’t an Extra Blank Page in the Document
First, check that the MS Word document doesn’t include additional blank pages at the bottom. If it does, you’ll need to remove the extra blank page from the document. To erase blank pages from documents, place the cursor at the top of the empty page.
Then keep on pressing the Backspace key until the page disappears. Alternatively, place the cursor at the bottom of the page just above the blank page and keep pressing the Delete key.
2. Remove Page Breaks From Pages
Blank pages usually appear at the end of documents when there are page breaks at the bottom of pages. Thus, removing all page breaks might get rid of the empty sheets that print. You can show page breaks and sections in MS Word documents by selecting the Home tab and clicking the application’s Show/Hide button. T
hen you can manually delete the page breaks and sections. However, you can erase all page breaks more quickly with MS Word’s Replace tool as follows.
- Select the Home tab.
- Click the Replace button on the Home tab to open the window directly below.
- Press the Move >> button to fully expand that window’s options.
- Select the Replace tab on that window.
- Click inside the Find what box, and press the Special button. Then select Manual Page Break on the menu.
- Click in the Replace with box, and press the Replace All button.
- A dialog box will then open stating that “Word has completed its document search” and made a certain number of replacements. Click the OK button on that window to close it.</li>
3. Reduce the Font Size for Non-deleteable End Paragraphs
Extra blank pages get printed at the end of documents when there are non-deleteable end paragraphs in them. You can’t erase the non-deleteable paragraph, but you can still ensure that it fits within the previous page that includes some text. This is how you can fit a non-deleteable paragraph into the previous document page.
- First, click the Show/Hide button on the Home tab so that the non-deleteable paragraph mark is visible.
- Then select the non-deleteable paragraph mark on the blank page with the cursor.
- Click inside the Font size box to delete the current value.
- Then enter 01 as the replacement value as shown directly below. That will reduce the non-deleteable paragraph to a tiny font size so that it fits on the previous page.
4. Print Hidden Text in the Document
It might be the case that the blank page which printed with the rest of your document does include some text, but you just can’t see it! MS Word includes a Hide Text option that you can select to turn text invisible. This is how you can check for and print hidden text in your Word documents.
- Click Word’s Fi>le tab and select Options to open the window shown directly below.
- Then click Display on the left of the window to open the options in the snapshot below.
- Select the Hidden text option.
- Just below that there’s a Print hidden text option. Select the Print hidden text setting, and then click OK to close the window.
- Now the blank document will display hidden text, if there is any, as in the snapshot directly below. The printer will print the hidden text as you’ve selected the Print hidden text option.
You can also restore the invisible text on the blank page by deselecting the Hidden option. To do so, select the hidden text with cursor, right-click it and select Font. Then you can deselect the Hidden option on the Font window. Thereafter, click the OK button; and print the document.
5. Enter a Specific Page Range When you Select Print
By default, printers usually print all pages, which might include extra blank sheets in documents. However, you can also select to print a specific range of pages instead to get rid of blank sheets. Thus, you can ensure that the printer prints just the pages you need by selecting to print a specified range of pages.
This is how you can print a specified range of pages more in MS Word.
- Click the Filen> tab, and then select Print to open the print settings as below. Alternatively, you can press the Ctrl + P hotkey.
- Then click Print All Pages to open the submenu shown directly below.
-
- Next, select Print Custom Range on the menu.
Enter the range of pages that you need to print. For example, you would enter 1-3 if there were three pages in your document that i nclu de text.
- Then press the Print button. Now the exact range of pages that you specified will print, which should leave out extra blank pages at the end of the print job.
6. Select the Print Directly to Paper Option
- Selecting the Print Directly to Printer option, instead of the Spool print setting, can also stop HP (and other) printe<span id="urn:enhancement-18c1f940-f2c1-dbf7-ce8d-993bd494f89c" class="textannotation”>rs printing extra blank pages. To select that option, press the Windows key + R hotkey.
- Enter ‘control.exe printers’ in Run and click OK to open the Control Pan>nel window as in the snapshot directly below.
- Then click the Advanced tab shown in the image below.
- Select the Print directly to the printer option on that tab.
- Press the Apply and OK buttons.
7. Reinstall HP Printer Software
If none of the above resolutions stop extra pa<span id=”urn:enhancement-338dcb09-0b38-8583-410f-5d86e5573e40″ class=”textannotatiges printing, reinstall the HP printer software. Some users have confirmed that reinstalling the HP software fixed blank page printouts. You can reinstall HP printer software in Windows 10 as follows.
- Remove the USB cord from the printer.
- Right-click the Start menu button and select Run on the menu.
- Enter ‘appwiz.cpl’ in Run and click OK to open Programs and Features.
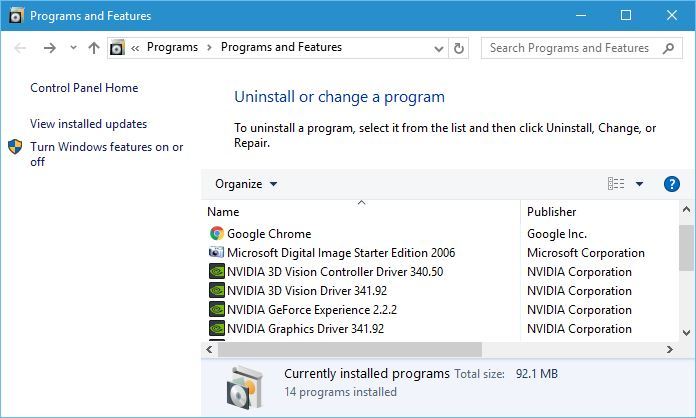
- Click your HP printer in the installed software list. Then press the Uninstall button, and click Yes to confirm.
- Restart Windows after uninstalling the HP printer software.
- Open this HP page in your browser.
- Click Printer to open the page in the snapshot directly below.
- Enter your printer model in the text box, and press the Submit buttonn
- Click the Selected operating system box at top of page to select your 32 or 64->bit OS version.
- Click the Download button to save the HP software and drivers to a Windows folder.
- Then you can reinstall the required software with the downloaded HP installer.
Those fixes will probably stop HP printers printing extra blank pages with MS Word documents. Note that some of the above resolutions might also fix other printer brands printing additional blank pages.
Read our disclosure page to find out how can you help Windows Report sustain the editorial team. Read more


Improve this guide


User forum
0 messages