5 Ways to Fix Hyper-V Audio Not Working on Windows 11
Try installing the latest audio drivers and restarting the audio service
Key notes
- Hyper-V lets you create virtual machines in a unique environment without affecting your primary workspace.
- You can try to uninstall the latest Windows update or use the audio troubleshooter to fix Hyper-V audio not working issues.

Microsoft’s Hyper V or hypervisor lets users create and manage virtual machines on their Windows PCs. We have a guide to help you understand how to enable Hyper V in Windows 11.
If the audio is not working on your Hyper V virtual machine, we provide multiple solutions to fix the problem.
What causes Hyper V audio not working issue?
- You haven’t installed the latest version of Windows update: Not keeping Windows updated constantly causes multiple issues.
- The audio service isn’t running or is disabled: If the audio service isn’t running, then it could trigger the Hyper V audio not working issue.
- Your speaker is faulty: Well, if the speakers themselves are faulty, then there is no point in applying any troubleshooting method. Instead, it would be best if you simply replaced them.
- The connection ports aren’t working correctly: Problematic ports or loose connections can also raise this issue.
- Your audio drivers aren’t updated: Audio drivers should be up to date as they fix multiple bugs or glitches because of the previous update.
- The audio device isn’t selected as the default speaker: You should ensure that you have chosen the correct speaker or output device as your default speaker.
- Audio enhancements are incompatible with your output device: Often, all speakers don’t support specific enhancements. Try disabling them and check if this fixes the issue.
- The latest version of the Windows update might have popped up a bug: Sometimes, the latest Windows update version brings along bugs that could trigger multiple problems. In such cases, roll back to the previous update.
Now that we know the causes of this problem let’s get to the actual solutions and fix them.
What can I do if Hyper V audio is not working?
Before you go ahead with the advanced solutions, here are a few preliminary checks that we advise you to go through:
- Restart your PC: Temporary files can often pile up and cause multiple problems. So, restart your PC and check if this fixes the issue.
- Install the latest available Windows update: Check if a new Windows update is available; if yes, then install it.
- Check your speaker connection: Check if the ports you are using to connect your speaker are proper and if there is damage or fault.
- Check if the mute option is enabled: Make sure that the quiet option isn’t enabled or that you turned down the volume all the way down.
If you’ve gone through the checklist above, let’s start troubleshooting the problem with our solutions below.
1. Install the latest audio driver
- Click the Search icon, type device manager, and select Device Manager.

- Expand the Audio output and input devices section.
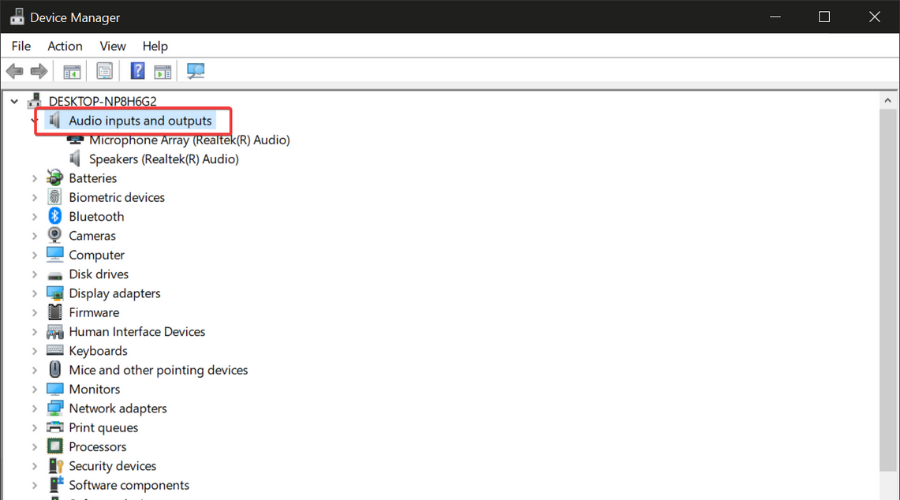
- Right-click on your audio driver and select the Update driver option.

- Select the option Search automatically for drivers option.

- Install the latest update if available.
You must update all the drivers on your device to ensure they are working fine.
We have a complete guide on how to update your drivers on Windows 11 that will offer more information.
While the above steps let you update your driver, you need to check for each driver manually. To ease the process, you can take the help of a dedicated tool called Outbyte Driver Updater.
Using Outbyte Driver Updater, you can update old drivers, fix broken or faulty ones, find missing ones, and much more with just a button.

Outbyte Driver Updater
Keeping all your drivers up to date will reduce the chances of additional or other problems.2. Restart the audio service
- Press Win + R to open the Run dialogue, type services.msc, and hit Enter.

- Locate Windows Audio, right-click on it, and select Restart.

- Right-click again and select Properties.
- Set the Startup type as Automatic.

- Apply the same procedure for the Windows Audio Endpoint Builder service.
- Press Apply and OK to save the settings.
3. Run the audio troubleshooter
- Click the Search icon, type troubleshoot, and click on Troubleshoot settings.

- Press the Other troubleshooters option.

- Click on the Run button for the Playing audio option.

- Follow the on-screen instructions to go through the troubleshooting and fix the problem.
4. Roll-back sound drivers
- Press Windows + R to open Run, type devmgmt.msc, and click OK to open Device Manager.

- Expand the Audio inputs and outputs category, right-click on your audio driver, and select Properties.

- Switch to the Driver tab and click the Roll Back Driver button.

- In the Driver Package rollback window, select any reason and click Yes.
- If the option is grayed out, you don’t have any older drivers to roll back to.
5. Uninstall the Windows update
- Press Win + I to open Settings.
- From the left side, select Windows Update, then click on Update history on the right.

- Select Uninstall updates.

- Choose the latest update that you installed and hit the Uninstall button.

If the problem started after you installed a new Windows update, then chances are there are some bugs in the latest Windows update version that is causing the issue.
In such a case, we suggest you roll back to the previous version of the Windows update by uninstalling the latest one following the above steps.
Also, you can try system restore and bring back your PC to a state where everything is working fine. There are chances that a third-party program might have messed up the system settings.
How do I get audio on Hyper-V?
 NOTE
NOTE
Unfortunately, Hyper-V doesn’t offer a virtual audio device. For audio, you have to use RDP (Remote Desktop Protocol) to start the virtual audio support.
For that, press the Windows + R keys to launch Run, type regedit, and press Enter. Then, navigate to the following key: HKLM\SYSTEM\CurrentControlSet\Control\Terminal Server\WinStations\RDP-Tcp
Now, edit the value fDisableAudioCapture and set it to 0 because the value 1 disables the microphone redirection.
SFC Scan and DISM commands are always helpful in fixing system-related errors as they select missing or corrupt files that may be causing the problem.
If nothing helps, then you can go for resetting your PC. This will help fix the corrupt or missing system files because you face Hyper-V audio issues.
That is it from us in this guide. Let us know in the comments below which one of the above methods helped you fix the problem.
Read our disclosure page to find out how can you help Windows Report sustain the editorial team. Read more


Improve this guide


User forum
0 messages