Fix Intel Technology Access Service.exe high CPU usage

Windows is an extremely complicated piece of software. At times, some process may start hogging all the available resources of your system leading to instability issues. Just like the IntelTechnologyAccessService.exe causes high CPU usage for some users.
What is Intel Technology Access Service?
The Intel Technology Access service is a part of Intel Online Connect Access. Intel uses the process to provide a safe and secure way of making fingerprint touch payments.
Basically, the process is related to your Laptop’s fingerprint access and includes a built-in two factory authentication system for security. It sometimes goes rogue and thus its respective service, IntelTechnologyAccessService.exe, consumes large portions of CPU and HDD processing.
However, the service can often create problems with the system resources and leave the user with little to no resources to perform other actions. You can easily disable the service, following the steps given below.
How do I fix Intel Technology Access Service high CPU?
Method 1: Disable Intel Technology Access Service
If you don’t want to remove all the functionalities that come with this Intel process, you can simply disable the process from auto-restarting from the services window. Here is how to do it.
- Press Windows Key + R, to open Run.
- Type services.msc and click OK to open the Services window.
- In services, locate “IntelTechnologyAccessService.exe” process.
- Right-click on IntelTechnologyAccessService.exe and select Properties.

- For the Startup type, click on the drop-down menu and select Disable. If you want to be able to start the process manually, select Manual. But, I would recommend you to select Disable for now.
- Now, under the Status, click on the Stop button to kill the service.
- Click Apply and then OK to save the changes.
- Close the Services window and reboot your system.
After the restart, open the Task manager and check if the IntelTechnologyAccessService.exe service has started again. If the issue persists, you can uninstall the program to fix the issue.
Method 2: Uninstall Intel Management Engine Components
The IntelTechnologyAccessService.exe process is a part of a tool called Intel Management Engine Components. If you want to remove the software, you can uninstall the software from the Control Panel or Settings.
Create a Restore Point
Before trying to remove or uninstall any of the system related or hardware related programs, it is recommended to create a Restore Point. If anything goes wrong, you can easily roll back the changes through the Restore Points. Here is how to create Restore Points in Windows 10.
- In the Cortana/search bar, type Restore Point and select “Create a Restore Point” option.
- In the System Properties window, click on the Create button (refer the image).
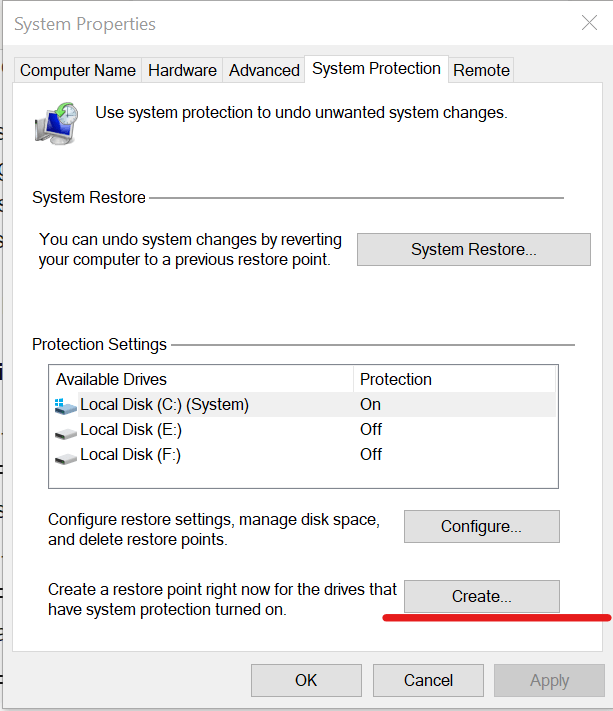
- It will ask you to enter a description and time for the restore point to identify it in the future quickly.

- Click on the Create button and System Protection will start creating a Restore point for your C: drive.
- Once the System Restore Point is created, you will see a “The restore point was created successfully” message.
You can proceed with deleting/uninstalling Intel Management Component once the Restore Point is created.
- Open Control Panel and go to Programs > Programs and features.

- Select Intel Management Engine Components and select Uninstall.
Alternatively, you can also remove it from the Settings interface.
- Click on Start and select Settings.
- Click on Apps > Apps and Features.

- Look for Intel Management Engine Components. Click on the software and select Uninstall.
- Close the Settings interface and restart the system.
- After the restart, open the task manager and check if the problem is resolved.
That should deal with the IntelTechnologyAccessService.exe process for good. If you have further issues with it, make sure to tell us in the comments section below. We might look into alternative ways to solve it.
Read our disclosure page to find out how can you help Windows Report sustain the editorial team. Read more


Improve this guide


User forum
0 messages