FIX: Limited connectivity and Internet access [Windows 10/11]
7 min. read
Updated on
Read our disclosure page to find out how can you help Windows Report sustain the editorial team. Read more

How do I fix limited Internet connection?
- Update Network Adapter Drivers
- Uninstall Network drivers
- Reboot your wireless router
- Enable Receive Side Scaling in CMD
- Set up a new wireless network
- Check your router and update it
- Run the Internet troubleshooter
Yes, if you’re experiencing limited Internet connectivity issues on Windows 10, 8.1 or Windows 7, you found the right tutorial. This guide will show you how you can manage and fix the limited connectivity access error or perhaps a gateway error when you try to connect to the internet in your Windows 7, 8.1 or Windows 10 operating system. This sort of errors usually happen when you upgrade from Windows 7 or Windows 8 to Windows 8.1 or Windows 10. You only need to follow the instructions posted below in the right order and you will get your internet up and running in no time.
Most of the time, there is an issue with your wireless card driver which is not really compatible with your Windows 8.1 or Windows 10. Upgrading this driver is really easy and we’ll show you how to do that. You’ll also going to check some internet connectivity items and you’ll be able to solve this issue once and for all.
How can I fix limited connectivity no internet access?
1. Update Network Adapter Drivers
- Move the mouse cursor over to the upper right side of the screen.
- The Charms bar should be in front of you.
- Left click or tap on the “Search” feature present there. If you’re running Windows 10, you can simply type ‘device manager’ and hit Enter to open the Device Manager feature.
- In the search box, you will need to write “Device Manager” without the quotes.
- After the search is finished left-click or tap on the “Device Manager” icon.
- If you are prompt by a user account control message, you will need to left click or tap on the “Yes” button.
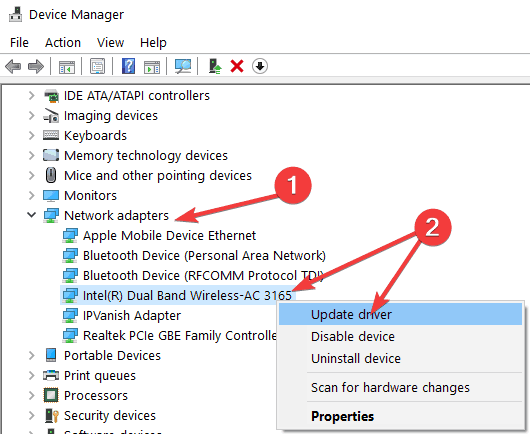
- On the left side panel in the “Device manager” window, left-click or tap on the “Network Adapters” icon to expand it.
- Look in the list of Network Adapters for the adapter you are using.
- Right-click or hold tap on your network adapter.
- Left click or tap on the “Update Driver Software” feature present in the list.
- Choose the feature to “Search Automatically for Updated Driver Software”.
- Reboot your Windows 7, 8.1 or Windows 10 device and check to see if your Wireless connectivity still shows as Limited or it gives you access error.
2. Uninstall Network drivers
- Go again to the Network Adapter feature as you did in the step above.
- Right-click or hold tap on the network adapter, but this time left click or tap on the “Uninstall” button.
- Go on the Manufacturer’s website and download then install the latest version of the driver that is compatible with your Windows 7, 8.1 or Windows 10 device.
3. Reboot your wireless router
- Unplug the Wireless router from the power socket.
- Wait approximately one minute.
- Plug in the power cord to the wireless router.
- Reboot your Windows 7, 8.1 or Windows 10 device.
- Try connecting again to your wireless router and see if you have the same limited connectivity and access error or gateway error.
— RELATED: Best Windows 10 router software you can configure routers with
4. Reset TCP connection
- Move the mouse cursor over to the upper right side of the screen.
- From the Charms bar present there you will need to left click or tap on the “Search” feature.
- In the search box write the following: “cmd” without the quotes.
- A “Command Prompt” icon should show after the search.
- Right click or hold tap on the “Command Prompt” icon and left click or tap on the “Run as Administrator” option.
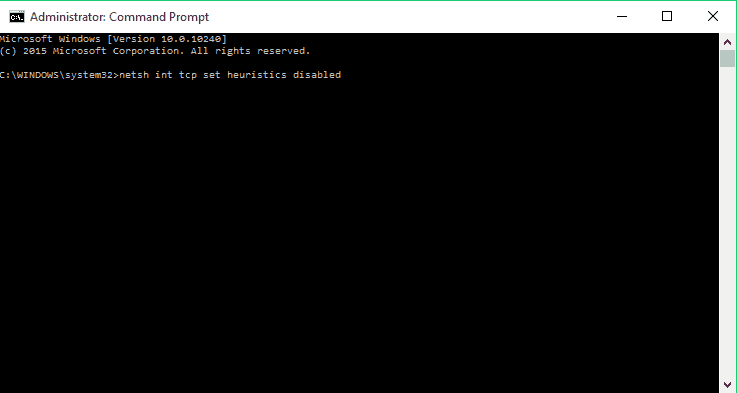
- In the command prompt you will need to write the following: “netsh int tcp set heuristics disabled” without the quotes.
- Press the “Enter” button on the keyboard.
- Wait for the message “OK” then continue with the lines below.
- Write in the command prompt the following: “netsh int tcp set global autotuninglevel=disabled” without the quotes.
- Press the “Enter” button on the keyboard.
- Wait for the message “OK” then continue with the lines below.
- Write the following in the command prompt: “netsh int tcp set global rss=enabled” without the quotes.
- Press the “Enter” button on the keyboard.
- Wait for the message “OK” then continue with the lines below.
- Write the following in the command prompt: “netsh int tcp show global”without the quotes.
- Press the “Enter” button on the keyboard.
- Now reboot your Windows 8.1 or Windows 10 operating system.
- Check to see if your internet connectivity is working for you now.
Editor’s Note: This article continues on the next page.
5. Set up a new wireless network
- Move the mouse cursor over to the upper right side of the screen.
- Now left click or tap on the “Search” feature present in the Charms bar.
- In the search box write the following: “Network and Sharing Center”.
- After the search is finished left click or tap on the “Network and Sharing Center” icon.
- Now in the “Network and Sharing Center” you will need to left click or tap on the “Set up a new connection or network” feature.
- Left click or tap on the “Manually connect to a wireless network” feature.
- Now you will need to write the network details you have to connect to the wireless router.
- After you saved the network details please reboot your Windows 7, 8.1 or Windows 10 device.
- After the operating system has started check to see if you still have this issue.
— RELATED: How to fix Wi-Fi range issues on Windows 10
6. Check your router and update it
- Try connecting to a different wireless router to see if this happens only on your device or on multiple devices.
- If this happens when you try to connect to multiple devices, then it is most probably an issue with your network wireless adapter or with the Windows 7, 8.1 or Windows 10 operating system itself and not with the wireless router.
Note: If it is a Windows issue and the steps above did not work, I would suggest making a clean install of the Windows operating system. - If it only happens when you try connecting to your wireless router, then you will have to check on the manufacturer’s website of the wireless router. If there are new firmware updates available, install them. Even if you reboot the router but you don’t install the latest updates, this issue will reappear after a couple of days or a couple of weeks.
7. Run the Internet troubleshooter
If the problem persists, running the built-in Internet troubleshooting tool may help you fix it for good. On Windows 7 or Windows 8.1, you can find the troubleshooter on the Control Panel page.
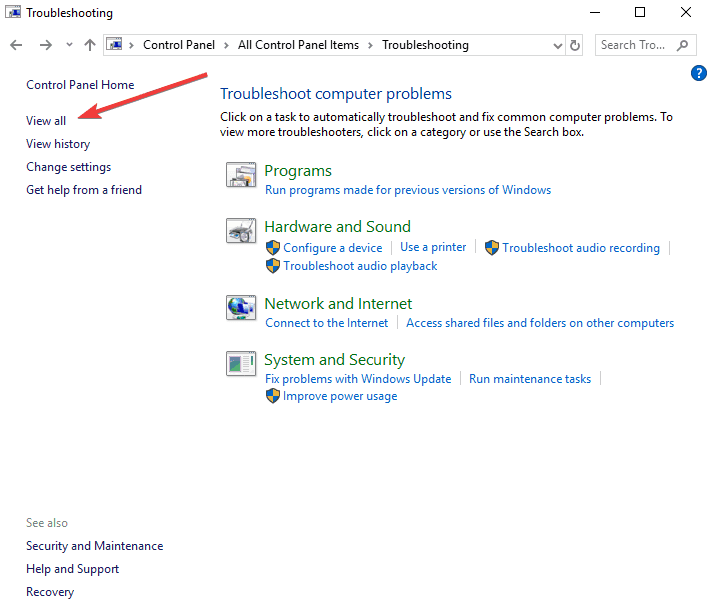
- Launch Control Panel > type ‘troubleshoot’ in the search menu > select Troubleshooting.
- Click on View all to list all the troubleshooting tools available on your PC.
- Select and run the Internet Connection and Network Adapter troubleshooters, as shown in the screenshot below.
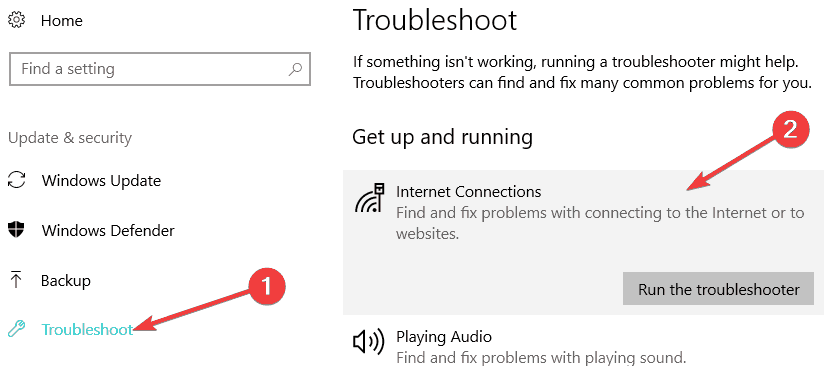
On Windows 10, you’ll find the two troubleshooters on the Settings page. Go to Settings > Update & Security > Troubleshoot > run the two troubleshooters.
This is it folks, following the steps above will help you to properly connect your computer to the wireless internet in your home. We hope these solutions help you solve your limited connectivity and access error or gateway error issue. If you’re still getting limited connectivity errors, you can also check out this in-depth guide for Windows 10 for additional solutions.
If you have any additional questions related to this article, let us know in the comments below.
RELATED STORIES TO CHECK OUT:
- Full Fix: No Internet, secured Wi-Fi issue in Windows 10, 8.1, 7
- Fix the VPN Unlimited ‘No internet connection’ error for good
- Fix: High CPU when browsing the Internet


User forum
0 messages