How to Install Logitech C270 Webcam Driver on Windows 10
Get your Logitech webcam working properly again in no time
2 min. read
Updated on
Read our disclosure page to find out how can you help Windows Report sustain the editorial team. Read more
Key notes
- Installing the Logitech webcam C270 driver can be a bit difficult but this guide will show just how to do it and get ready for all your meetings.
- Do note that downloading a bad version of drivers can cause your system to crash.
- The Windows Device Manager feature can help you resolve the issue, but keep in mind that it is not a fail-safe option.

You’re preparing for a meeting, you got your notes and everything you need when you realize your webcam doesn’t work as it should.
This is usually caused by a broken driver that either needs to be downloaded and installed from scratch or just updated. Things are no different for Logitech webcam C270 drivers.
Keep reading and discover two simple methods to download and update the necessary driver on your Windows 10 PC.
How to download and install the Logitech webcam C270 driver?
1. Manually download and install the driver
1. Go to Logitech’s official website.
2. Type Logitech webcam C270 in the search bar and press Enter.
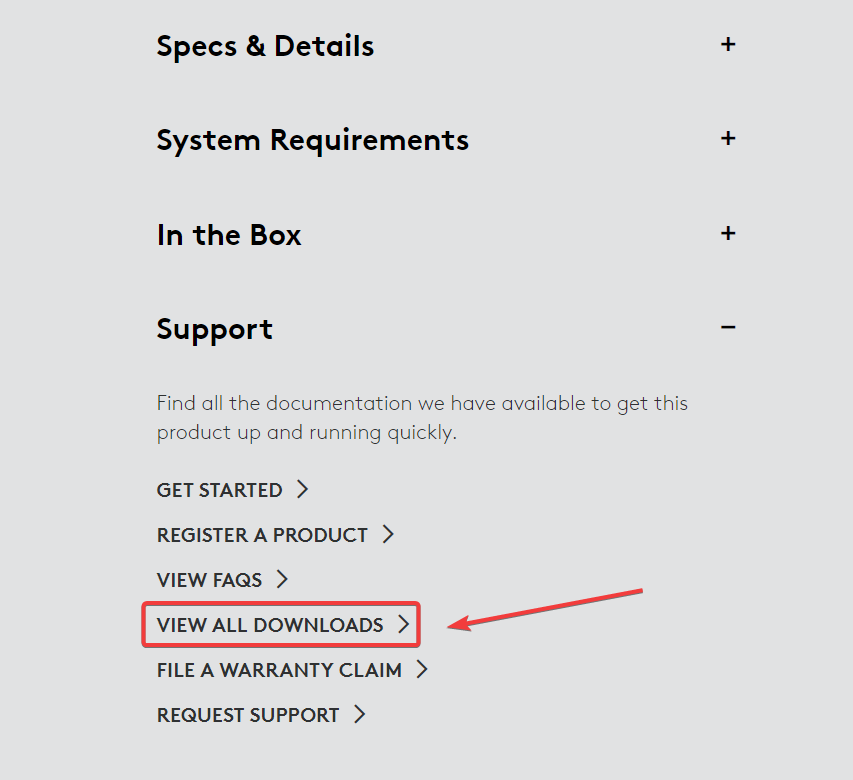
3. Scroll down to the Support section and click on View all downloads.
4. A new page will open, and from there you’ll be able to download the necessary driver.
5. Download the driver setup file and launch it.
6. Follow the on-screen instructions to complete the driver installation.
7. After the installation is complete, reboot your computer.
The first recommended method to install Logitech C270 drivers for Windows 10 devices is from the manufacturer’s website, which is Logitech’s official website.
The driver available there is safe to use and up to date, so that you don’t need to update your C270 webcam further after you install it.
2. Update your C270 webcam driver using Device Manager
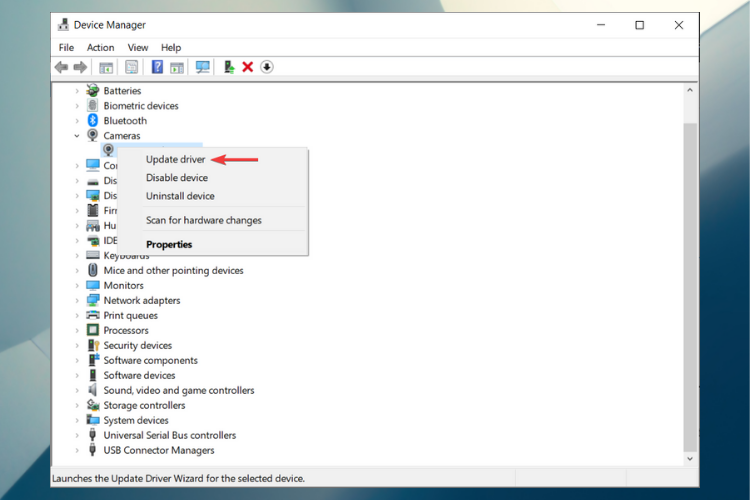
- Right-click on Start and select Device Manager.
- Go to Cameras and expand the menu.
- Locate your Logitech C270 webcam, right-click on it, and select Update driver.
- On the next screen, choose Search automatically for updated driver software.
- Follow the on-screen instructions to finish.
- After the update is complete, reboot your Windows 10 device.
3. Use a third-party app to automatically update the driver
A far better solution to update your driver is using dedicated software, that way you’ll be keeping your PC safe from any serious malfunctions caused by installing the wrong ones.
This software does it all for you, so if any driver is found broken, the app will compare it to its built-in database and update it accordingly.
In addition, you can resolve any aspect regarding driver performance and have full support for optimizing driver devices at maximum capacity.
There you have it, a fully, functional Logitech webcam with the latest C270 driver installed on your Windows 10 computer, just in time for work.
Isn’t the webcam working properly? In this case, take a look at our guide on how to fix webcam connection issues, and don’t let them interrupt your workflow.
Have any suggestions or just want to say a quick thank you? Feel free to use the comments section below.


User forum
0 messages